Endgate Lock Striker Replacement Pickup
Removal Procedure
- Remove the tail lamp. Refer to Tail Lamp Replacement in Lighting Systems.
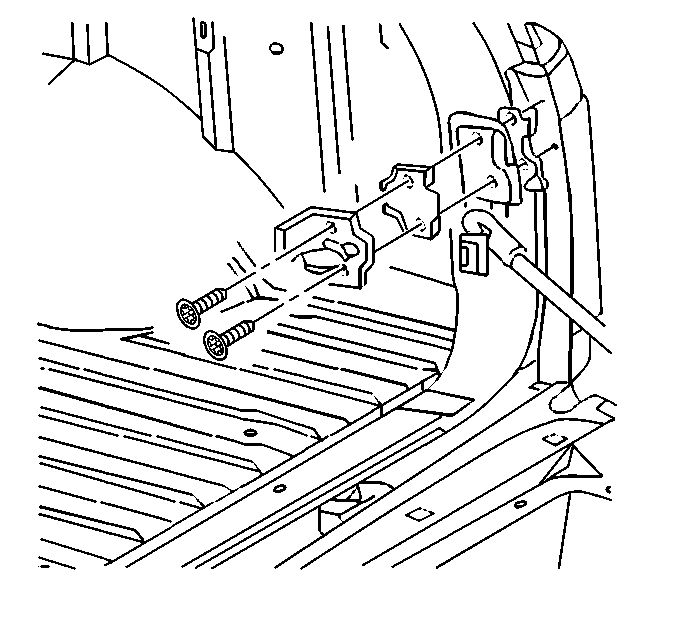
- Perform the following steps in order to remove the pickup box endgate cable from the striker bolt:
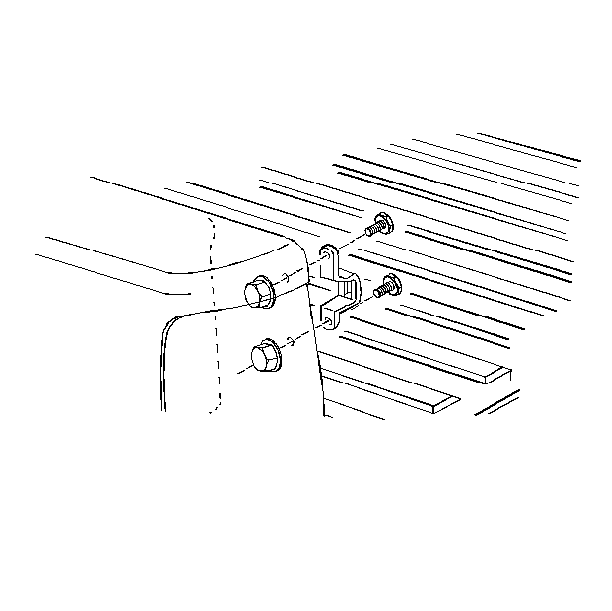
- Remove the nuts and bolts that retain the pickup box endgate striker to the vehicle.
- Remove the pickup box endgate striker from the vehicle.
| 2.1. | Open the endgate. |
| 2.2. | Safely support the endgate. |
| 2.3. | Disconnect the slotted hole at the end of the cable from the endgate striker bolt. |
Installation Procedure
- Install the pickup box endgate striker to the vehicle.
- Install the nuts that retain the pickup box endgate striker to the vehicle.
- Install the bolts that retain the pickup box endgate striker to the vehicle.
- Connect the pickup box endgate cable to the endgate striker bolt.
- Install the tail lamp. Refer to Tail Lamp Replacement in Lighting Systems.
Notice: Use the correct fastener in the correct location. Replacement fasteners must be the correct part number for that application. Fasteners requiring replacement or fasteners requiring the use of thread locking compound or sealant are identified in the service procedure. Do not use paints, lubricants, or corrosion inhibitors on fasteners or fastener joint surfaces unless specified. These coatings affect fastener torque and joint clamping force and may damage the fastener. Use the correct tightening sequence and specifications when installing fasteners in order to avoid damage to parts and systems.
Tighten
Tighten the bolts to 25 N·m (18 lb in).
Endgate Lock Striker Replacement Utility
Removal Procedure
- Remove the lower striker bolt.
- Loosen the upper striker bolt in order to rotate the striker and the spacer (if equipped) away from the lower bolt hole.
- Install the lower striker bolt.
- Tighten the lower striker bolt in order to hold the striker backing plate in place.
- Remove the upper striker bolt.
- Remove the spacer (if equipped).
- Remove the striker.
Important: Do not remove both endgate striker bolts at the same time in order to prevent the striker backing plate from falling into the body.
Installation Procedure
- Install the striker.
- Install the spacer (if equipped).
- Install the upper striker bolt.
- Remove the lower bolt.
- Rotate the striker and the spacer (if equipped) in order to align the lower threaded hole in the striker backing plate.
- Install the lower striker bolt.
Rotate the lower striker bolt until the upper threaded hole is properly aligned in order to ensure that the backing plate is in the correct position.
Notice: Use the correct fastener in the correct location. Replacement fasteners must be the correct part number for that application. Fasteners requiring replacement or fasteners requiring the use of thread locking compound or sealant are identified in the service procedure. Do not use paints, lubricants, or corrosion inhibitors on fasteners or fastener joint surfaces unless specified. These coatings affect fastener torque and joint clamping force and may damage the fastener. Use the correct tightening sequence and specifications when installing fasteners in order to avoid damage to parts and systems.
Tighten
Tighten the bolts to 22 N·m (16 lb ft).
