Tools Required
J 39500-B GM Air Conditioning Refrigerant Recovery, Recycling and Recharging System
Notice: R-12 refrigerant and R-134a refrigerant must never be mixed, even in the smallest of amounts, as they are incompatible with each other. If the refrigerants are mixed, compressor failure is likely to occur. Refer to the manufacturer instructions included with the service equipment before servicing.
All with one hook-up, the J 39500-B GM air conditioning refrigerant recovery, recycling and recharging (ACR4) system removes Refrigerant-134a from the vehicle air conditioning (A/C) system, recycles, and recharges the system. Single pass filtering during the recovery cycle, plus automatic multiple pass filtering during the evacuation cycle assures a constant supply of clean and dry refrigerant for A/C system charging. Refer to the manufacturer's instructions for further information.
Recovering the Refrigerant
- Connect a battery charger in order to prevent battery drain.
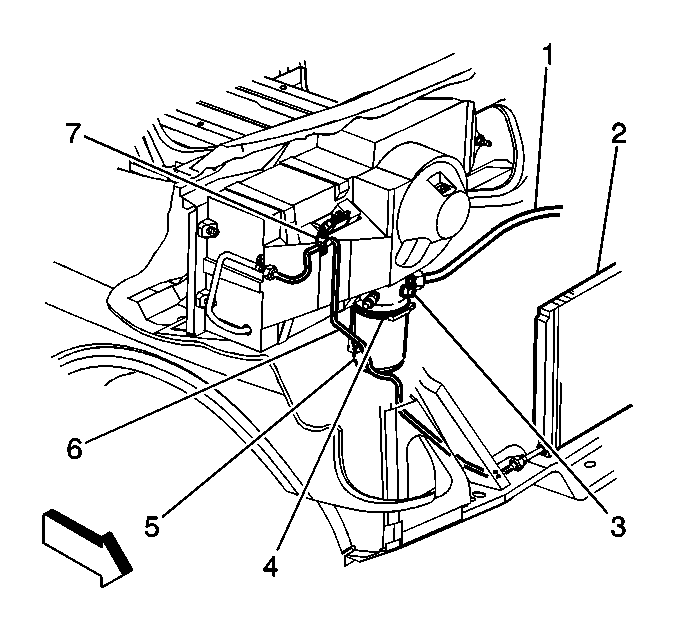
- Attach the red high-side hose with the quick disconnect coupler to the high-side refrigerant service valve fitting (7) of the vehicle A/C system.
- Open the high-side coupler valve.
- Attach the blue low-side hose with the quick disconnect coupler to the low-side refrigerant charge valve fitting (3) of the vehicle A/C system.
- Open the low-side coupler valve.
- Observe the high-side gauge and the low-side gauge on the unit control panel in order to be sure the A/C system has pressure.
- Open both the high-side and the low-side valves on the control panel.
- Open both the red LIQUID and the blue GAS valves on the tank.
- Slowly open the oil drain valve in order to determine whether the oil separator contains oil.
- Drain any oil present in the separator into the catch bottle at the bottom of the unit.
- Close the oil drain valve.
- Dispose of the oil in the catch bottle in an appropriate manner.
- Plug the unit into the proper voltage outlet.
- Activate the MAIN POWER switch.
- Start the engine.
- With the A/C system in the ON position in order to stabilize the system, idle the engine for a period of one minute.
- Turn the ignition switch to the OFF position.
- Connect a battery charger in order to prevent battery drain.
- Turn the ignition switch to the RUN position.
- Turn the blower motor switch to the HIGH position.
- Press the RECOVER key on the keypad.
- Observe the cleaning process, which is 30-180 seconds in duration.
- When the cleaning is complete, the unit automatically starts the recover.
- The compressor automatically ceases operation when the initial recovery occurs at a vacuum of approximately 57 kPa (17 in. of Hg).
- At the end of the initial recovery process, the display shows CPL.
- Slowly open the oil drain valve in order to drain the oil into the calibrated oil catch bottle at the bottom of the unit.
- Close the oil drain valve.
- Record the amount of oil in the catch bottle.
- Dispose of the recovered oil in an appropriate manner.
- Observe the LOW-SIDE GAGE reading on the control panel.
- If refrigerant remains in the system, press the HOLD/CONT key on the keypad in order to recover the additional refrigerant.
- Repeat the previous step, as necessary, until the system maintains a vacuum for 2 minutes.
Important: Use only the 23 kg (50 lb) unit refrigerant tank (J 39500-50) designed for the ACR4. The calibration of the unit overfill limitation mechanism is specific for use with this tank. The tank valving is specific for use with the unit.
This valve is in the receiver dehydrator tube, between the receiver and dehydrator and the condenser.
This valve is located between in the compressor and condenser hose, between the compressor and the expansion (orifice) tube.
Important: If the A/C system has no refrigerant, do not continue with the recovery operation. A recovery operation without refrigerant draws air into the recovery tank.
No pressure indicates that the system has no refrigerant in need of recovery.
Return the bottle in place on the unit.
Important: The blower motor in the HIGH setting increases the rate at which the J 39500-B recovers refrigerant. Maintain the A/C blower motor on the HIGH setting during the recovery operation.
The unit clears itself of refrigerant.
The display reads CL-L.
The control panel shows that the unit is in the RECOVER mode of the AUTOMATIC cycle.
Important:
• The recovery might remove a small amount of the A/C system lubricating
oil polyakylene glycol (PAG) with the refrigerant. Often, the recovery does
not remove any oil. The amount of oil removed varies greatly. The amount
of oil removed depends on various conditions of the vehicle. The J 39500-B
separates the oil from
the refrigerant. • The flashing of the OIL/OZ (OIL/GMS) indicator is a reminder:
drain the recovered oil at this time. Replace the same amount of oil into
the A/C system when you recharge with refrigerant the system.
The display then alternately displays the weight of the refrigerant recovered and the OIL/OZ (OIL/GMS) indicator.
Never reuse this oil.
| • | If the A/C system maintains a vacuum, the recovery is complete. |
| • | A rise in the LOW-SIDE GAGE pressure above 0 indicates the presence of more refrigerant. |
Important:
• If the display flashes the FULL indicator during the recovery
process, the unit ceases operation. The unit tank is full. • Prior to continuation of the recovery process, install an empty
unit tank (J 39500-50) in order to accommodate additional refrigerant.
Do not use any other kind of tank. • If necessary, lower the amount of refrigerant in the unit tank
by charging other vehicles.
