High Mount Stop Lamp Replacement Pickup
Removal Procedure
- Disconnect the battery negative cable.
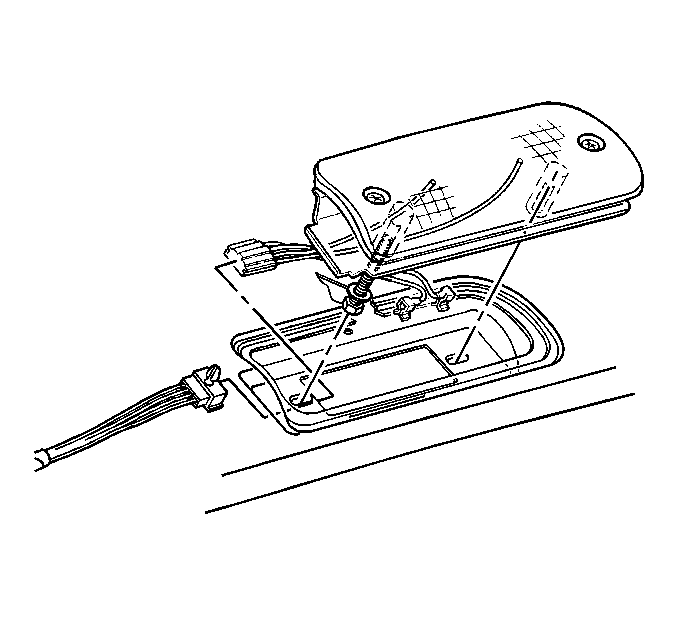
- Squeeze the release tabs in order to remove the dome lamp lens.
- Remove the dome lamp bulb.
- Remove the screws that retain the dome lamp base to the high mount stop lamp from inside the vehicle.
- Remove the dome lamp base from the vehicle.
- Remove the body wiring harness from the dome lamp/high mount stop lamp.
- Remove the high mount stop lamp from the vehicle.
Caution: Unless directed otherwise, the ignition and start switch must be in the OFF or LOCK position, and all electrical loads must be OFF before servicing any electrical component. Disconnect the negative battery cable to prevent an electrical spark should a tool or equipment come in contact with an exposed electrical terminal. Failure to follow these precautions may result in personal injury and/or damage to the vehicle or its components.
Installation Procedure
- Install the high mount stop lamp to the vehicle.
- Install the body wiring harness to the dome lamp/high mount stop lamp.
- Install the dome lamp base to the vehicle.
- Install the screws that retain the dome lamp base to the high mount stop lamp from inside the vehicle.
- Install the dome lamp bulb.
- Squeeze the lens in order to install the dome lamp lens.
- Connect the battery negative cable.
Notice: Use the correct fastener in the correct location. Replacement fasteners must be the correct part number for that application. Fasteners requiring replacement or fasteners requiring the use of thread locking compound or sealant are identified in the service procedure. Do not use paints, lubricants, or corrosion inhibitors on fasteners or fastener joint surfaces unless specified. These coatings affect fastener torque and joint clamping force and may damage the fastener. Use the correct tightening sequence and specifications when installing fasteners in order to avoid damage to parts and systems.
Tighten
Tighten the screws to 2.5 N·m (22 lb in).
High Mount Stop Lamp Replacement Utility - Roof Mounted
Removal Procedure
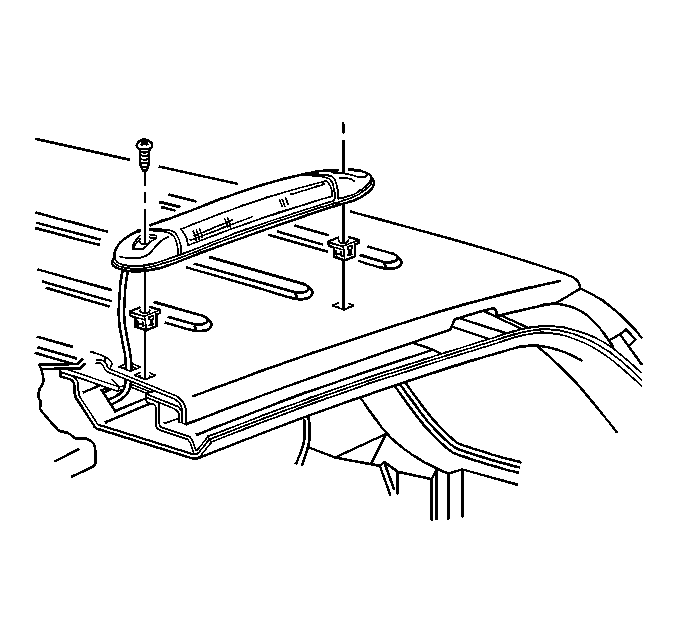
- Remove the screws that retain the high mount stop lamp to the roof.
- Remove the high mount stop lamp from the vehicle.
- Disconnect the electrical connector.
- Pull the wiring harness connector through the hole in the roof and disconnect the electrical connector.
Installation Procedure
- Connect the wiring harness connector to the high mounted stop lamp.
- Install the high mount stop lamp to the vehicle.
- Install the screws that retain the high mount stop lamp to the roof.
Notice: Use the correct fastener in the correct location. Replacement fasteners must be the correct part number for that application. Fasteners requiring replacement or fasteners requiring the use of thread locking compound or sealant are identified in the service procedure. Do not use paints, lubricants, or corrosion inhibitors on fasteners or fastener joint surfaces unless specified. These coatings affect fastener torque and joint clamping force and may damage the fastener. Use the correct tightening sequence and specifications when installing fasteners in order to avoid damage to parts and systems.
Tighten
Tighten the high mount stop lamp screws to 1.4 N·m (12 lb in).
High Mount Stop Lamp Replacement Utility - Endgate Window
Removal Procedure
- Remove the screws that retain the high mount stop lamp to the endgate window.
- Remove the high mount stop lamp from the vehicle.
- Pull the rubber grommet from the body at the top of the endgate opening in order to remove the electrical connector.
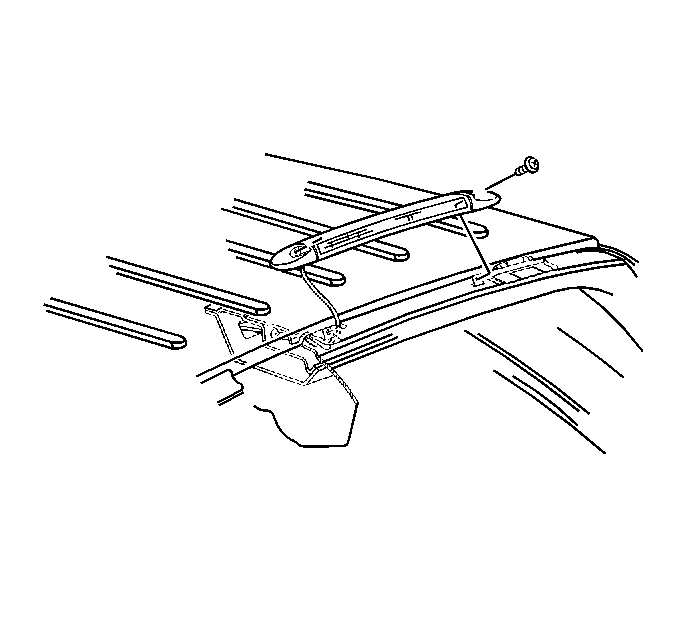
Pull the electrical connector through the hole in the body and disconnect.
Installation Procedure
- Connect the electrical connector and push the connector through the hole in the body in order to install the electrical connector.
- Insert the rubber grommet into the hole in order to ensure that the hole is properly seated.
- Install the high mount stop lamp to the vehicle.
- Install the screws that retain the high mount stop lamp to the endgate window.
Notice: Use the correct fastener in the correct location. Replacement fasteners must be the correct part number for that application. Fasteners requiring replacement or fasteners requiring the use of thread locking compound or sealant are identified in the service procedure. Do not use paints, lubricants, or corrosion inhibitors on fasteners or fastener joint surfaces unless specified. These coatings affect fastener torque and joint clamping force and may damage the fastener. Use the correct tightening sequence and specifications when installing fasteners in order to avoid damage to parts and systems.
Tighten
Tighten the high mount stop lamp screws to 2.5 N·m (22 lb in).
High Mount Stop Lamp Replacement Envoy Only
Removal Procedure
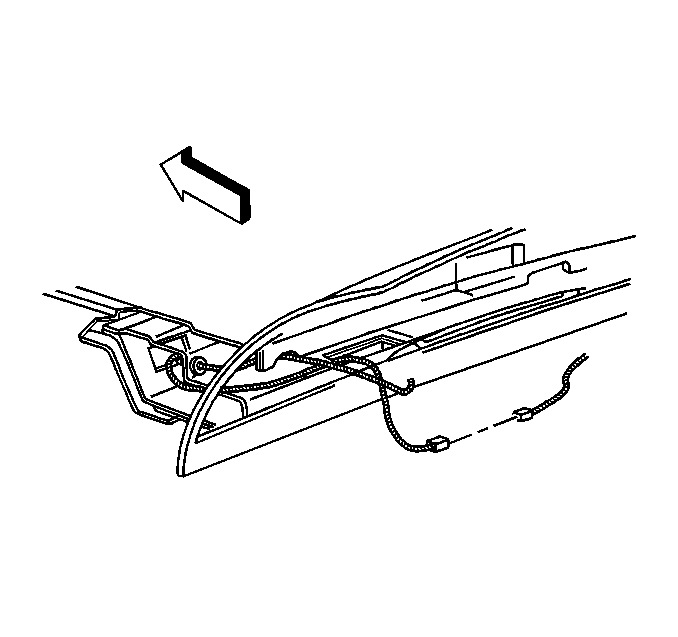
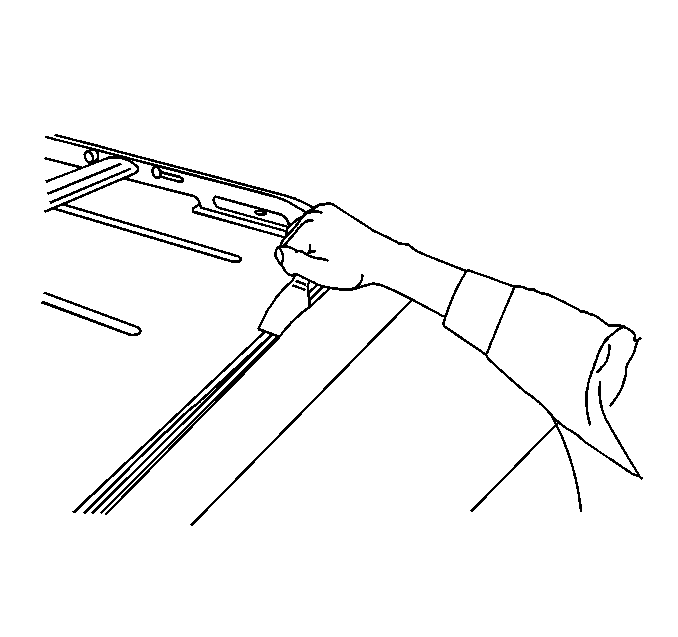
- Remove the roof rear upper garnish molding. Refer to Rear Upper Garnish Molding Replacement in Interior Trim.
- Disconnect the high mount stoplamp electrical connector.
- Disconnect the battery negative cable.
- Using a heat gun, apply heat to the tape seal until the seal becomes soft and pliable.
- With a flat-bladed tool, cut the tape that seals the spoiler to the liftgate window. This cut will be made along the top, left and right edges.
- From the top edge, pull the spoiler back to release if from the liftgate window clips. The locating clips on the spoiler may break. These are for assembly locating purposes only. The spoiler will still snap into place during assembly.
- Place spoiler on the roof of the vehicle.
- Remove the liftgate window from the vehicle. Refer to Liftgate Window Replacement in Body Rear End.
- Remove all traces of the adhesive from the window using a general purpose adhesive remover or an adhesive remover disc (3M part number 7501 or 7502 or equivalent) attached to a drill. A 50-75 mm (2-3 in) square rubber or felt block may also be used to aid in the removal of the old adhesive.
- Clean the affected area with a suitable grease remover and wipe clean with isopropyl alcohol.
Important: Before replacing the high mount stop lamp, ensure that the power and ground have been verified. Refer to Stop Lamps Inoperative - Center High Mounted .
Caution: Unless directed otherwise, the ignition and start switch must be in the OFF or LOCK position, and all electrical loads must be OFF before servicing any electrical component. Disconnect the negative battery cable to prevent an electrical spark should a tool or equipment come in contact with an exposed electrical terminal. Failure to follow these precautions may result in personal injury and/or damage to the vehicle or its components.
Important: Ensure that care is taken when making this cut. The spoiler and/or window frame surface may be damaged and lead to premature corrosion.
Installation Procedure
- Place the spoiler on the roof of the vehicle.
- Install the body wiring harness to the high mount stop lamp.
- Connect the battery negative cable.
- Test the lamp for proper operation.
- Install the roof rear garnish molding. Refer to Rear Upper Garnish Molding Replacement in Interior Trim.
- Install the liftgate window to the vehicle. Refer to Liftgate Window Replacement in Body Rear End.
- Close the liftgate.
- Snap the spoiler into place and locate on the center of the liftgate.
- Remove the protective strip from the two-side adhesive.
- Apply firm and even pressure to seat the spoiler.
Important: Do not remove the protective strip from the two-sided adhesive yet.
