SPARE TIRE COVER INSTALLATION (INFORMATIONAL TIPS)

SUBJECT: SPARE TIRE COVER INSTALLATION TIPS (INFORMATIONAL)
VEHICLES AFFECTED: 1991-1992 T1 BRAVADA WITH SPARE TIRE
Installation and alignment of the spare tire cover on 1991 - 1992 Bravadas equipped with a spare tire carrier (RPO P16) can be difficult to achieve and if not done properly can cause an appearance concern. The following INSTALLATION PROCEDURE should be followed when installing the spare tire cover on a Bravada.
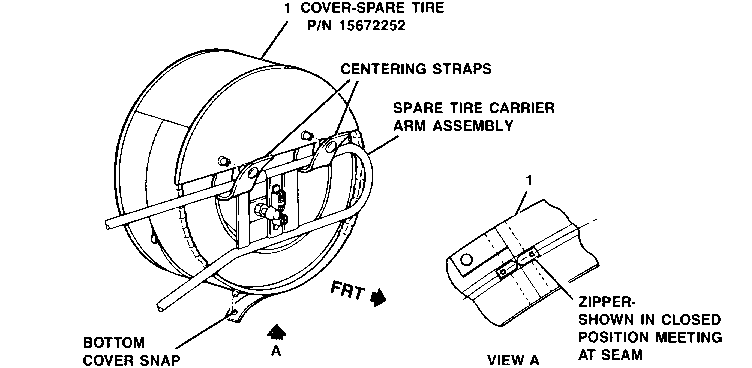
INSTALLATION PROCEDURE: (Figure 1) ----------------------------------- 1. After the spare tire is installed on the spare tire carrier arm, open the spare tire carrier arm.
2. Unzip the two tire cover zippers fully, unsnap the bottom snap and the two centering straps.
3. Begin to slip the cover over the tire starting at the top of the tire. Grasp the cover from the side material only.
NOTICE: DO NOT USE THE CENTERING STRAPS AS PULL STRAPS FOR INSTALLATION OR MATERIAL DAMAGE CAN OCCUR.
During installation of the cover, visually inspect the cover graphics for appearance, centering and alignment. Adjust as required. Continue cover installation over lower portion of the tire.
4. Fasten the cover snap located at the bottom of the tire cover.
5. Close both cover zippers. Zippers should meet at the seam at the bottom of the cover.
6. Grasp the bottom of the cover and pull it toward the body of the vehicle. This will help prevent the bottom snap from contacting the bumper facia step pad resulting in the unfastening of the snap.
7. Route the centering straps around the spare tire carrier arm and fasten the snaps.
8. Close the spare tire carrier arm assembly, ensuring that the latch is fully engaged in its secondary latch position.
To check for complete latch engagement (secondary latch position), grasp the spare tire and shake the carrier assembly. If the carrier assembly is loose and rattles, reopen and close firmly.
If a rattle condition still exists in the spare tire carrier assembly, refer to Product Service Bulletin #91-2-229 for correction procedure.
WARRANTY INFORMATION:
For vehicles repaired under warranty use:
Labour Operation: C4720 Labour Time: 0.2 hrs.
General Motors bulletins are intended for use by professional technicians, not a "do-it-yourselfer". They are written to inform those technicians of conditions that may occur on some vehicles, or to provide information that could assist in the proper service of a vehicle. Properly trained technicians have the equipment, tools, safety instructions and know-how to do a job properly and safely. If a condition is described, do not assume that the bulletin applies to your vehicle, or that your vehicle will have that condition. See a General Motors dealer servicing your brand of General Motors vehicle for information on whether your vehicle may benefit from the information.
