Removal Procedure
Notice: Turn the ignition OFF when installing or removing the PCM connectors and disconnecting or reconnecting the power to the PCM (battery cable, PCM pigtail, PCM fuse, jumper cables, etc.) in order to prevent internal PCM damage.
- Using a scan tool, retrieve the percentage of remaining engine oil. Record the remaining engine oil life.
- Turn OFF the ignition.
- Disconnect the negative battery cable.
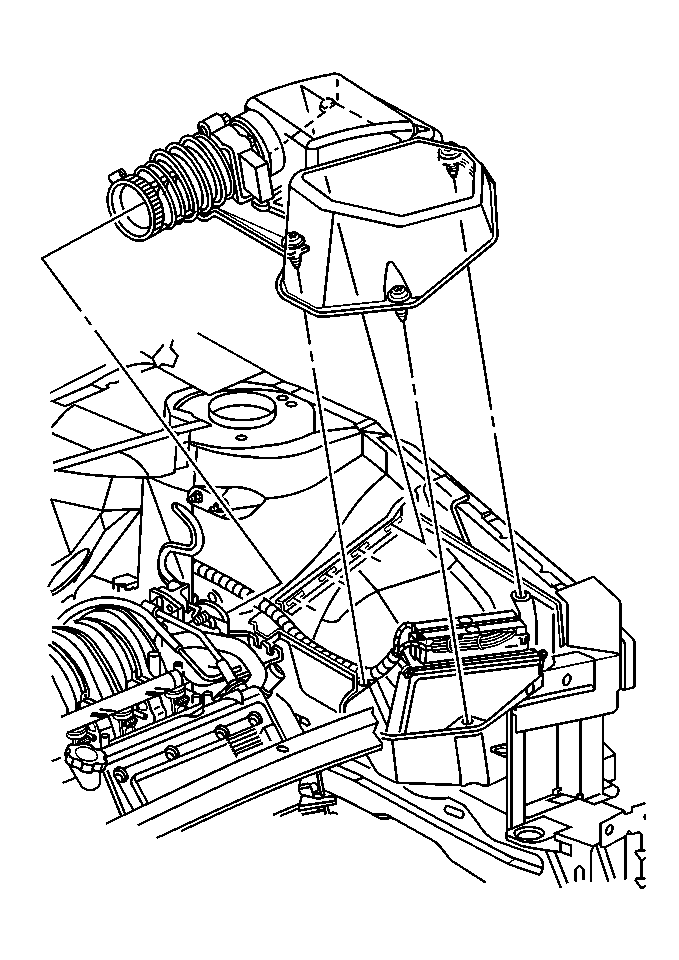
- Disconnect the mass air flow/intake air temperature (MAF/IAT) sensor electrical connector.
- Loosen the intake air duct clamp at the throttle body.
- Loosen the air filter element/PCM housing cover screws.
- Remove the air filter element/PCM housing cover, the MAF/IAT sensor, and the intake air duct.
- Disconnect both PCM connectors.
- Remove the PCM.
Important: It is necessary to record the remaining engine oil life. If the replacement module is not programed with the remaining engine oil life, the engine oil life will default to 100%. If the replacement module is not programmed with the remaining engine oil life, the engine oil will need to be changed at 5000 km (3,000 mi) from the last engine oil change.
Caution: Unless directed otherwise, the ignition and start switch must be in the OFF or LOCK position, and all electrical loads must be OFF before servicing any electrical component. Disconnect the negative battery cable to prevent an electrical spark should a tool or equipment come in contact with an exposed electrical terminal. Failure to follow these precautions may result in personal injury and/or damage to the vehicle or its components.
Installation Procedure
Important: You must inspect the following areas before
installing the PCM and insure that:
• There is no debris in the air filter element/PCM housing assembly, or
in the MAF/IAT sensor inlet screen that may distort the air flow. • There are no signs of damage to the air filter element/PCM housing assembly,
or to the intake air duct. If a problem is found, replace the component as necessary.
Important: If the PCM is being programmed using the Off-Board method, perform the programming before continuing with the steps listed below. Refer to the Off-Board procedure in Powertrain Control Module Programming .
- Install the PCM.
- Install the PCM connectors.
- Install the intake air duct, the MAF/IAT sensor, and the air filter element/PCM housing cover to the throttle body.
- Align and engage the tabs on the air filter element/PCM housing cover with the slots in the air filter element/PCM housing.
- Tighten the air element/PCM housing cover screws
- Tighten the intake air duct clamp at the throttle body.
- Reconnect the MAF/IAT sensor connector.
- Connect the negative battery cable.
- Program the PCM. Refer to Powertrain Control Module Programming .
Notice: Refer to Fastener Notice in the Preface section.
Tighten
Tighten the PCM connectors screws to 8 N·m
(71 lb in).
Important: You must properly install the intake air duct to the throttle body. An improperly installed, distorted, or damaged air filter or intake air duct may cause a DTC to set.
Tighten
Tighten the air element/PCM housing cover screws
to 4 N·m (35 lb in).
Tighten
Tighten the clamp to 3 N·m (27 lb in).
Important: The replacement PCM must be programmed.
