Removal Procedure
- Using a scan tool, retrieve the percentage of remaining engine oil and the remaining automatic transmission fluid life. Record the remaining engine oil and the remaining automatic transmission fluid life.
- Disconnect the negative battery cable.
- Remove the two screws for the right side sound insulator. Refer to Instrument Panel Insulator Panel Replacement - Right Side in Instrument Panel, Gauges, and Console.
- Disconnect the courtesy lamp socket.
- Remove the sound insulator.
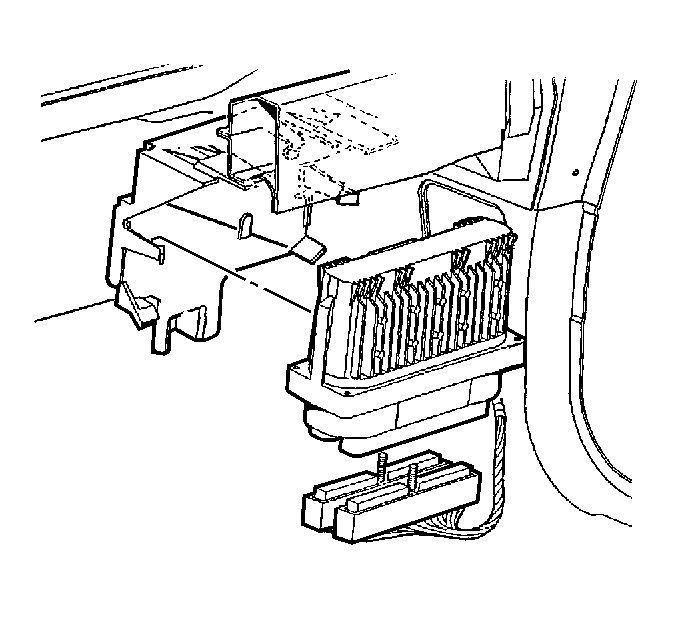
- Pull the PCM from the mounting bracket.
- Disconnect the PCM connectors from the PCM.
- If the PCM is being replaced it will be necessary to remove the Knock Sensor module for installation into the replacement PCM. Refer to Knock Sensor Module Replacement .
Important: It is necessary to record the remaining engine oil life. If the replacement module is not programed with the remaining engine oil life, the engine oil life will default to 100%. If the replacement module is not programmed with the remaining engine oil life, the engine oil will need to be changed at 5000 km (3,000 mi) from the last engine oil change.
Important: It is necessary to record the remaining automatic transmission fluid life. If the replacement module is not programed with the remaining automatic transmission fluid life, the automatic transmission fluid life will default to 100%. If the replacement module is not programmed with the remaining automatic transmission fluid life, the automatic transmission fluid will need to be changed at 83000 km (50,000 mi) from the last automatic transmission fluid change.
Important: The key must be OFF for a minumum of 30 seconds before disconnecting PCM connectors or disconnecting battery voltage. This is to allow the TP sensor learned value, the Transaxle shift adapt values and the fluid life indexes to be stored in the EEPROM of the PCM. Failure to wait the 30 seconds may result in a EEPROM reset and the fluid life index being reset to zero.
Installation Procedure
- If the original PCM is being replaced, the Knock Sensor module must be installed from the original PCM. Refer to Knock Sensor Module Replacement .
- Connect the PCM connectors.
- Insert the PCM up into the mounting bracket. Ensure the PCM is engaged firmly into the clips.
- Connect the negative battery cable.
- If a replacement PCM is being installed it must be reprogrammed (flashed) using the latest Techline programming procedures.
- For the following steps ensure that the throttle blade is at rest and is not moved.
- Connect the courtesy lamp socket to the right side sound insulator.
- Install the sound insulator using the two screws. Refer to Instrument Panel Insulator Panel Replacement - Right Side in Instrument Panel, Gauges, and Console.
Tighten
Tighten the connectors screws to 8 N·m
(71 lb in).
Notice: The PCM will be damaged if proper programming procedures are not followed.
Connect a scan tool and perform the following:
| • | Clear DTC P0603. |
| • | Reset Transaxle fluid life. |
| • | Reset Engine Oil life to that recorded prior to PCM Removal. |
| Important: Turn the key to LOCK and wait 30 seconds to ensure that the memory learn procedures occur. |
Tighten
Tighten the sound insulator screws to 19 N·m
(17 lb in).
