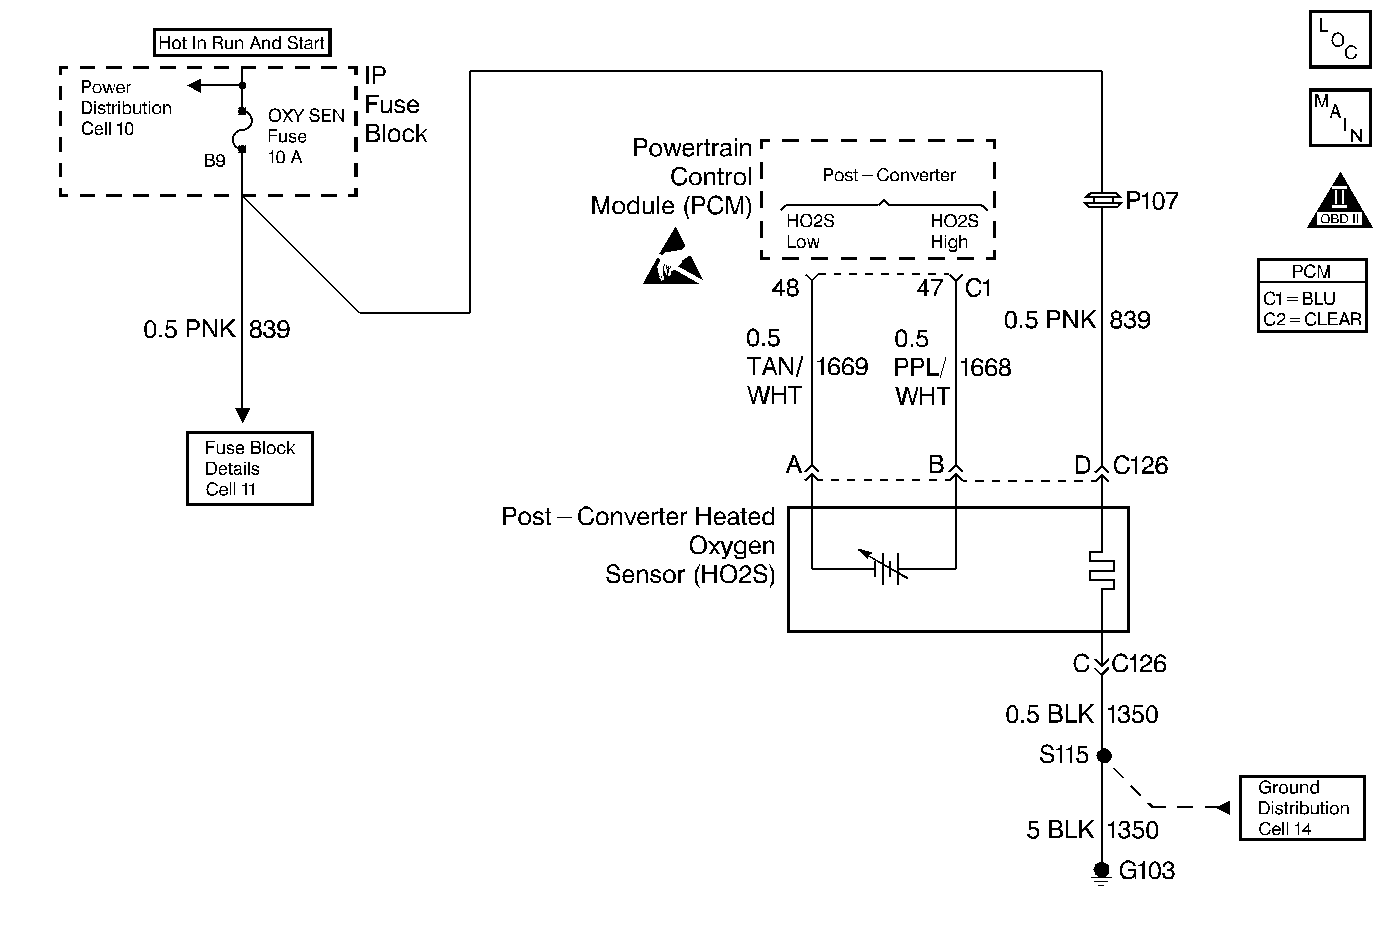
Circuit Description
The PCM provides a 0.45 volt reference to the oxygen sensor on CKT 1668. When the Oxygen Sensor reaches operating temperature it will generate a counter voltage that will vary based on the amount of oxygen in the exhaust. The post-converter heated oxygen sensor is located in the exhaust after the catalytic converter. A lean exhaust will generate a low voltage and cause the 0.45 reference to move lower. A rich exhaust will generate a high voltage and cause the 0.45 reference to move higher. If the oxygen sensor cannot respond under the test conditions and generate a voltage greater than 0.609 volt or less than 0.307 volt, it will set a DTC P0146. Possible causes of DTC P0146 are:
| • | Open in CKT 1668 or 1669. |
| • | Short to voltage on CKT 1668 or 1669. |
| • | Oxygen sensor that malfunctions. |
| • | An ineffective oxygen sensor heater. |
| • | A poor HO2S ground. |
Conditions for Setting the DTC
Test Conditions
| • | DTCs P0117, P0118, P0122 and P0123 not set. |
| • | Coolant temperature 75°C (167°F) or greater. |
| • | Throttle between 2.2 and 81.6 degrees. |
| • | (Calculated) Throttle position switch open. |
| • | Engine speed between 800 and 3000 RPM. |
Failure Condition
Oxygen sensor voltage stays between 0.307 volt and 0.609 volt for 250 out of 300 seconds (oxygen sensor voltage not toggling).
Action Taken When the DTC Sets
| • | The PCM will illuminate the Malfunction Indicator Lamp (MIL) after two consecutive drive trips that the diagnostic runs and fails. |
| • | The PCM will record operating conditions at the time the DTC sets. This information will be stored in the Freeze Frame and Failure Records. |
| • | A first failure of this DTC will store in Last Test Failed but not History. |
Conditions for Clearing the MIL/DTC
| • | The PCM will turn the MIL OFF after three consecutive drive trips that the diagnostic runs and does not fail. |
| • | A Last Test Failed DTC will clear when the diagnostic runs and does not fail. |
| • | A History DTC will clear after forty consecutive warm-up cycles with no failures of any diagnostic test. |
| • | Use a scan tool to clear DTCs. |
| • | Interrupting PCM battery voltage may or may not clear DTCs. This practice is not recommended. Refer to Clearing Diagnostic Trouble Codes in PCM Description and Operation. |
Diagnostic Aids
Notice: Do not solder heated oxygen sensor wires. Soldering the wires will result in the loss of the air reference to the sensor. Refer to Engine Electrical for proper wire and connection repair techniques.
A loose HO2S or one with a poor exhaust ground may cause this DTC to set. Before replacing an HO2S always check the resistance of the sensor ground. On a COLD engine, measure the resistance between the HO2S low circuit and the PCM ground at the PCM connector. If the resistance measures more than 500 ohms (typically less than 50 ohms), remove the sensor and check for corrosion at the HO2S sensor threads. Clean the HO2S sensor threads, apply a coating of anti-seize compound (5613695 or equivalent) and torque the HO2S sensor to the proper torque. Recheck HO2S ground resistance and replace any sensor with resistance above 500 ohms.
Test Description
Number(s) below refer to the step number(s) on the Diagnostic Table.
Step | Action | Value(s) | Yes | No |
|---|---|---|---|---|
1 | Was the Powertrain On-Board Diagnostic (OBD) System Check performed? | -- | Go to A Powertrain On Board Diagnostic (OBD) System Check | |
2 |
Does voltage remain between the specified values? | 85°C (185°F) 0.3 - 0.6 volts | Fault not present | |
Does voltage remain between the specified values? | 0.3 - 0.6 volts | |||
4 |
Is the resistance the same or less than the value specified? | 5 ohms | ||
5 | Measure the resistance between PCM connector C1 terminal 48 and oxygen sensor connector terminal A. Is the resistance the same or less than the value specified? | 5 ohms | ||
6 |
Is the voltage the same or more than the value specified? | 10.5 volts | ||
7 | Measure the voltage from terminal D (harness side) to ground. Is the voltage the same or higher than the value specified? | 10.5 volts | ||
8 | Repair the open in the Post HO2S High circuit. Is the repair complete? | -- | Go to Powertrain Control Module Diagnosis for Verify Repair | -- |
9 | Repair the open in the Post HO2S Low circuit. Is the repair complete? | -- | Go to Powertrain Control Module Diagnosis for Verify Repair | -- |
10 | Repair the open in the Post HO2S ground circuit. Is the repair complete. | -- | Go to Powertrain Control Module Diagnosis for Verify Repair | -- |
11 | Repair the open or short to ground (blown fuse) in the Post HO2S Ignition feed circuit. Is the repair complete? | -- | Go to Powertrain Control Module Diagnosis for Verify Repair | -- |
12 | Replace the post-converter heated oxygen sensor. Refer to Heated Oxygen Sensor (HO2S) Replacement (Pre- and Post-Converter) . Is the replacement complete? | -- | Go to Powertrain Control Module Diagnosis for Verify Repair | -- |
13 |
Was terminal contact repaired? | -- | Go to Powertrain Control Module Diagnosis for Verify Repair | |
14 | Replace the PCM. Refer to PCM Replacement/Programming . Is the replacement complete? | -- | Go to Powertrain Control Module Diagnosis for Verify Repair | -- |
