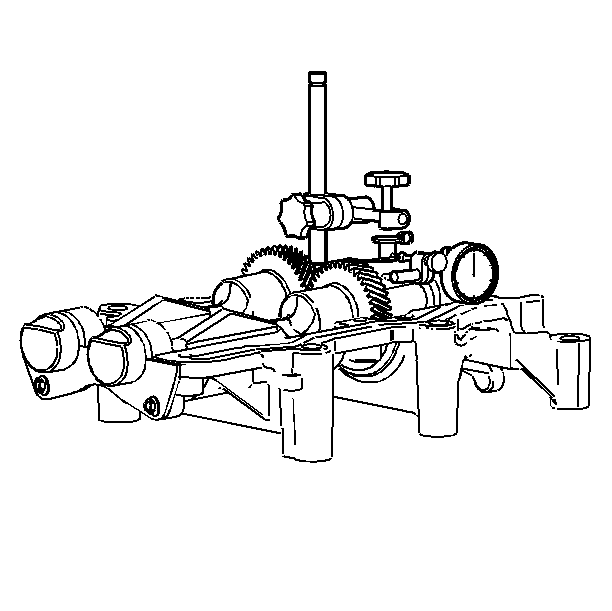
Balance Shaft Housing Disassembly
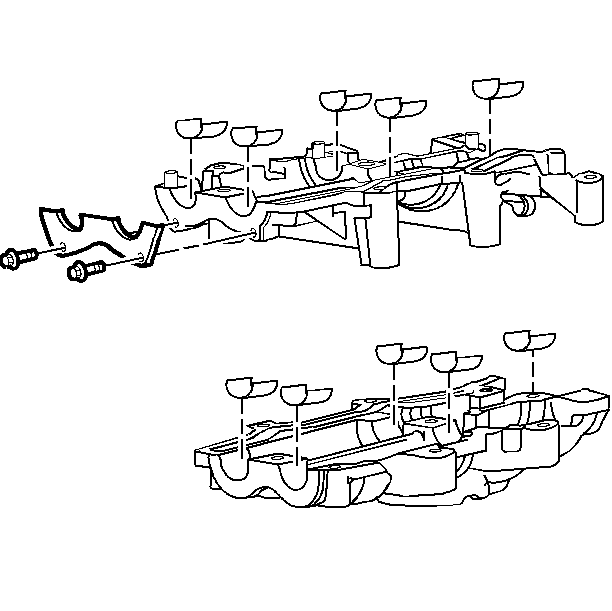
- Remove the oil pump pick-up
screen. Pry the screen out with a suitable tool.
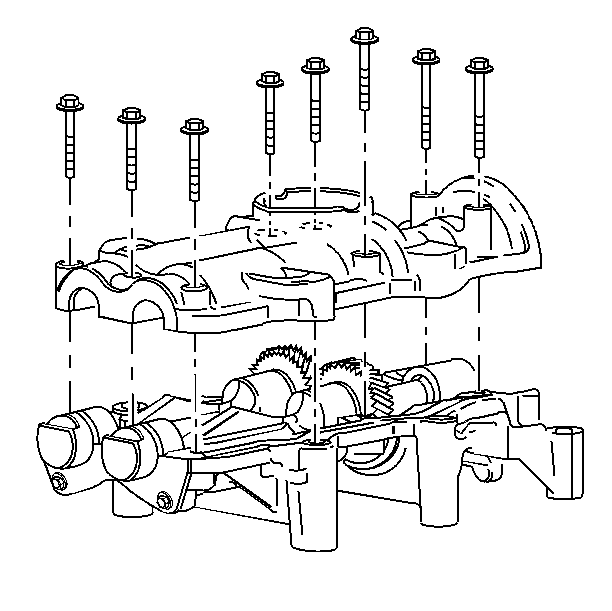
- Loosen all of the housing
bolts.
- Separate the balance shaft housings.
- Remove the balance shaft and gear subassemblies from the housing.
- Carefully remove the bearing
halves from the housing. Do not scratch or gouge the housing.
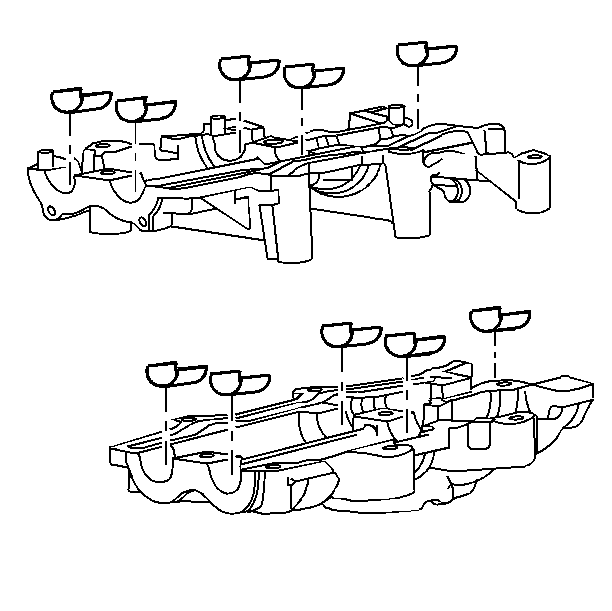
- Remove the thrust plate
bolts.
- Remove the thrust plate.
Balance Shaft Housing Inspection
- Clean all parts in cleaning solvent. Remove varnish, sludge and
dirt.
- Inspect the balance shaft housings for the following conditions:
- If the housings are damaged in any way, replace the entire assembly.
Balance Shaft Chain Cover Inspection
- Clean all parts in cleaning solvent. Remove varnish, sludge and
dirt.
- Inspect the balance shaft chain cover for the following conditions:
Balance Shaft Chain Guide Inspection
- Clean all of the balance shaft chain guide parts in cleaning solvent.
Remove the varnish, sludge, and dirt.
- Inspect the balance shaft chain guide for the following conditions:
| • | Plastic worn off of the guide |
- Replace the balance shaft chain guide if the guide has grooves
deeper than 2.0 mm (0.080 in).
Balance Shaft Driven Sprocket Inspection
- Clean all of the driven sprocket parts in cleaning solvent. Remove
the varnish, sludge and dirt.
- Inspect the driven sprocket teeth for the following conditions:
- Inspect the driven sprocket for the following conditions:
Balance Shaft and Gear Assembly Inspection
- Clean all of the balance shaft and gear assembly parts in cleaning
solvent. Remove the varnish, sludge and dirt.
- Inspect the balance shaft for the following conditions:
- Inspect the gears for the following conditions:
Notice: Do not attempt to resurface the balance shaft journals. They
have a slight taper and resurfacing the journal may remove the taper. The
taper is angled towards the counter weights.
- Replace both shafts even if only one needs to be replaced. Replace the
bearings any time the shafts are replaced.
- Measure the journals for the following conditions:
| • | The correct outside diameter |
| • | An out of round condition |
- Measure the gears for
backlash using the following procedure:
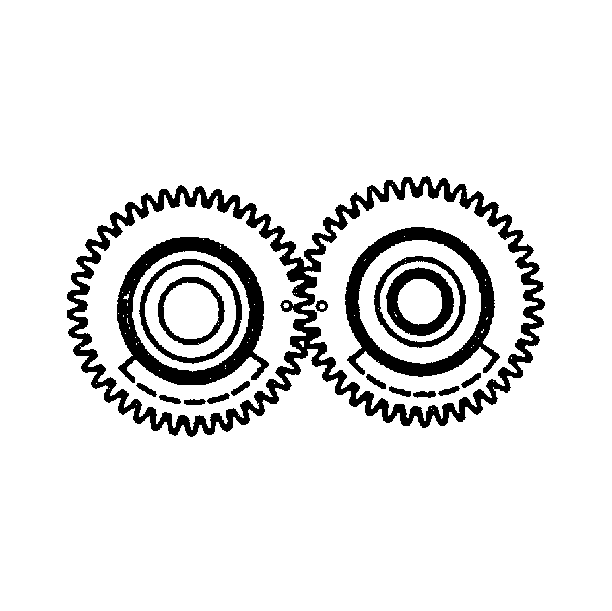
| 6.1. | Place the gear and the shaft assemblies in the housing. The bearings
must be installed. Ensure that the timing marks are aligned. |
| 6.2. | Set up the dial indicator to read off of one tooth of the balance
shaft gear. |
| 6.3. | Hold the other shaft. |
Important: If the shafts are not pulled in the same direction, the gears will climb
away from each other causing the reading to be incorrect. Do not rotate the
gear as you will get incorrect readings.
- While pulling both shafts
in the same direction, gently rock the gear in the direction of the rotation
to ensure the proper measurements.
- Note the total movement and compare the movement to specifications.
- Replace both the gear and the shaft assemblies if the backlash
is out of specification.
Balance Shaft Bearing Inspection
- Clean the bearings in cleaning solvent. Remove the varnish, sludge
and dirt.
- Inspect the bearings for the following conditions:
Balance Shaft Bearing Clearance Measurement
Important: Method A yields measurements from which the bearing clearance can be
computed. Method B yields the bearing clearance directly. Method B does not
indicate bearing or journal runout. Do not mix inserts of different
nominal size.
Method A
- Use a micrometer in order to measure the balance shaft journal
diameter in several places approximately 90 degrees apart. Average
the measurements.
- Compute the taper and runout to ensure they are within the specification
limits.
- Use an inside micrometer in order to measure the bearing insert
ID. If you are replacing the inserts, measure using the new inserts.
- Subtract the bearing measurement from the journal diameter in
order to get the clearance. Refer to specifications for allowable limits.
Method B
- Wipe all of the oil off of the balance shaft journal and the bearing
surfaces.
Important: Do not rotate the shafts after the gauging plastic has been placed on
the journals. If the shafts are rotated the gauging plastic will smear, making
the readings wrong.
- Place a piece of gauging plastic across the entire journal surface.
- Assemble the upper and lower housings and tighten all the fasteners
in sequence to specification.
- Disassemble the housing.
- Measure the flattened plastic at the widest point with the scale
on the gauging plastic package. The plastic will be wider on the journal end
away from the counter weight. This is because the journals are purposely
tapered.
- Remove all of the gauging plastic from the bearing and or journal.
- Compare the measurements to engine specifications.
Balance Shaft Thrust Plate Inspection
- Clean all parts in cleaning solvent. Remove the varnish, sludge
and dirt.
- Inspect the trust plate for the following conditions:
Balance Shaft Drive Chain Inspection
- Clean the balance shaft drive chain parts in cleaning solvent.
Remove the varnish, sludge and dirt.
- Inspect the balance shaft drive chain for the following conditions:
| • | Worn or missing rollers |
Notice: Do not attempt to remove a link from the chain. The chain may be weakened
and may fail, resulting in a loss of oil pressure and engine damage.
- Replace the chain and sprockets if the chain tension cannot be adjusted
to specification before the chain hits the housing or the guide comes to the
end of its travel.
Balance Shaft Drive Sprocket Inspection
- Clean all of the drive sprocket parts in cleaning solvent. Remove
the varnish, the sludge, and the dirt.
- Inspect the sprocket teeth for the following conditions:
- Inspect the sprocket for the following conditions:
- If the sprocket is to be replaced, inspect the crankshaft for
burrs or nicks.
Balance Shaft Housing Assembly
- Install the thrust plate.
Notice: Use the correct fastener in the correct location. Replacement fasteners
must be the correct part number for that application. Fasteners requiring
replacement or fasteners requiring the use of thread locking compound or sealant
are identified in the service procedure. Do not use paints, lubricants, or
corrosion inhibitors on fasteners or fastener joint surfaces unless specified.
These coatings affect fastener torque and joint clamping force and may damage
the fastener. Use the correct tightening sequence and specifications when
installing fasteners in order to avoid damage to parts and systems.
- Install the thrust
plate bolts.
Tighten
Tighten the thrust plate bolts to 13 N·m (115 lb in).
- Carefully install the bearing halves into the housing. Do not
scratch or gouge the housing or the bearings.
- Lubricate the bearings, shafts and gears with GM P/N 9985705
or an equivalent.
- Install the balance shaft
and gear assemblies into the housing.
- Ensure that the timing marks on the balance shaft gears are lined
up.
- Install the upper housing half to the lower housing half.
- Install the housing fasteners.
Tighten
Tighten the fasteners to 5 N·m (44 lb in).
Important: Do not install the oil pump pick-up screen until the housing fasteners
have been tightened to final specifications.
- Tighten the fasteners to final specifications after the housing assembly
has been installed on the engine.
