For 1990-2009 cars only
Removal Procedure
- Place the front seat in the highest vertical position.
- Remove the front seat. Refer to Front Seat Replacement - Bucket .
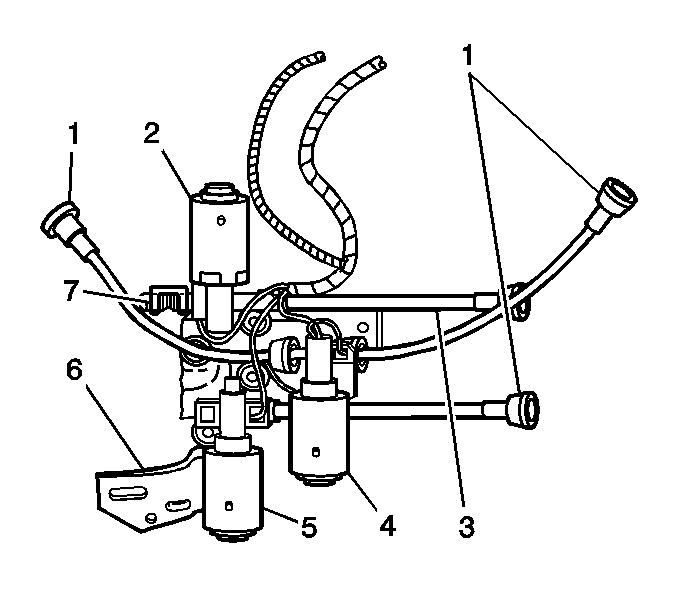
- Disconnect the electrical connectors from the motors (2, 4, 5).
- Squeeze the oblong connectors for the vertical and horizontal drive cables (1, 3).
- Pull the drive cables (1, 3) out from the vertical and horizontal actuators.
- Remove the motor support bracket nut from the seat adjuster.
- Remove the retaining clip (7) from the horizontal motor (2).
- Remove the motor support bracket (6) from the seat adjuster.
- Drill out the rivets.
- Remove the motors (2, 4, 5) from the mounting support bracket (6).
Installation Procedure
- Install the grommet to the motor support bracket (6). Secure the motor (2, 4, 5) to the grommet using appropriate rivets.
- Install the motor support bracket (6) to the seat adjuster.
- Install the motor support bracket nut to the seat adjuster.
- Install the retaining clip (7) to the horizontal motor (2).
- Install the drive cables (1, 3) to the vertical and horizontal actuators.
- Push the drive cable connectors into the actuators until a loud audible click is heard.
- Connect the electrical connectors to the motors (1, 2, 3).
- Install the front seat. Refer to Front Seat Replacement - Bucket .
- Return the seat to the original position.
Notice: Refer to Fastener Notice in the Preface section.
Tighten
Tighten the nut to 8 N·m (71 lb in).
