Diagnosis
Go to the Air Conditioning portion of the service manual for the diagnosis of the refrigerant portion of the system.
A scan tool can be used to display the following parameters:
| • | A/C Request--This displays if PCM has received an A/C request from Instrument Panel Cluster (IPC) YES or NO. |
| • | A/C Clutch--This displays if the PCM has commanded the A/C clutch ON or OFF. |
| • | A/C Highside--This displays the A/C refrigerant highside pressure in VOLTS and PSI . |
Circuit Description
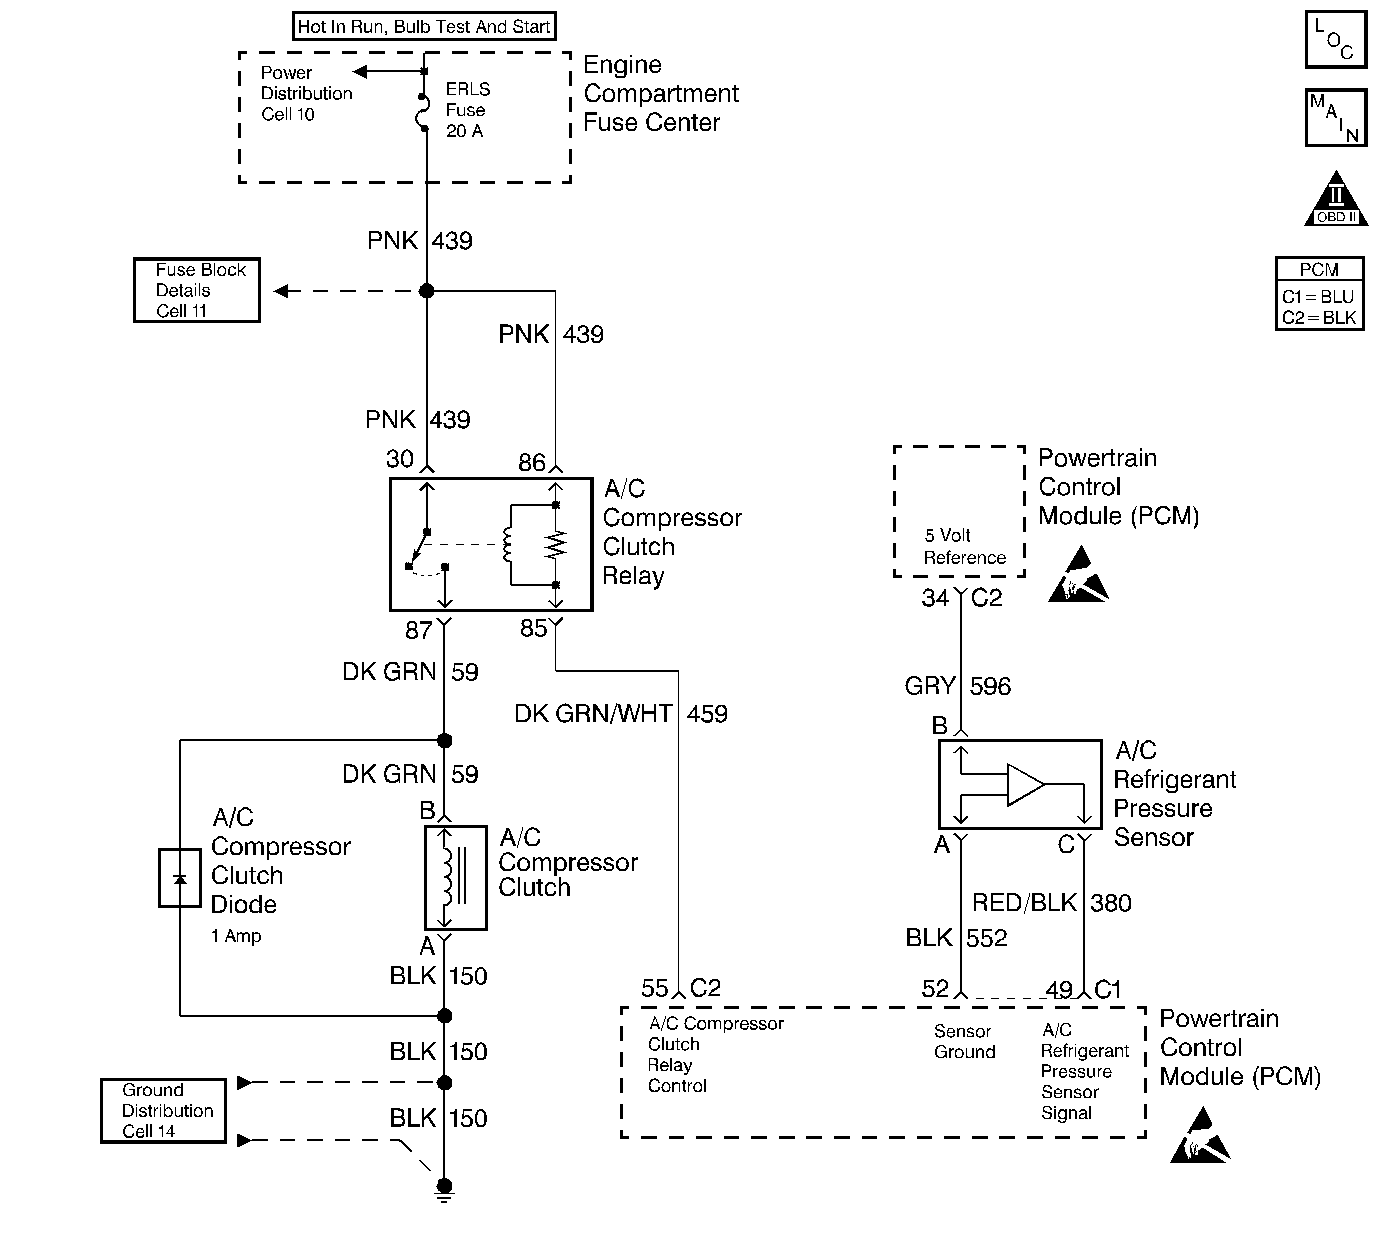
The Powretrain Control Module (PCM) receives an A/C request signal from the instrument panel cluster (IPC) over the UART serial data line. When A/C is requested, the Powertrain Control Module (PCM) provides a ground path to the A/C clutch relay control circuit. When the relay circuit is grounded, the A/C compressor clutch relay is energized. The PCM delays grounding the relay circuit for 0.3 second, so the PCM can adjust the engine idle RPM for the additional load.
The PCM will temporarily de-energize the A/C compressor clutch relay for one or more of the following conditions:
| • | A hot engine restart |
| • | A wide open throttle (TP sensor over 90 percent) |
| • | Engine RPM greater than 6,000 RPM |
| • | During an idle air control (IAC) valve reset |
| The A/C compressor clutch relay will remain de-energized when one or both of the following conditions exist: |
| • | A DTCs P0530 or U1016 is set |
| • | There is no A/C request signal to the PCM |
| Refer to the Air Conditioning portion of the service manual for more information on the A/C refrigerant systems. |
Diagnostic Aids
| • | If DTCs P0530 or U1016 are set, do not use this table. |
| • | If the complaint is insufficient cooling, the problem may be caused by an inoperative cooling fan. Refer to Electric Cooling Fan Diagnosis. |
| • | If the fan operates correctly, refer to A/C Diagnosis in the Air Conditioning portion of the service manual. |
| • | An A/C refrigerant pressure outside the range of 43 to 428 psi, will cause the A/C compressor clutch to be disabled by the PCM. Observe the A/C refrigerant pressure parameter on the scan tool for 2 minutes with the engine idling and A/C ON. If pressure goes out of range, refer to the Air Conditioning portion of the service manual. |
Test Description
Number(s) below refer to number(s) on the diagnostic table.
-
The Powertrain OBD System Check prompts the technician to complete some basic checks and store the freeze frame and failure records data on the scan tool if applicable. This creates an electronic copy of the data taken when the malfunction occurred. The information is then stored on the scan tool for later reference.
-
The PCM will only energize the A/C relay when the engine is running. This test will determine if the relay or control circuit is malfunctioning.
-
By disconnecting the relay, the system can be divided into two sections. If the clutch does not disengage, the malfunction lies on the compressor side of the system.
-
A test light that does not illuminate indicates that the A/C compressor clutch relay is malfunctioning.
-
Determines if the system is normal or if the A/C refrigerant pressure sensor reading is out of range.
-
Determines if the signal is reaching the PCM from the A/C control panel through the IPC. The signal should only be present when an A/C mode or defrost mode has been selected.
-
The A/C request signal is communicated through the IPC to the PCM over the UART serial data line. The A/C selector switch must send a signal to the IPC before the IPC will send a signal to the PCM to turn ON the A/C compressor.
-
The replacement PCMs must be reprogrammed and the crankshaft position system variation procedure must be preformed. Refer to the latest Techline procedure for the PCM reprogramming and also refer to the Powertrain Control Module (PCM) for the Crankshaft variation learn procedure .
-
This step determines if the A/C refrigerant pressure sensor is out of range causing the A/C compressor clutch to be disabled or if the A/C charge is to low to allow A/C operation.
-
Connecting circuits 59 and 439 together bypasses the PCMs control of the A/C compressor clutch. An A/C compressor clutch that fails to engage at this point indicates that the malfunction is in circuit 59, the compressor coil or compressor coil ground circuit.
-
With the engine running and the A/C relay commanded ON, the PCM should ground the A/C relay control circuit. This will also illuminate the test light.
-
If no malfunction have been found at this point, refer to Diagnostic Aids for additional checks and information.
Step | Action | Value(s) | Yes | No |
|---|---|---|---|---|
Was the Powertrain On-Board Diagnostic (OBD) System Check performed? | -- | |||
2 | Install a scan tool. Were DTCs P0530 or P1601 set? | -- | Go to DTC tables first | |
Turn the ignition switch ON, with the engine OFF. Is the A/C compressor clutch engaged? | -- | |||
Disconnect the A/C relay. Does the A/C compressor clutch disengage? | -- | |||
5 |
Does the A/C compressor clutch cycle ON and OFF with the selector switch? | 85°C (185°F) | ||
With a test light connected to B+, probe the A/C relay control terminal. Does the test light illuminate? | -- | |||
7 | Disconnect the A/C clutch electrical connector. Does the A/C compressor clutch disengage? | -- | ||
Are the high side pressures within the specified value of each other? | 20 psi | |||
Turn the A/C ON and OFF. Does the scan tool indicate when the A/C is requested and not requested correctly? | -- | |||
10 | Check the A/C compressor clutch relay control circuit for a short to ground and repair as necessary Was a repair necessary? | -- | ||
11 | Replace the A/C compressor clutch relay. Is the action complete? | -- | -- | |
12 | Repair the short to B+ in the A/C compressor clutch ignition feed circuit. Is the action complete? | -- | -- | |
13 | Replace the malfunctioning A/C compressor clutch assembly. Is the action complete? | -- | -- | |
14 |
Does the DVM read the specified value? | B+ | ||
15 | Turn the ignition switch ON, with the engine OFF. Is the A/C High side value between the specified values? | 40-430 psi | ||
Does the test light turn ON and OFF when the A/C selector switch is cycled? | -- | |||
Replace the PCM. Is the action complete? | -- | -- | ||
18 | Replace the A/C refrigerant pressure sensor. Is the action complete? | -- | -- | |
19 | Repair the open or poor connection in the A/C refrigerant pressure sensor ground. Is the action complete? | -- | -- | |
20 |
Does the test light illuminate on both circuits? | -- | ||
Are the highside pressures within the specified value of each other? | 20 psi | Go to Section 1B | ||
22 | Replace the IPC. Is the action complete? | -- | -- | |
23 | Repair the signal from the A/C selector switch (refer to Section 8A-64). Is the action complete? | -- | -- | |
Connect a jumper between the A/C relay ignition feed terminal and the A/C compressor clutch feed terminal. Does the A/C compressor clutch engage? | -- | |||
25 |
Was a repair necessary? | -- | ||
Does the test light illuminate? | -- | |||
27 |
Does the test light illuminate? | -- | ||
28 | Repair the open battery or ignition feed circuit to the A/C relay. Is the action complete? | -- | -- | |
29 | Connect the test light to ground and again probe the compressor clutch relay control terminal. Did the test light illuminate? | -- | ||
30 | With a test light connected to B+, probe the A/C compressor clutch ground circuit. Does the test light illuminate? | -- | ||
31 | Repair the open in the A/C compressor clutch ignition feed circuit. Is the action complete? | -- | -- | |
32 | Check the A/C compressor clutch relay control circuit for a short to voltage and repair as necessary. Was a repair necessary? | -- | ||
33 | Check the A/C compressor clutch relay control circuit for an open or poor connection and repair as necessary. Was a repair necessary? | -- | ||
34 | Replace the A/C compressor clutch coil. Is the action complete? | -- | -- | |
35 | Repair the open or poor connection in the A/C compressor clutch ground circuit. Is the action complete? | -- | -- | |
Does the A/C compressor clutch cycle ON and OFF? | System OK Refer to Diagnostic Aids |
