DTC P0461 Fuel Level Sensor Performance Single Fuel Tank
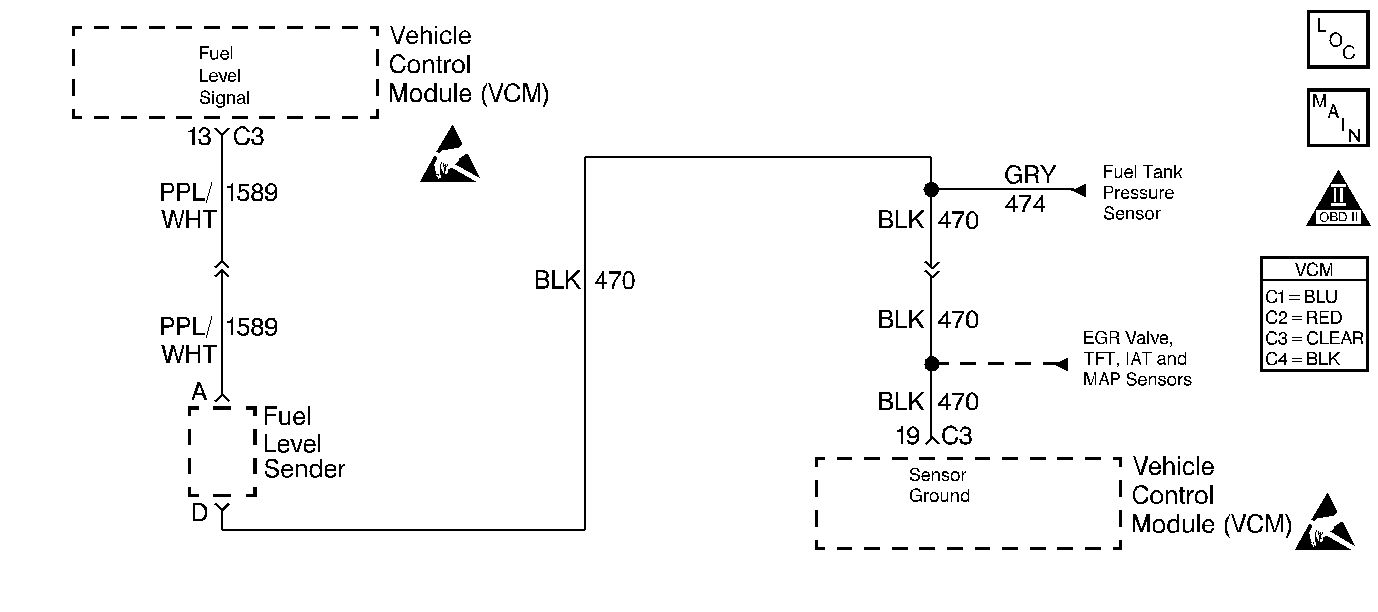
Circuit Description
The VCM requires an accurate indication of fuel level for EVAP system diagnosis. The fuel level in the fuel tank changes the rate of vacuum decay for the EVAP system leak DTCs.
The Fuel Level Sensor changes resistance based on fuel level. The Fuel Level Sensor has a signal circuit and a ground circuit. The VCM applies a voltage (about 5 volts) on the signal circuit to the sensor. The VCM monitors changes in this voltage caused by changes in the resistance of the sensor to determine fuel level.
When the fuel tank is full, the sensor resistance is high, and the VCMs signal voltage is only pulled down a small amount through the sensor to ground. Therefore, the VCM will sense a high signal voltage (fuel tank full). When the fuel tank is empty, the sensor resistance is low, and the signal voltage is pulled down a greater amount. This causes the VCM to sense a low signal voltage (fuel tank empty).
The VCM uses the input from the Fuel Level Sensor to calculate the fuel level in the fuel tank. This information is then sent to the IPC through Serial Data.
The diagnostic will not run when the tank is greater than 85 percent or less than 15 percent full. (This sensor signal disables the misfire when the fuel levels are less than 15 percent).
Conditions for Running the DTC
The VCM has confirmed that the fuel tank is between 15 percent and 85 percent full.
Conditions for Setting the DTC
The VCM does not detect a decrease in fuel level over a distance of 200 miles (320 Km)
Action Taken When the DTC Sets
| • | The control module stores the DTC in history after the first failure but will not illuminate the malfunction indicator lamp (MIL). |
| • | The control module records the operating conditions at the time the diagnostic fails. The control module stores the failure information in the scan tools Freeze Frame/Failure Records. |
Conditions for Clearing the MIL/DTC
| • | A history DTC will clear if no fault conditions have been detected for 40 warm-up cycles. |
| • | A warm-up cycle occurs when the coolant temperature has risen 22°C (40°F) from the startup coolant temperature and the engine coolant temperature exceeds 70°C (160°F) during the same ignition cycle. |
| • | Use the scan tool Clear Information function. |
Diagnostic Aids
Important: Fuel level is used to determine EVAP system diagnosis. Always diagnose the fuel level sensor before any other EVAP system components or DTCs.
Do not use the fuel gauge as an indication of a shorted or open circuit as the IPC may always default to EMPTY or FULL depending upon the vehicle model.Check for the following conditions:
| • | A poor connection or damaged harness - Inspect VCM harness connectors for the following: |
| - | Backed out terminals |
| - | Improper mating |
| - | Broken locks |
| - | Poor wire to terminal connections |
| • | Intermittent test - monitor a scan tool or digital voltmeter connected between the related circuits while moving the connectors and harnesses. If the failure is induced, the voltage reading will change. This will help locate a circuit problem. |
Test Description
Number(s) below refer to the step number(s) on the diagnostic table.
-
This step determines if there is a wiring problem.
-
This step determines if the Fuel Level sensor signal and ground circuits are OK.
Step | Action | Value(s) | Yes | No | ||||||
|---|---|---|---|---|---|---|---|---|---|---|
1 |
Important: : Before clearing the DTCs, use the scan tool Capture Info to save the Freeze Frame and Failure Records for reference. The control module's data is deleted once the Clear Info function is used. Did you perform the Powertrain On-Board Diagnostic (OBD) System Check? | -- | ||||||||
|
Important: : If DTCs P0462 and P0463 are also set, diagnose these codes first.
Is the Fuel Level voltage near the specified value? | 5.0 V | |||||||||
Is the Fuel Level sensor voltage near the specified value? | 0.0 V | |||||||||
4 | Repair the open or short to ground in the Fuel Level signal circuit. Is the action complete? | -- | ||||||||
5 | Check the Fuel Level Sender for the following:
Was a problem found? | -- | ||||||||
6 | Check the Fuel Level signal and ground circuits for an open. Was a problem found? | -- | ||||||||
7 | Repair as necessary. Is the action complete? | -- | -- | |||||||
8 | Replace the Fuel Level Sensor. Refer to Fuel Sender Assembly Replacement . Is the action complete? | -- | -- | |||||||
9 |
Was terminal contact repaired? | -- | ||||||||
10 |
Is the action complete? | -- | -- | |||||||
11 |
Does the scan tool indicate the diagnostic Passed? | -- | ||||||||
12 | Does the scan tool display any additional undiagnosed DTCs? | -- | Go to the applicable DTC table | System OK |
DTC P0461 Fuel Level Sensor Performance Dual Fuel Tanks
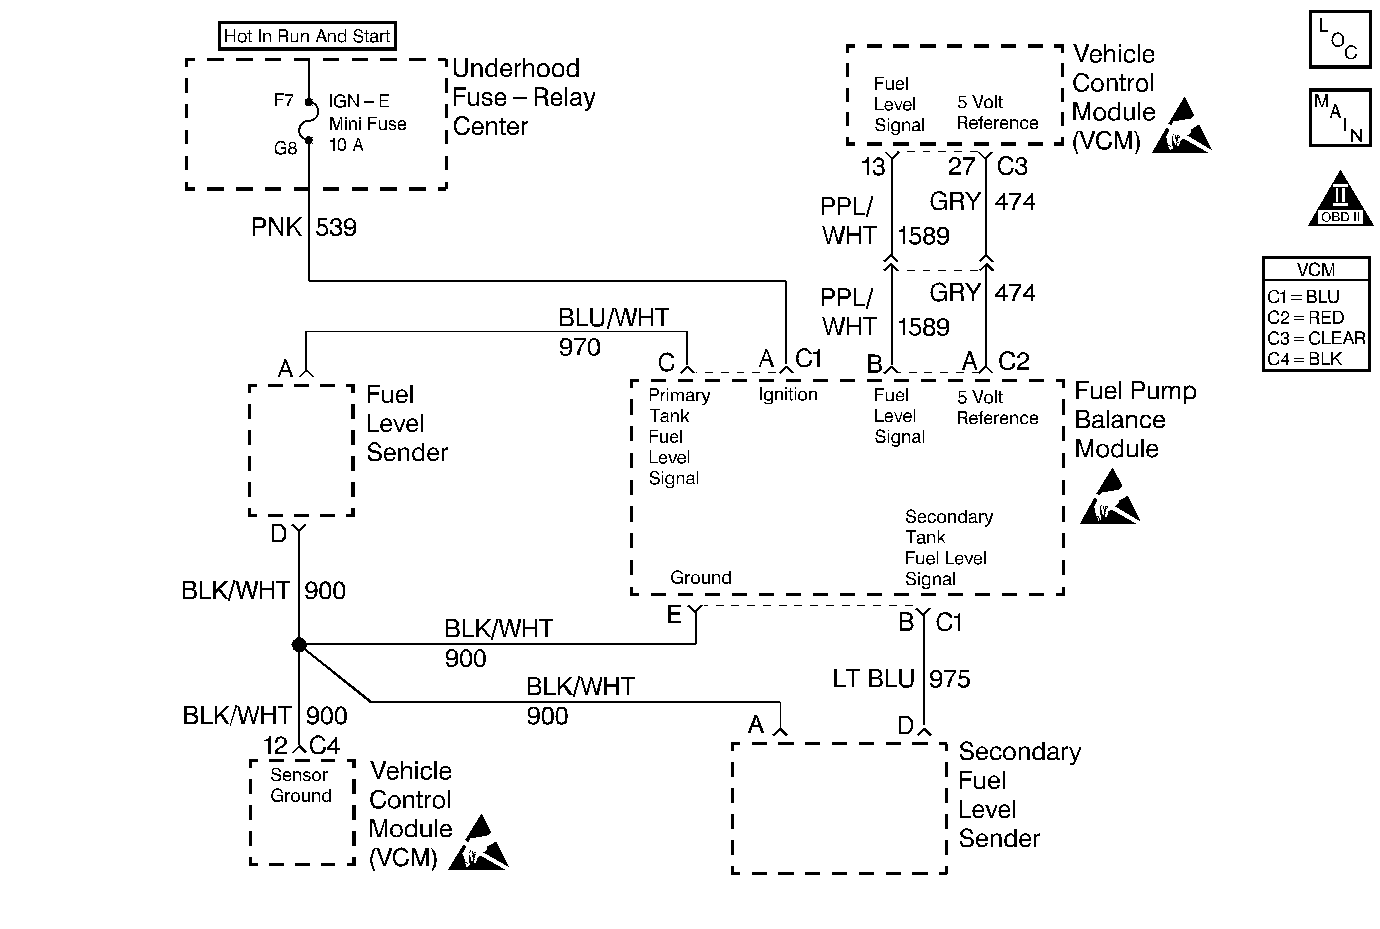
Circuit Description
The Fuel Level sensor is an important input to the VCM for the Enhanced Evaporative System Diagnostic. The VCM needs the fuel level information in order to know the volume of fuel in the tank. The fuel level affects the rate of change in the air pressure in the EVAP system. Several of the Enhanced Evaporative System Diagnostic sub-test are dependent upon the correct fuel level information. The diagnostic will not run when the tank is greater than 85% or less than 15% full. (This sensor signal disables the misfire when the fuel levels are less than 15%).
Conditions for Setting the DTC
| • | The fuel tank level slosh test is completed |
| • | The tank level main test is completed |
| • | The fuel tank level data is valid |
| • | The fuel level signal is unchanged over a distance of 200 miles |
Action Taken When the DTC Sets
| • | The control module stores the DTC in history after the first failure but will not illuminate the malfunction indicator lamp (MIL). |
| • | The control module records the operating conditions at the time the diagnostic fails. The control module stores the failure information in the scan tools Freeze Frame/Failure Records. |
Conditions for Clearing the MIL or DTC
| • | The control module turns OFF the MIL after 3 consecutive drive trips when the test has run and passed. |
| • | A history DTC will clear if no fault conditions have been detected for 40 warm-up cycles. A warm-up cycle occurs when the coolant temperature has risen 22°C (40°F) from the startup coolant temperature and the engine coolant reaches a temperature that is more than 70°C (158°F) during the same ignition cycle. |
| • | Use a scan tool in order to clear the DTCs. |
Diagnostic Aids
Check for the following conditions:
| • | A poor connection or damaged harness - Inspect VCM harness connectors for the following: |
| - | Backed out terminals |
| - | Improper mating |
| - | Broken locks |
| - | Poor wire to terminal connections |
| • | Intermittent test - monitor a scan tool or digital voltmeter connected between the related circuits while moving the connectors and harnesses. If the failure is induced, the voltage reading will change. This wil help locate a circuit problem. |
Test Description
Number(s) below refer to the step number(s) on the diagnostic table.
-
This step determines if sender is responding correctly.
-
This step determines if the VCM is functioning correctly.
Step | Action | Value(s) | Yes | No |
|---|---|---|---|---|
1 |
Important: Before clearing the DTCs, use the scan tool in order to record the Freeze Frame and the Failure Records for reference. This data will be lost when the Clear Info function is used. Was the Powertrain On-Board Diagnostic (OBD) System Check performed? | -- | ||
Did the Fuel Level Sensor voltage change? | -- | |||
3 |
Did the Fuel Level Sensor voltage change? | -- | ||
4 | This DTC is intermittent. Are any additional DTC stored? | -- | Go to the applicable DTC table | Go to Diagnostic Aids |
5 |
Is the voltage near the specified value? | 5.0V | ||
Is the voltage near the specified value? | 5.0V | |||
7 | Check the fuel level input circuit for an open, high resistance or a short. Did you find a problem? | -- | ||
8 |
Is the action complete? | -- | -- | |
9 | Probe the ground circuit of the balance module C1 connector with a test lamp connected to B+. Does the test lamp illuminate? | -- | ||
10 | Probe the ignition positive voltage circuit of the fuel pump balance module connector C1 with a test lamp connected to ground. Does the test lamp illuminate? | -- | ||
11 |
Does the resistance change by more than 20 Ohms? | -- | ||
12 |
Does the resistance change by more than 20 Ohms? | -- | ||
13 | Repair the circuit as necessary. Refer to Wiring Repairs in Wiring Systems. Is the action complete? | -- | -- | |
14 | Check the connections at the sender for corrosion. Make sure that connections are clean and tight. Did you find a problem? | -- | ||
15 | Replace the fuel level sensor. Refer to Fuel Sender Assembly Replacement . Is the action complete? | -- | -- | |
16 | Replace the fuel balance pump. Refer to Fuel Pump Replacement . Is the action complete? | -- | -- | |
17 |
Does the scan tool indicate that this diagnostic ran and passed? | -- | -- | |
18 | Does the scan tool display any additional undiagnosed DTCs? | -- | Go to the applicable DTC table | System OK |
