Circuit Description
Important: If the voltage is measured with a 10 Megaohm Digital Voltmeter, the voltage may read as low as 0.32 volt (320 mV).
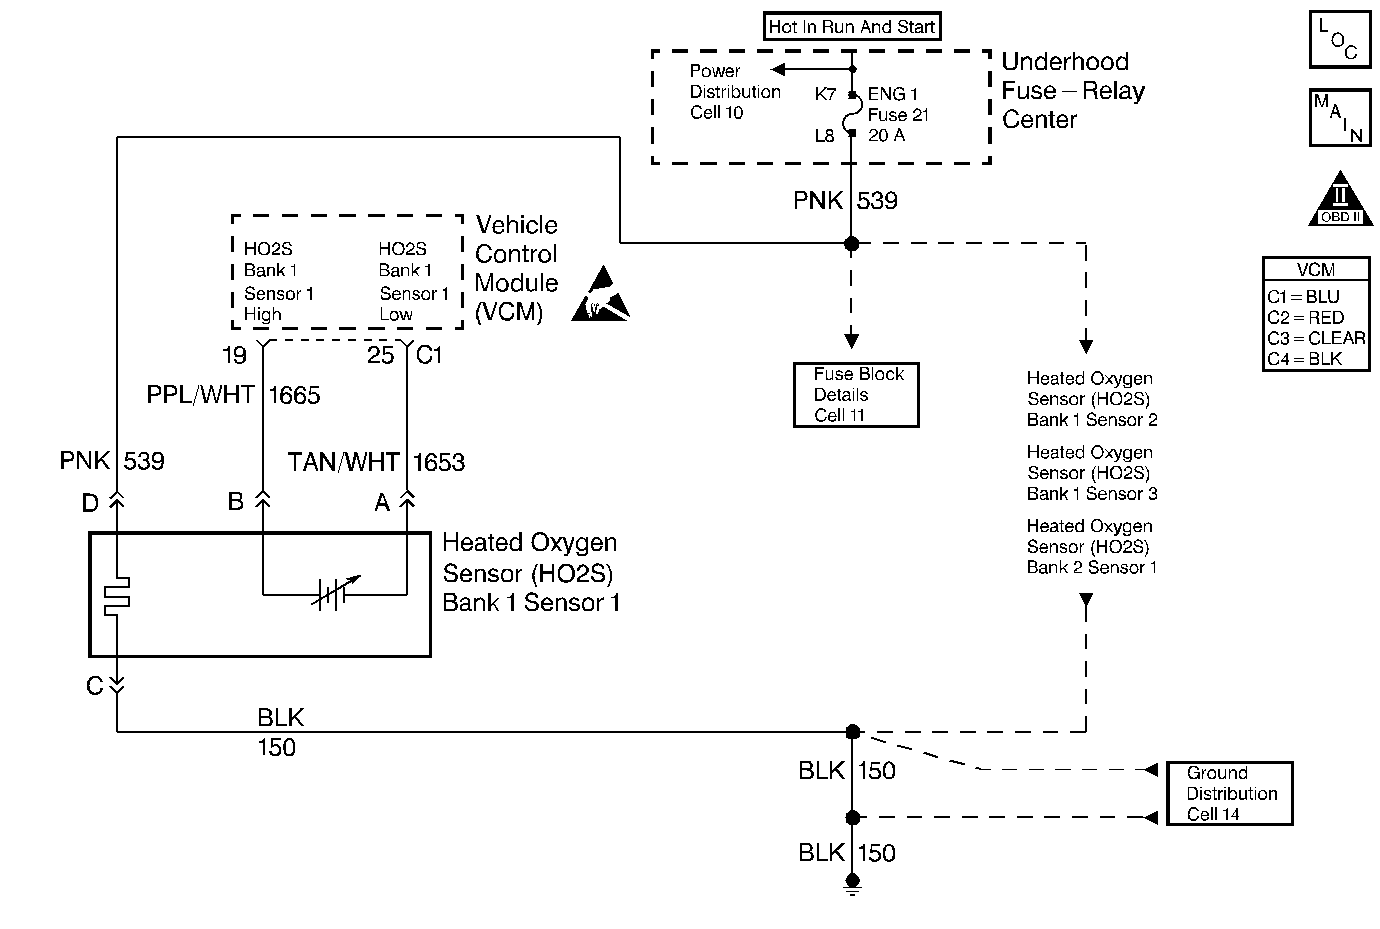
The VCM supplies a voltage of approximately 0.45 volt (450 mV) between the HO2S High and HO2S Low circuits. The Heated Oxygen Sensor (HO2S) varies the voltage from approximately 1.0 volt (1000 mV) during rich conditions to 0.10 volt (100 mV) during lean conditions.
When the HO2S temperature measures below 360°C (600°F) the sensor will not produce any voltage and will behave like an open circuit. This will result in an Open Loop operation.
The HO2S heater provides for a faster sensor warm-up which allows the sensor to become active in a shorter period of time. The sensor will remain active during a long extended idle. The DTC P0135 determines if the HO2S is functioning properly by checking the response time of the sensor. This is a type B DTC.
Conditions for Setting the DTC
| • | The system voltage is greater than 9.0 volts but less than 17.0 volts. |
| • | The MAF is less than 27 grams per second for 5.0L, 5.7L |
| • | The MAF is less than 45 grams per second for 7.4L |
| • | The engine run time is greater than 2 seconds. |
| • | The ECT sensor is less than 32°C. |
| • | The IAT is less than 32°C. |
| • | The difference between the ECT and IAT is no more than 5°C for 5.0L, 5.7L. |
| • | The difference between the ECT and IAT is no more than 8°C for 7.4L. |
| • | The elapsed time to obtain the ±0.150 volts from the HO2S bias voltage (0.300-0.600 volts) is greater than the calculated value. |
Action Taken When the DTC Sets
The VCM turns the malfunction indicator lamp (MIL) ON after 2 consecutive test failures.
Conditions for Clearing the MIL/DTC
The VCM turns OFF the MIL after 3 consecutive driving trips without a fault condition present. A history DTC will clear if no fault conditions have been detected for 40 warm-up cycles (the coolant temperature has risen 22°C (40°F) from the start-up coolant temperature and the engine coolant temperature exceeds 71°C (160°F) during that same ignition cycle) or the scan tool clearing feature has been used.
Diagnostic Aids
Important: Never solder the HO2S wires. For proper wire and connection repairs, refer to Wiring Repairs in Engine Electrical.
| • | Check for a poor connection or a damaged harness. |
| • | Inspect the harness for the following conditions: |
| - | Backed out terminals |
| - | Improper mating |
| - | Broken locks |
| - | Improperly formed or damaged terminals |
| - | A poor terminal to wire connection |
| - | A damaged harness |
Test Description
The numbers below refer to the step numbers on the diagnostic table.
-
This step determines if the DTC P0135 is the result of a hard failure or an intermittent condition present. With the ignition ON and the engine off, the HO2S Bank 1, Sensor 1 voltage displayed on the scan tool should gradually change to 0.150 volt, indicating that the heater is working properly. The HO2S voltage can rise as high as 975 mV before it toggles back down. The main thing to look for is a change.
-
Probing the terminal D of the HO2S Bank 1, Sensor 1 connector verifies if the voltage is available to the HO2S Bank 1, Sensor 1 heater.
Step | Action | Value(s) | Yes | No |
|---|---|---|---|---|
1 |
Important: Before clearing DTCs, use the scan tool in order to record freeze frame and the failure records for reference because the Clear Info function will lose the data. Was the Powertrain On-Board Diagnostic (OBD) System Check performed? | -- | ||
Does the voltage displayed gradually decrease by the specified value? | 0.150 V (150 mV) | |||
Is the test lamp on? | -- | |||
4 | Connect a test lamp between the terminals C and D of the HO2S Bank 1, Sensor 1 sensor connector. Is the test lamp on? | -- | ||
5 | The DTC is intermittent. If no additional DTCs are stored, refer to the Diagnostic Aids. If additional DTCs are stored, refer to those tables. | -- | Go to The Applicable DTC Table | |
6 | Check for an open in the HO2S Bank 1, Sensor 1 sensor fuse. Is the HO2S fuse open? | -- | ||
7 | Check the connections at the HO2S Bank 1, Sensor 1 sensor. Was a problem found? | -- | ||
8 | Check the connections at the HO2S Bank 1, Sensor 1. Was a problem found? | -- | ||
9 | Check the connections at The HO2S Bank 1, Sensor 1. Was a problem found? | -- | ||
10 | Repair the open HO2S Bank 1, Sensor 1 sensor ground circuit. Refer to Wiring Repairs in Engine Electrical. Is the action complete? | -- | -- | |
11 | Check for an open at the HO2S Bank 1, Sensor 1 sensor ignition feed circuit. Was a problem found? | -- | -- | |
12 | Repair the faulty connection. Refer to Wiring Repairs in Engine Electrical. Is the action complete? | -- | -- | |
13 | Repair the open to the ground in the HO2S Bank 1, Sensor 1 sensor ignition feed circuit. Refer to Wiring Repairs in Engine Electrical. Is the action complete? | -- | -- | |
14 |
Is the repair complete. | -- | -- | |
15 | Replace the HO2S Bank 1, Sensor 1 sensor. Refer to Heated Oxygen Sensor (HO2S) Replacement . Is the repair complete. | -- | -- | |
16 |
Does the scan tool indicate that this diagnostic ran and passed? | -- | ||
17 | Using the scan tool, select the Capture Info and the Review Info. Are any DTCs displayed that have not been diagnosed? | -- | Go to The Applicable DTC Table | System OK |
