Strut Assembly Replacement SWBHSV Except Clubsport
Removal Procedure - Type B
- Raise and support the vehicle. Refer to Lifting and Jacking the Vehicle.
- Disconnect the negative battery cable. Refer to Battery Negative Cable Disconnection and Connection.
- Remove the rear wheels. Refer to Tire and Wheel Removal and Installation.
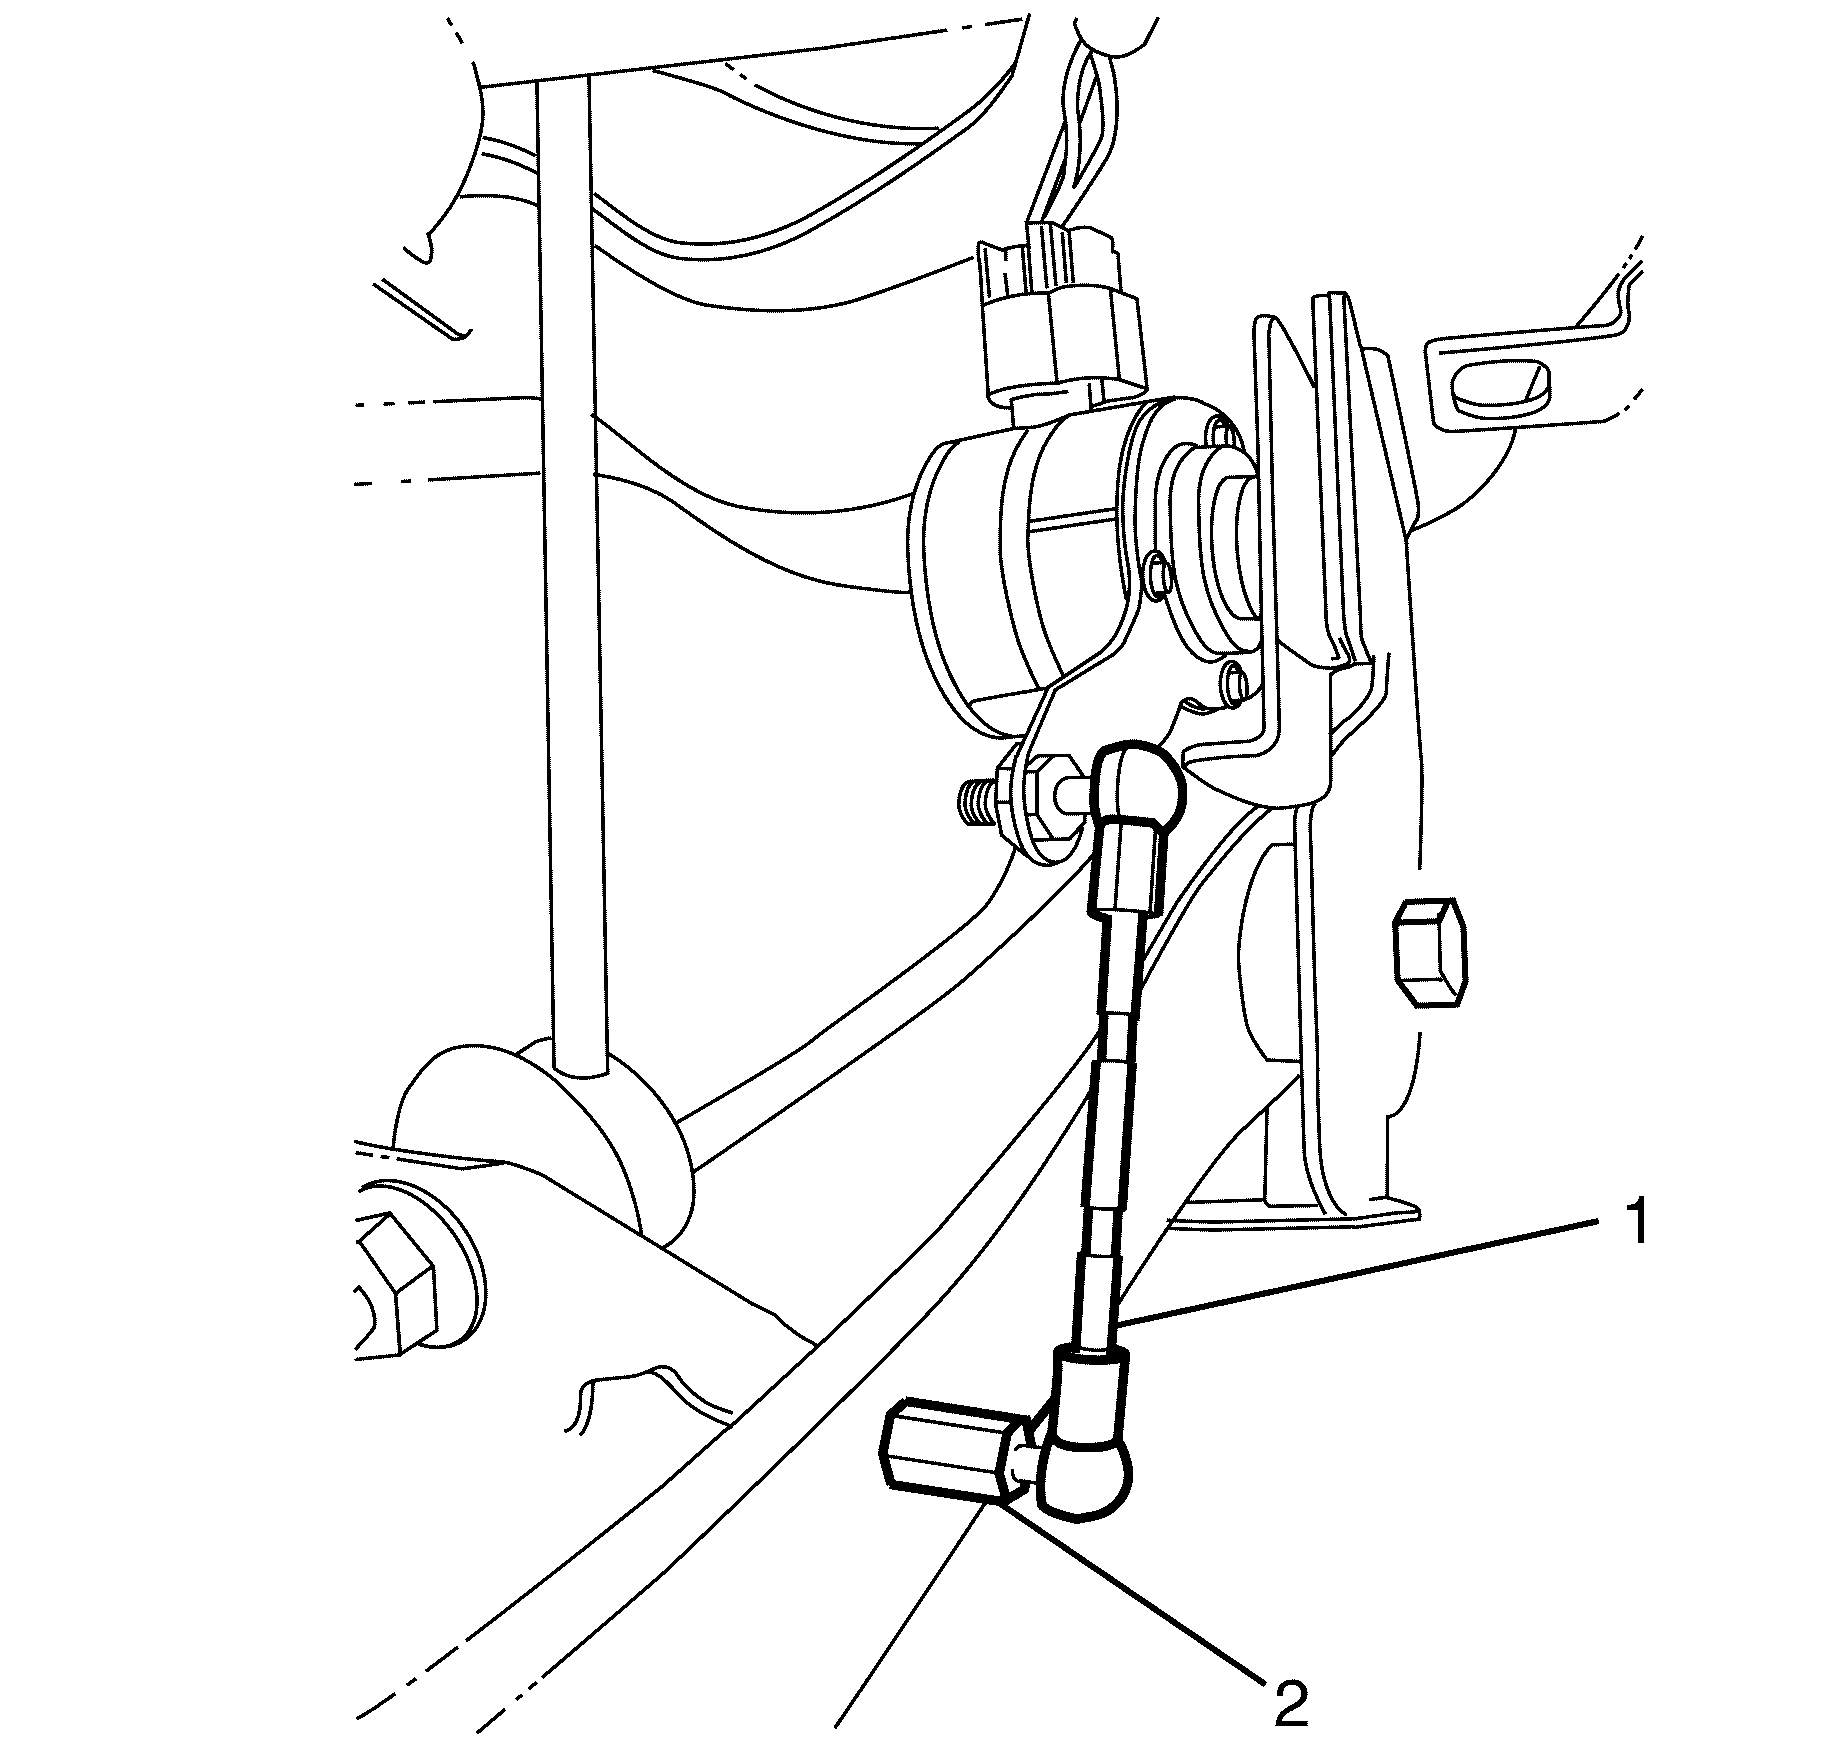
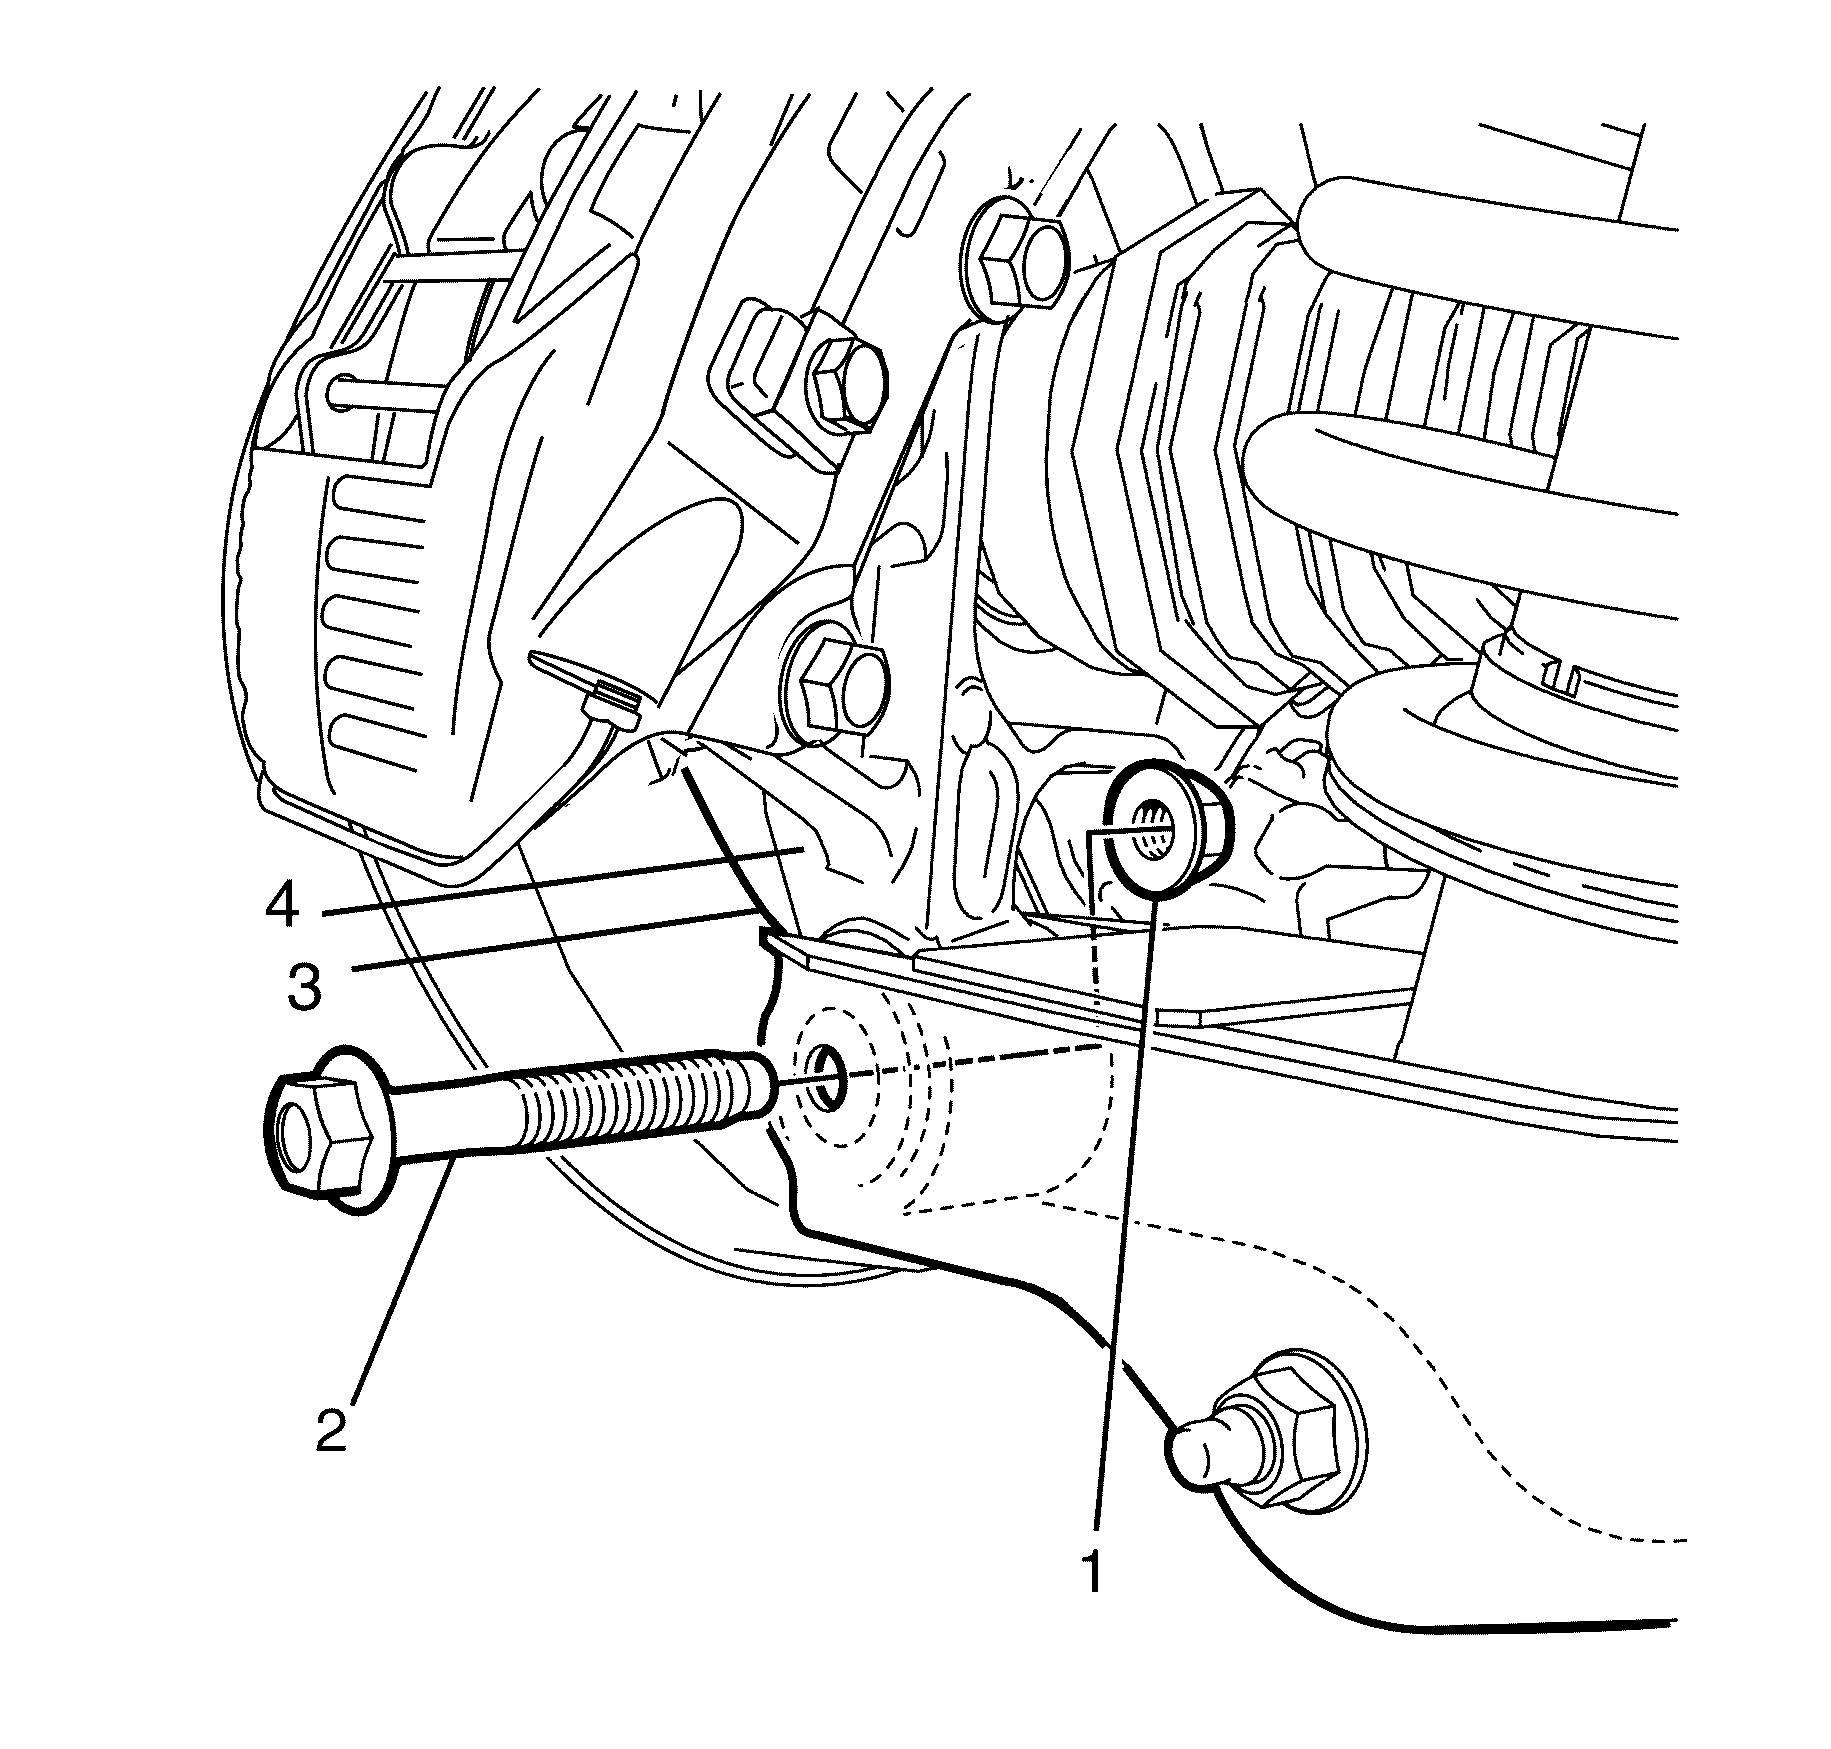
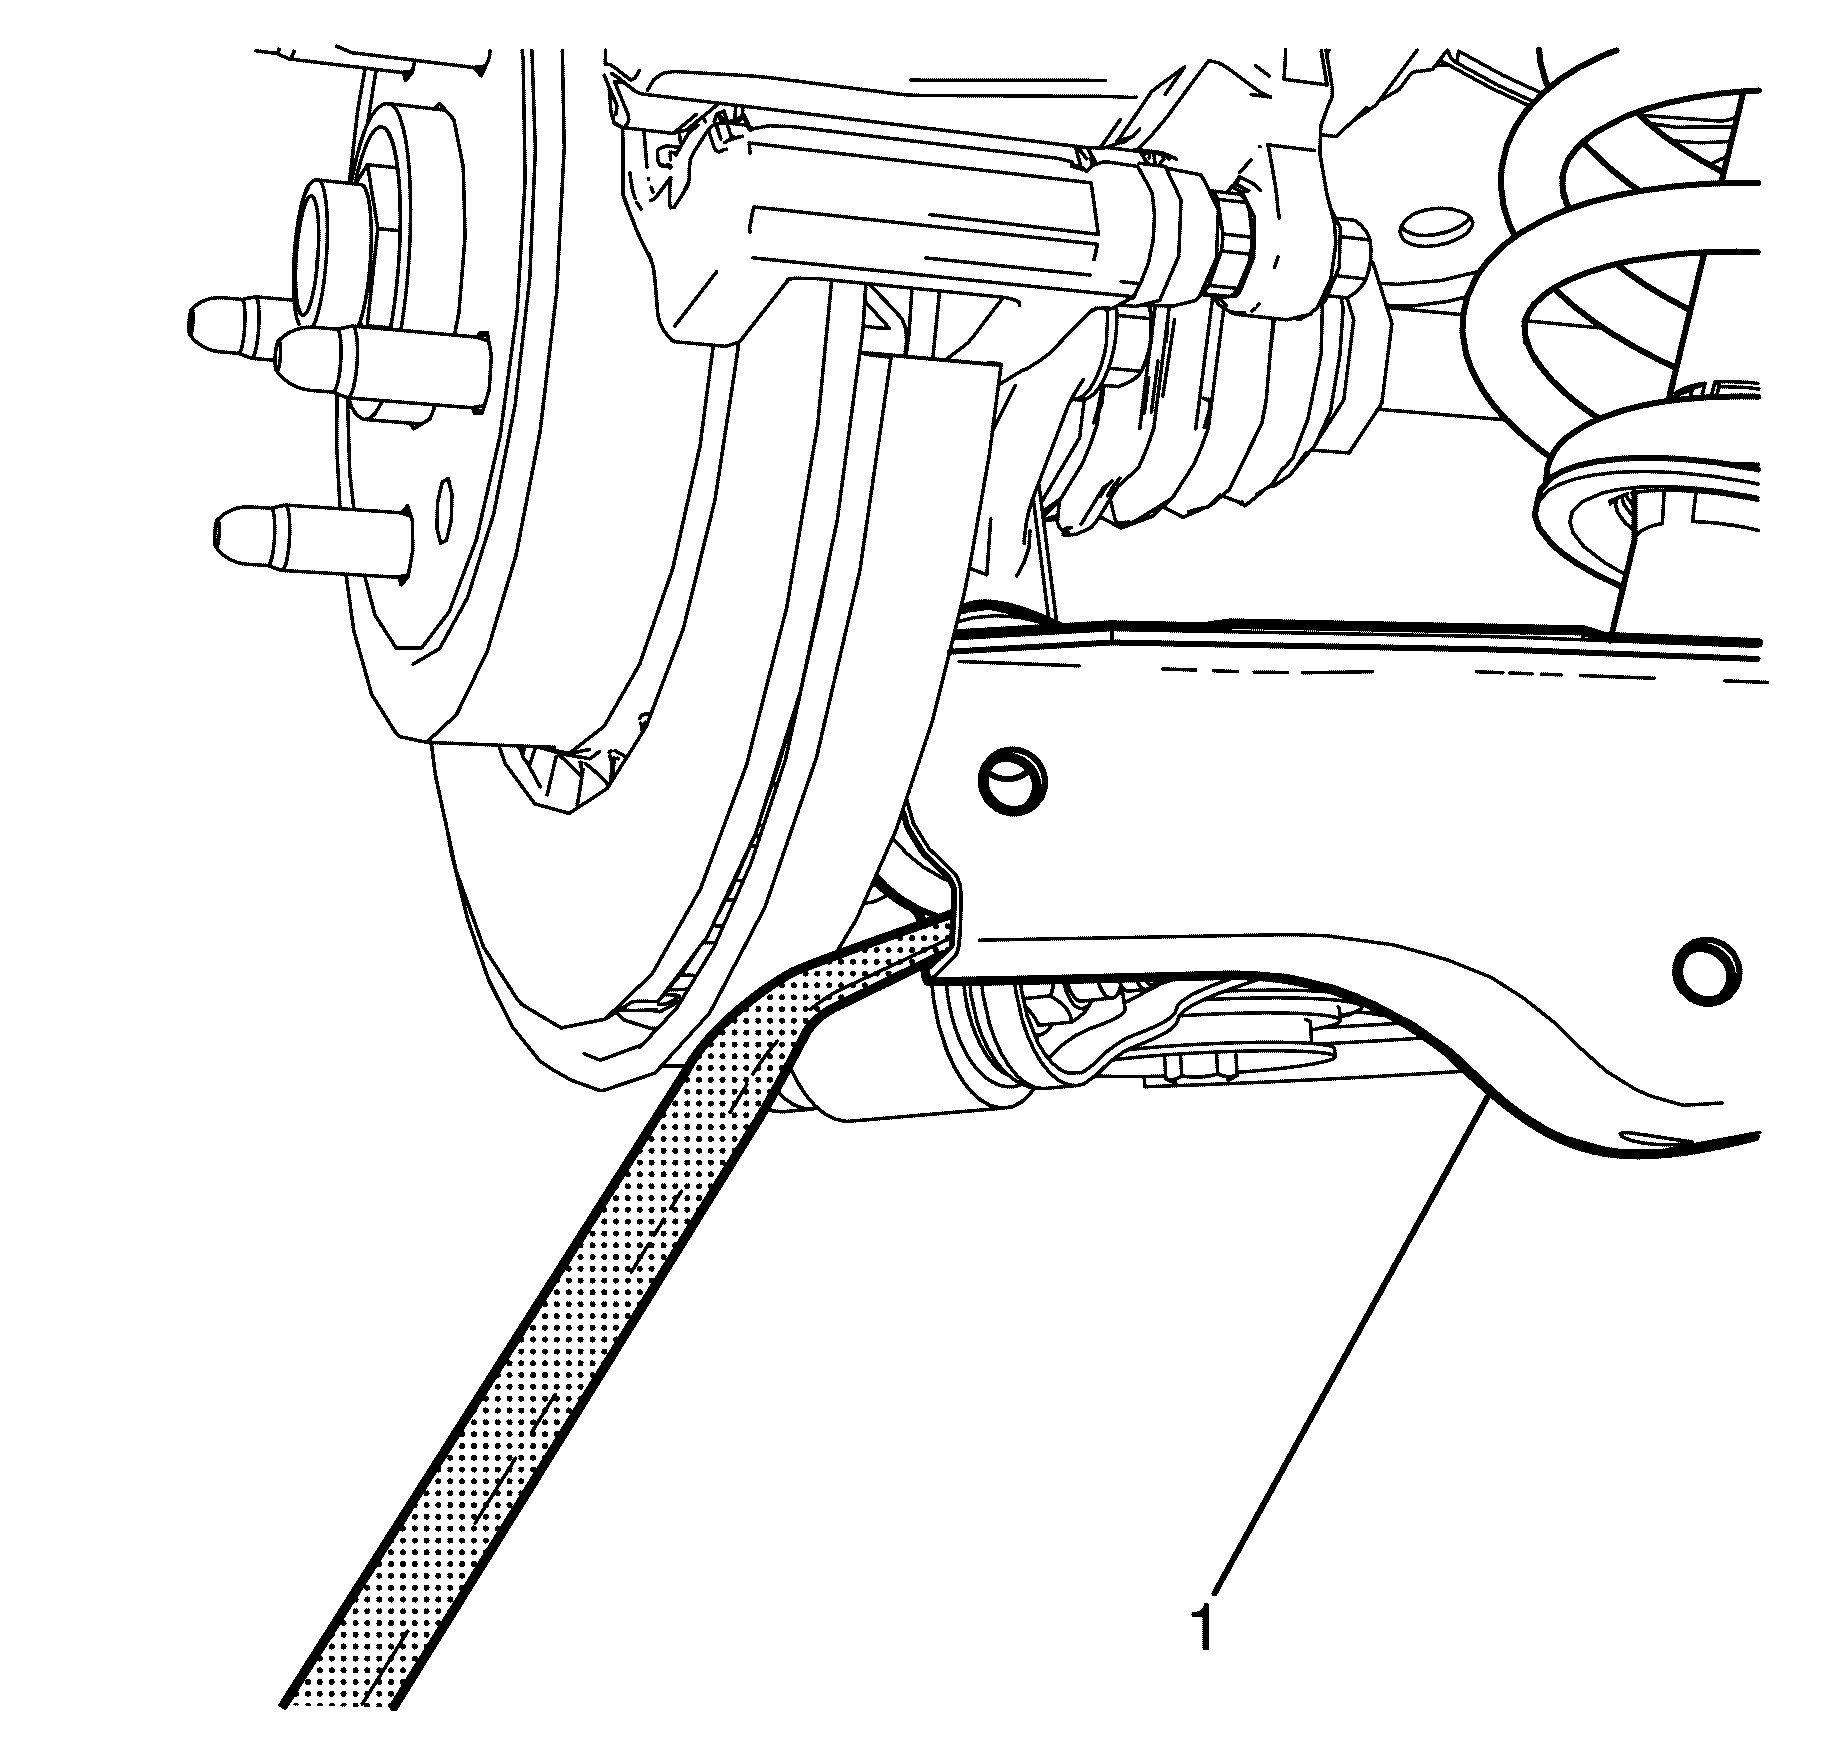
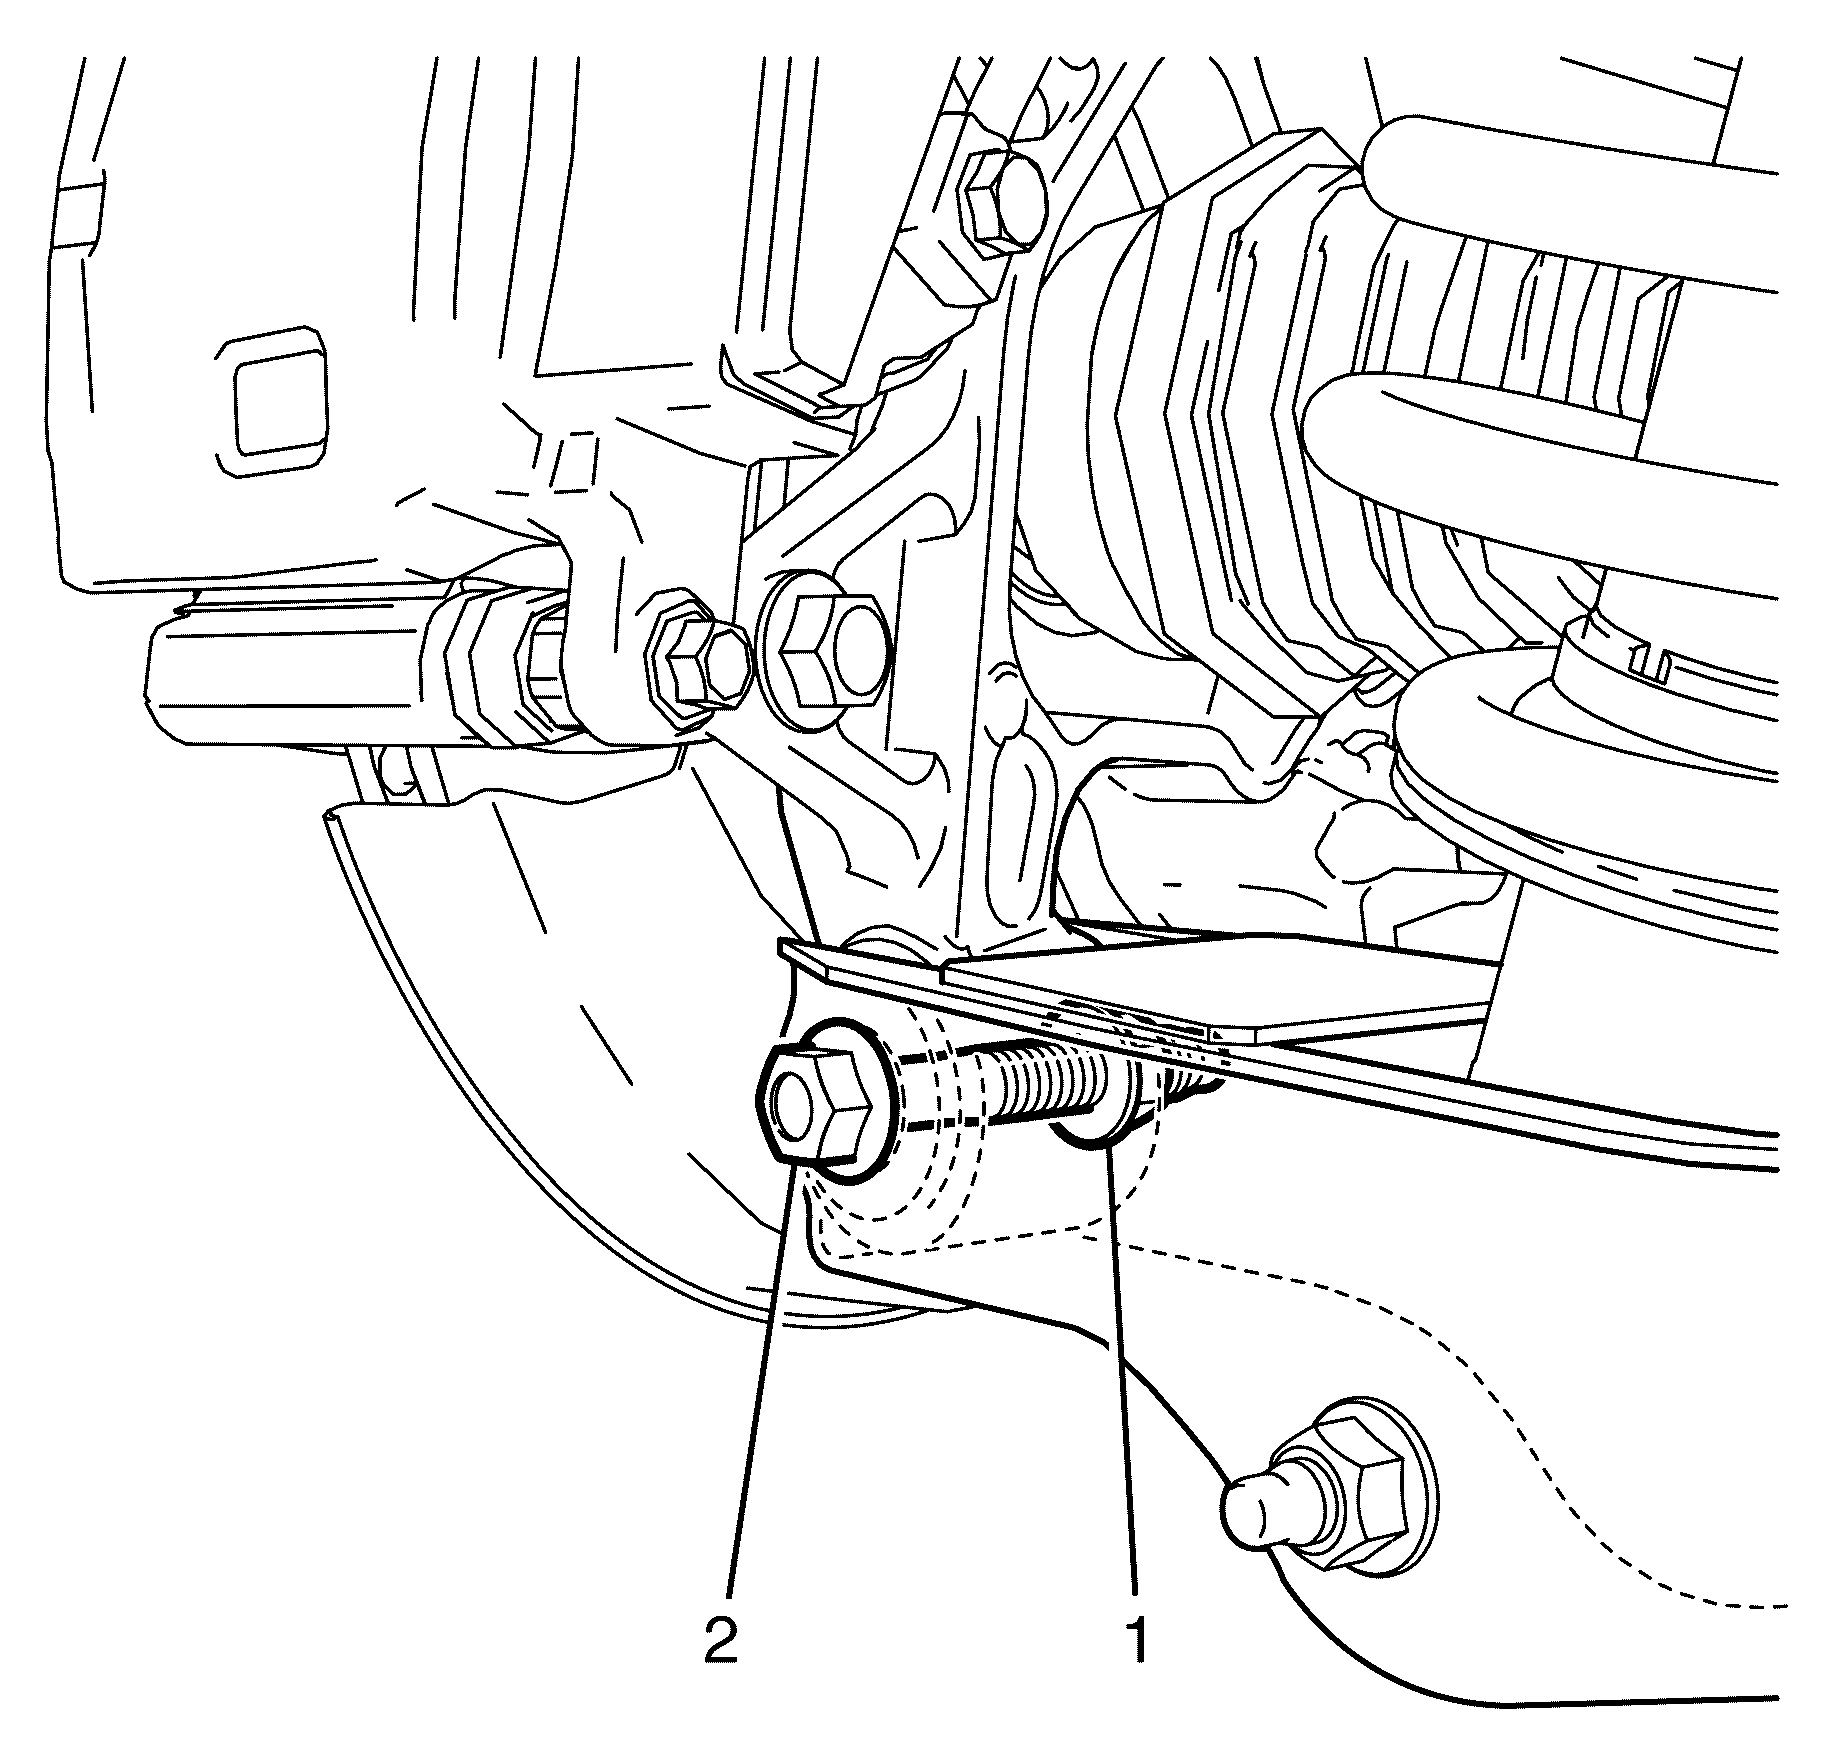
- Disconnect the ESC link (1) from the rear lower control arm ball stud (2).
- Support the lower control arm with a suitable jack.
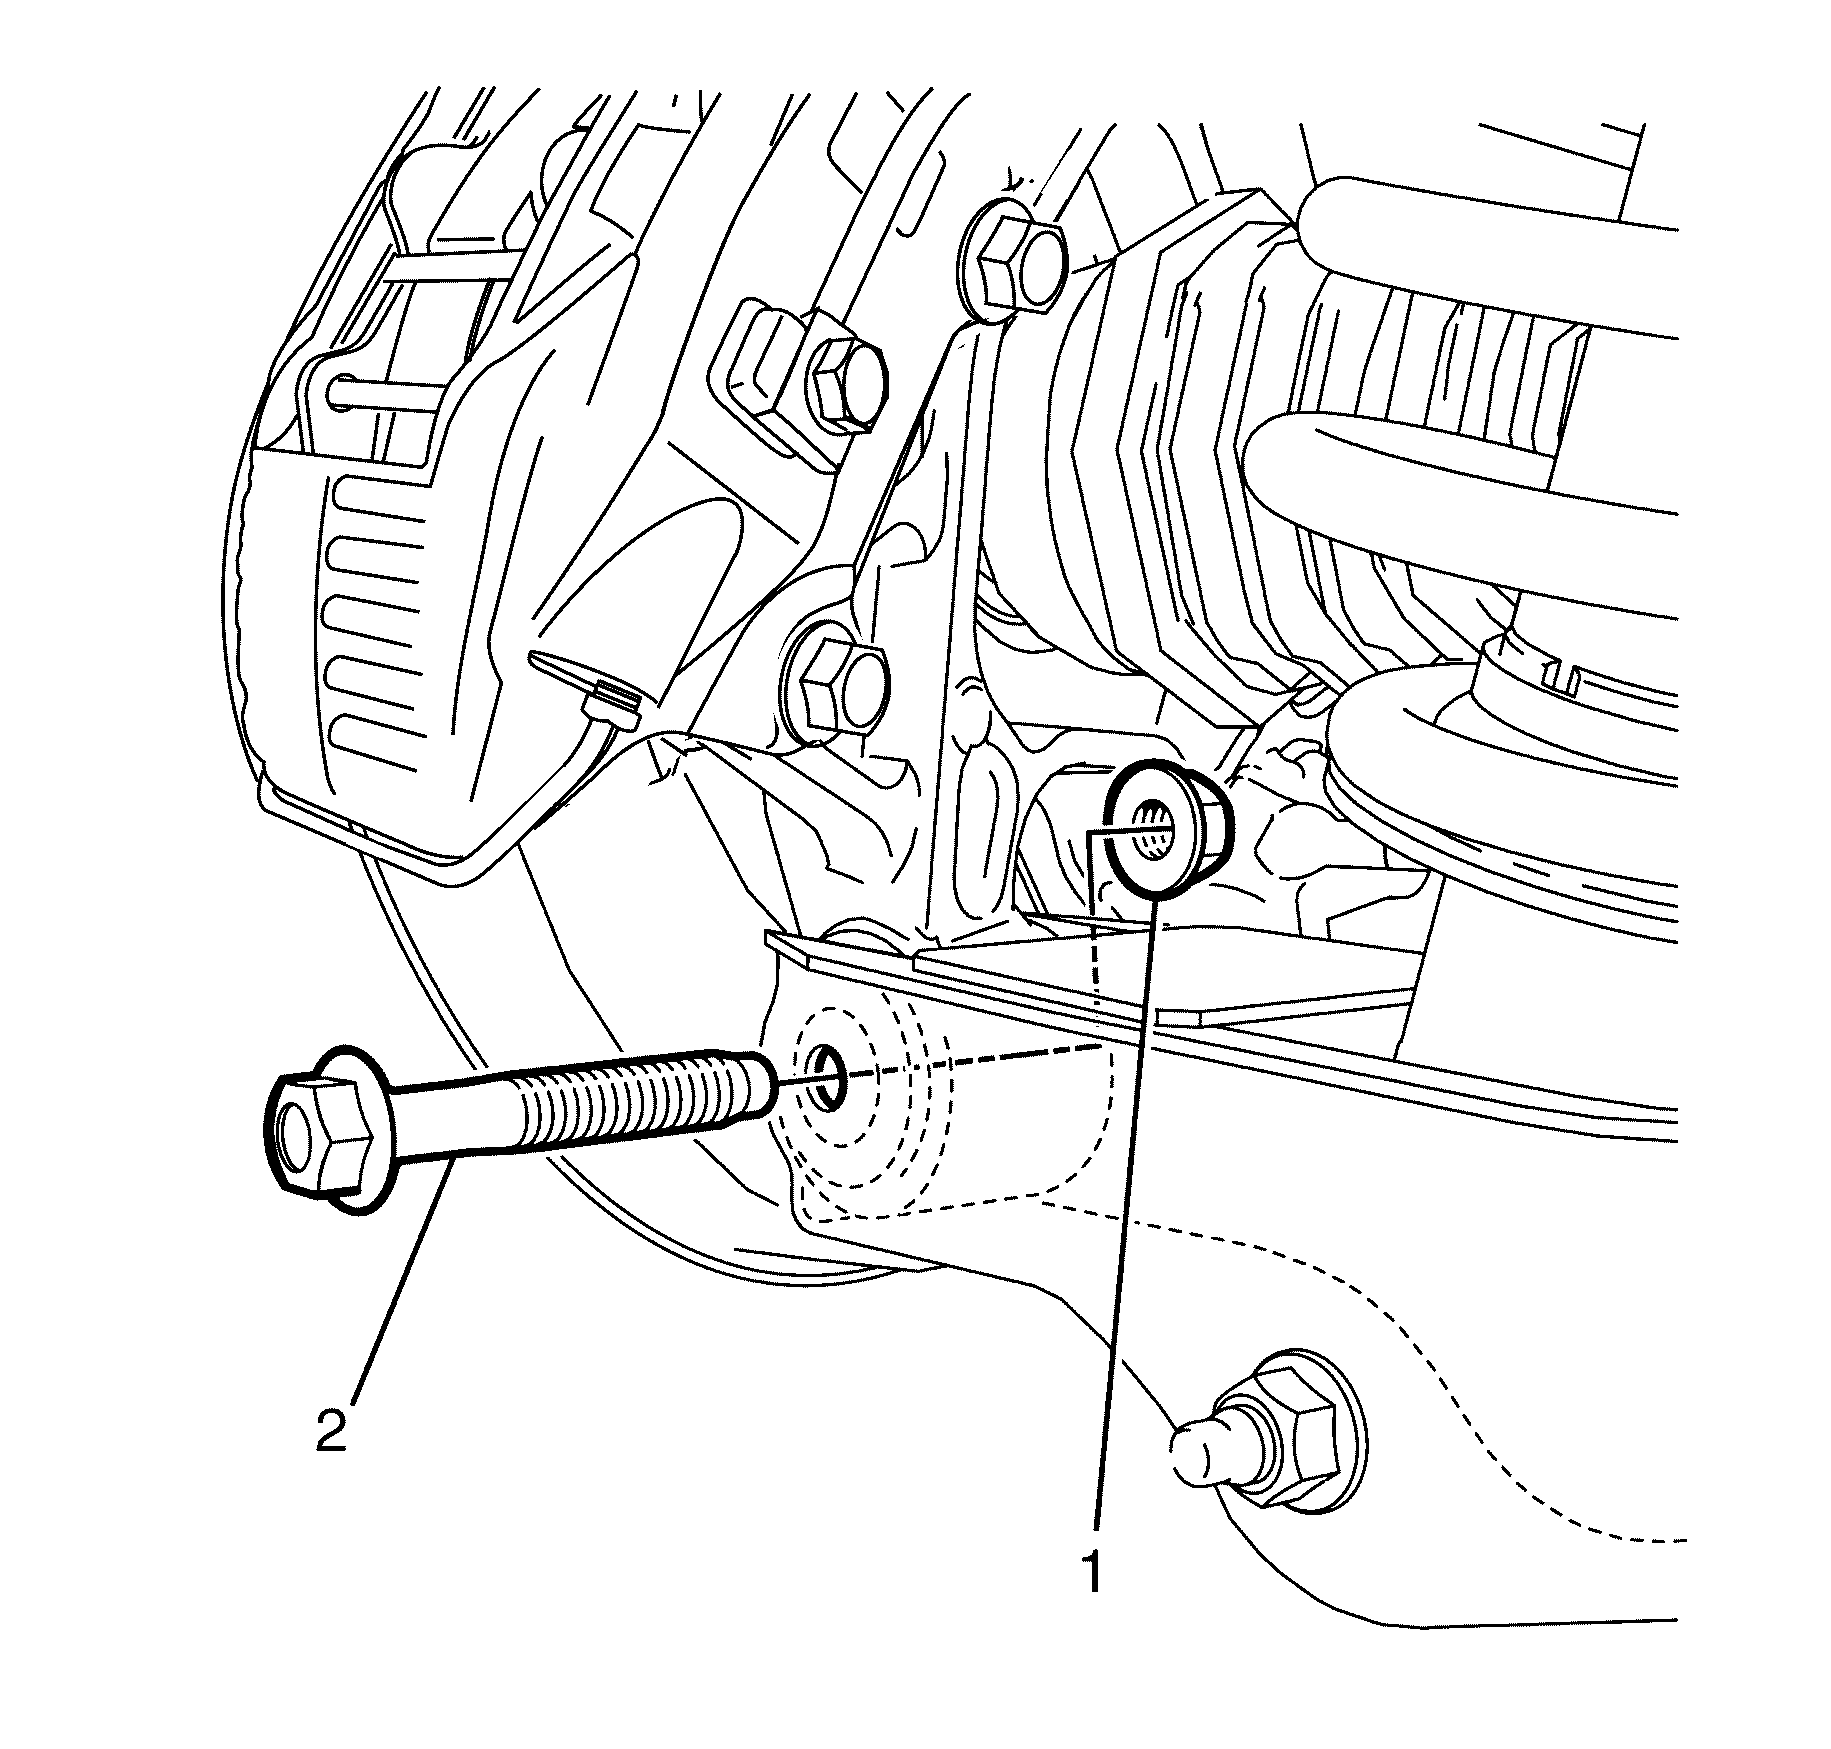
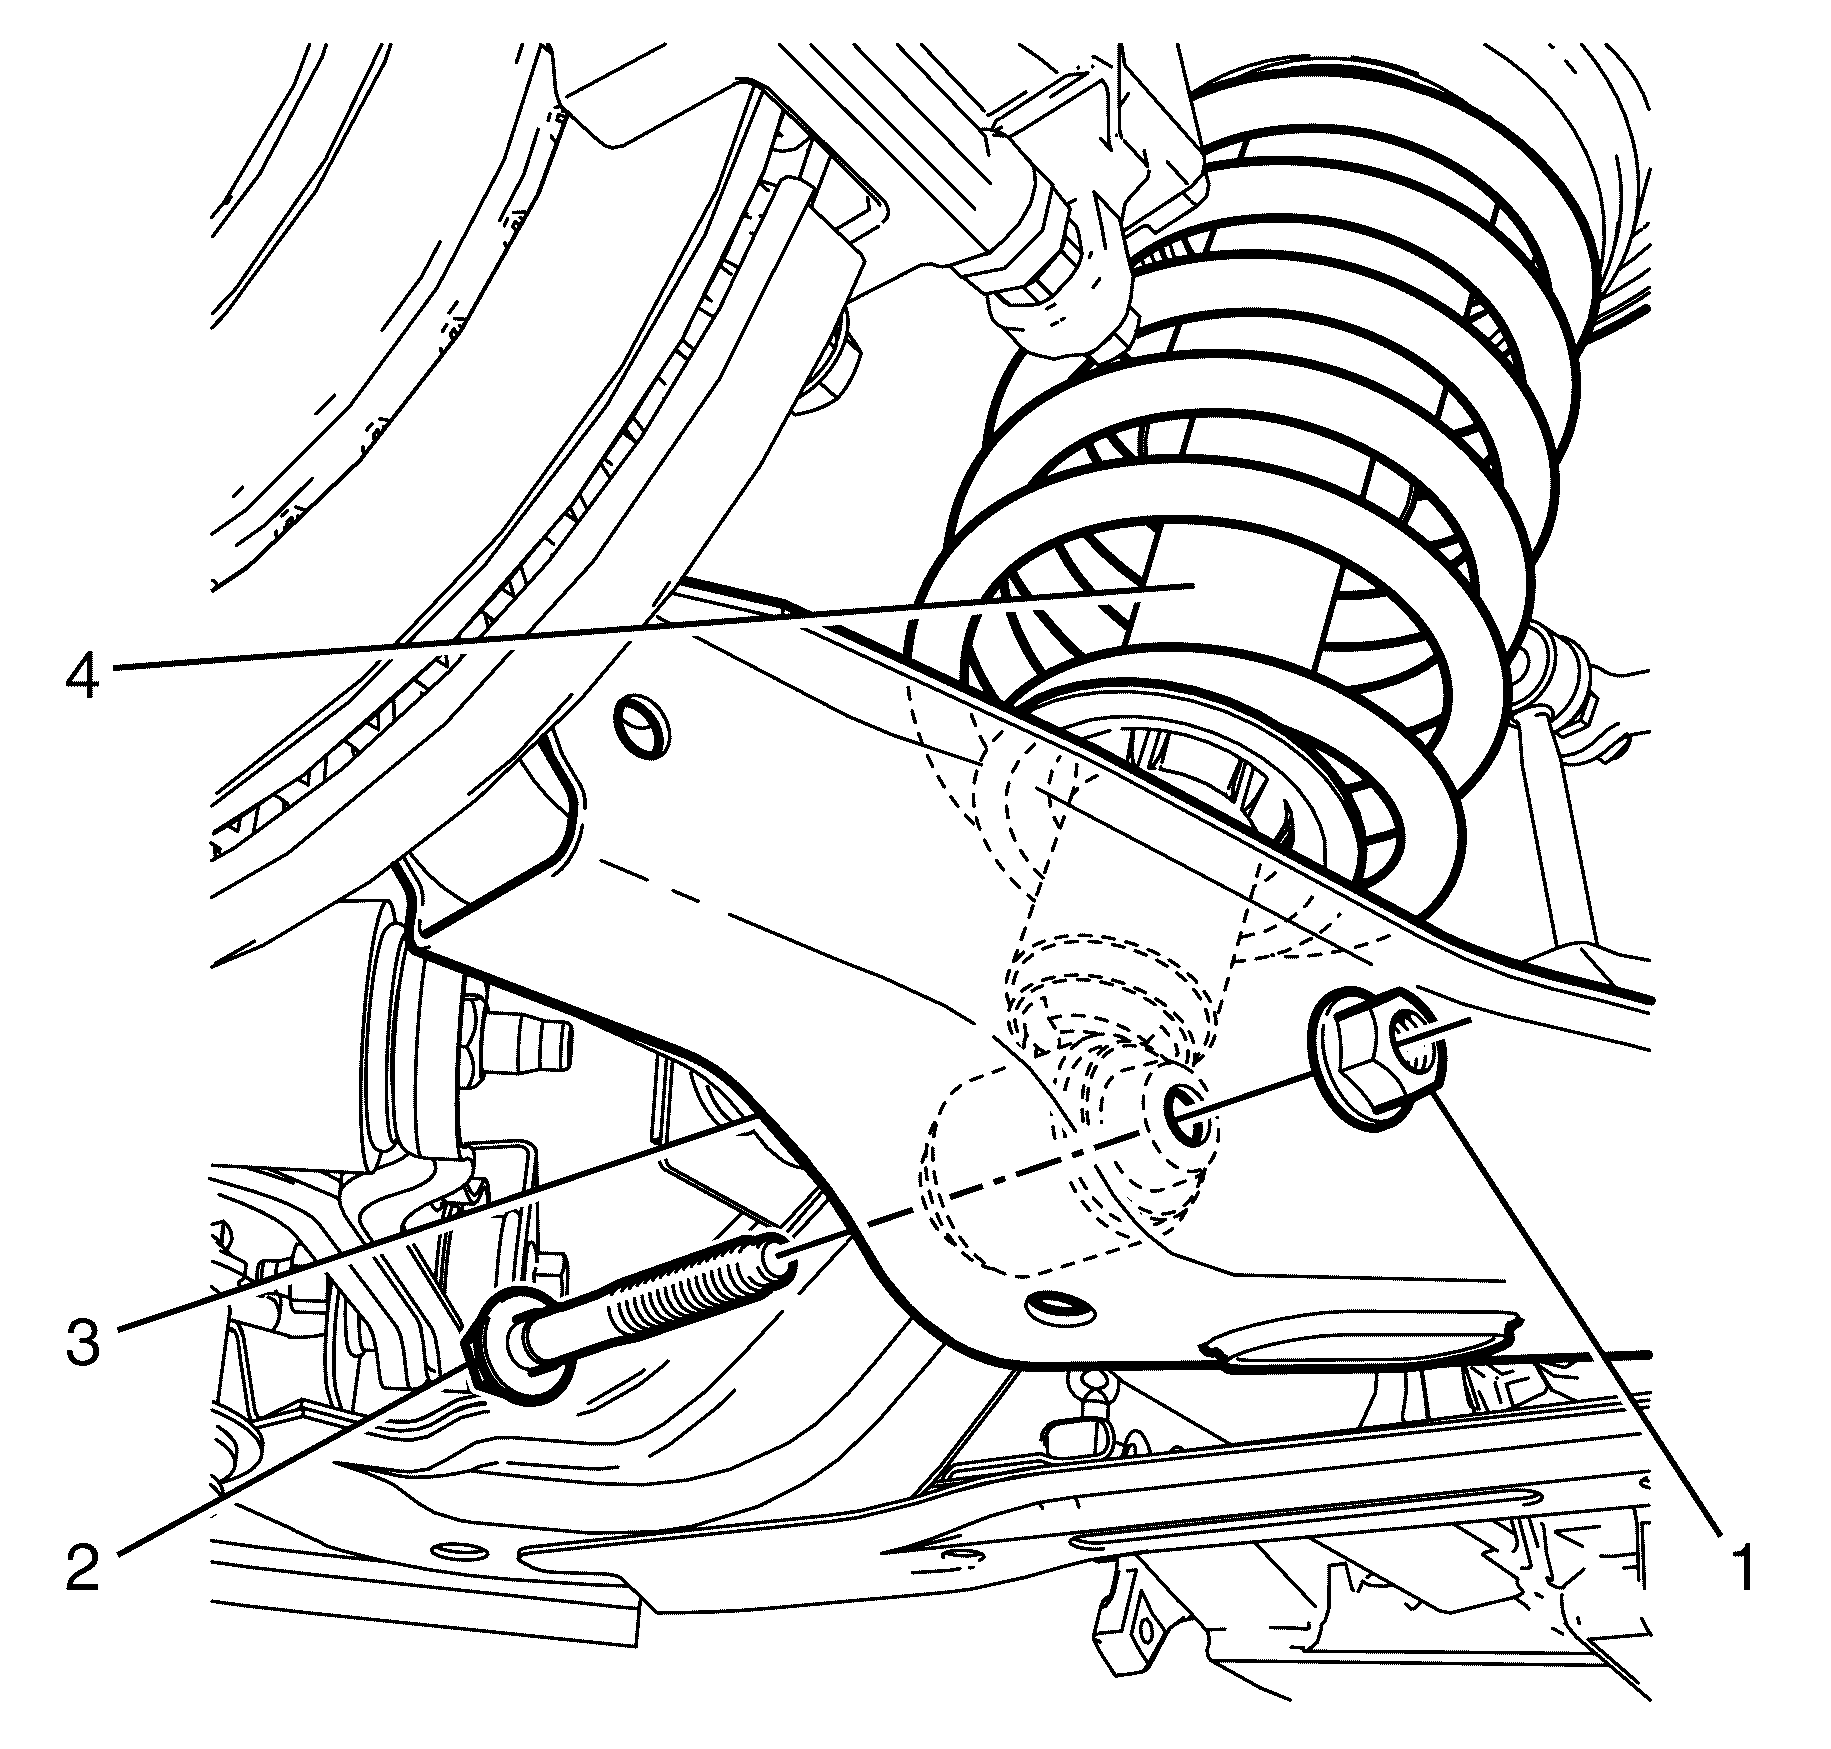
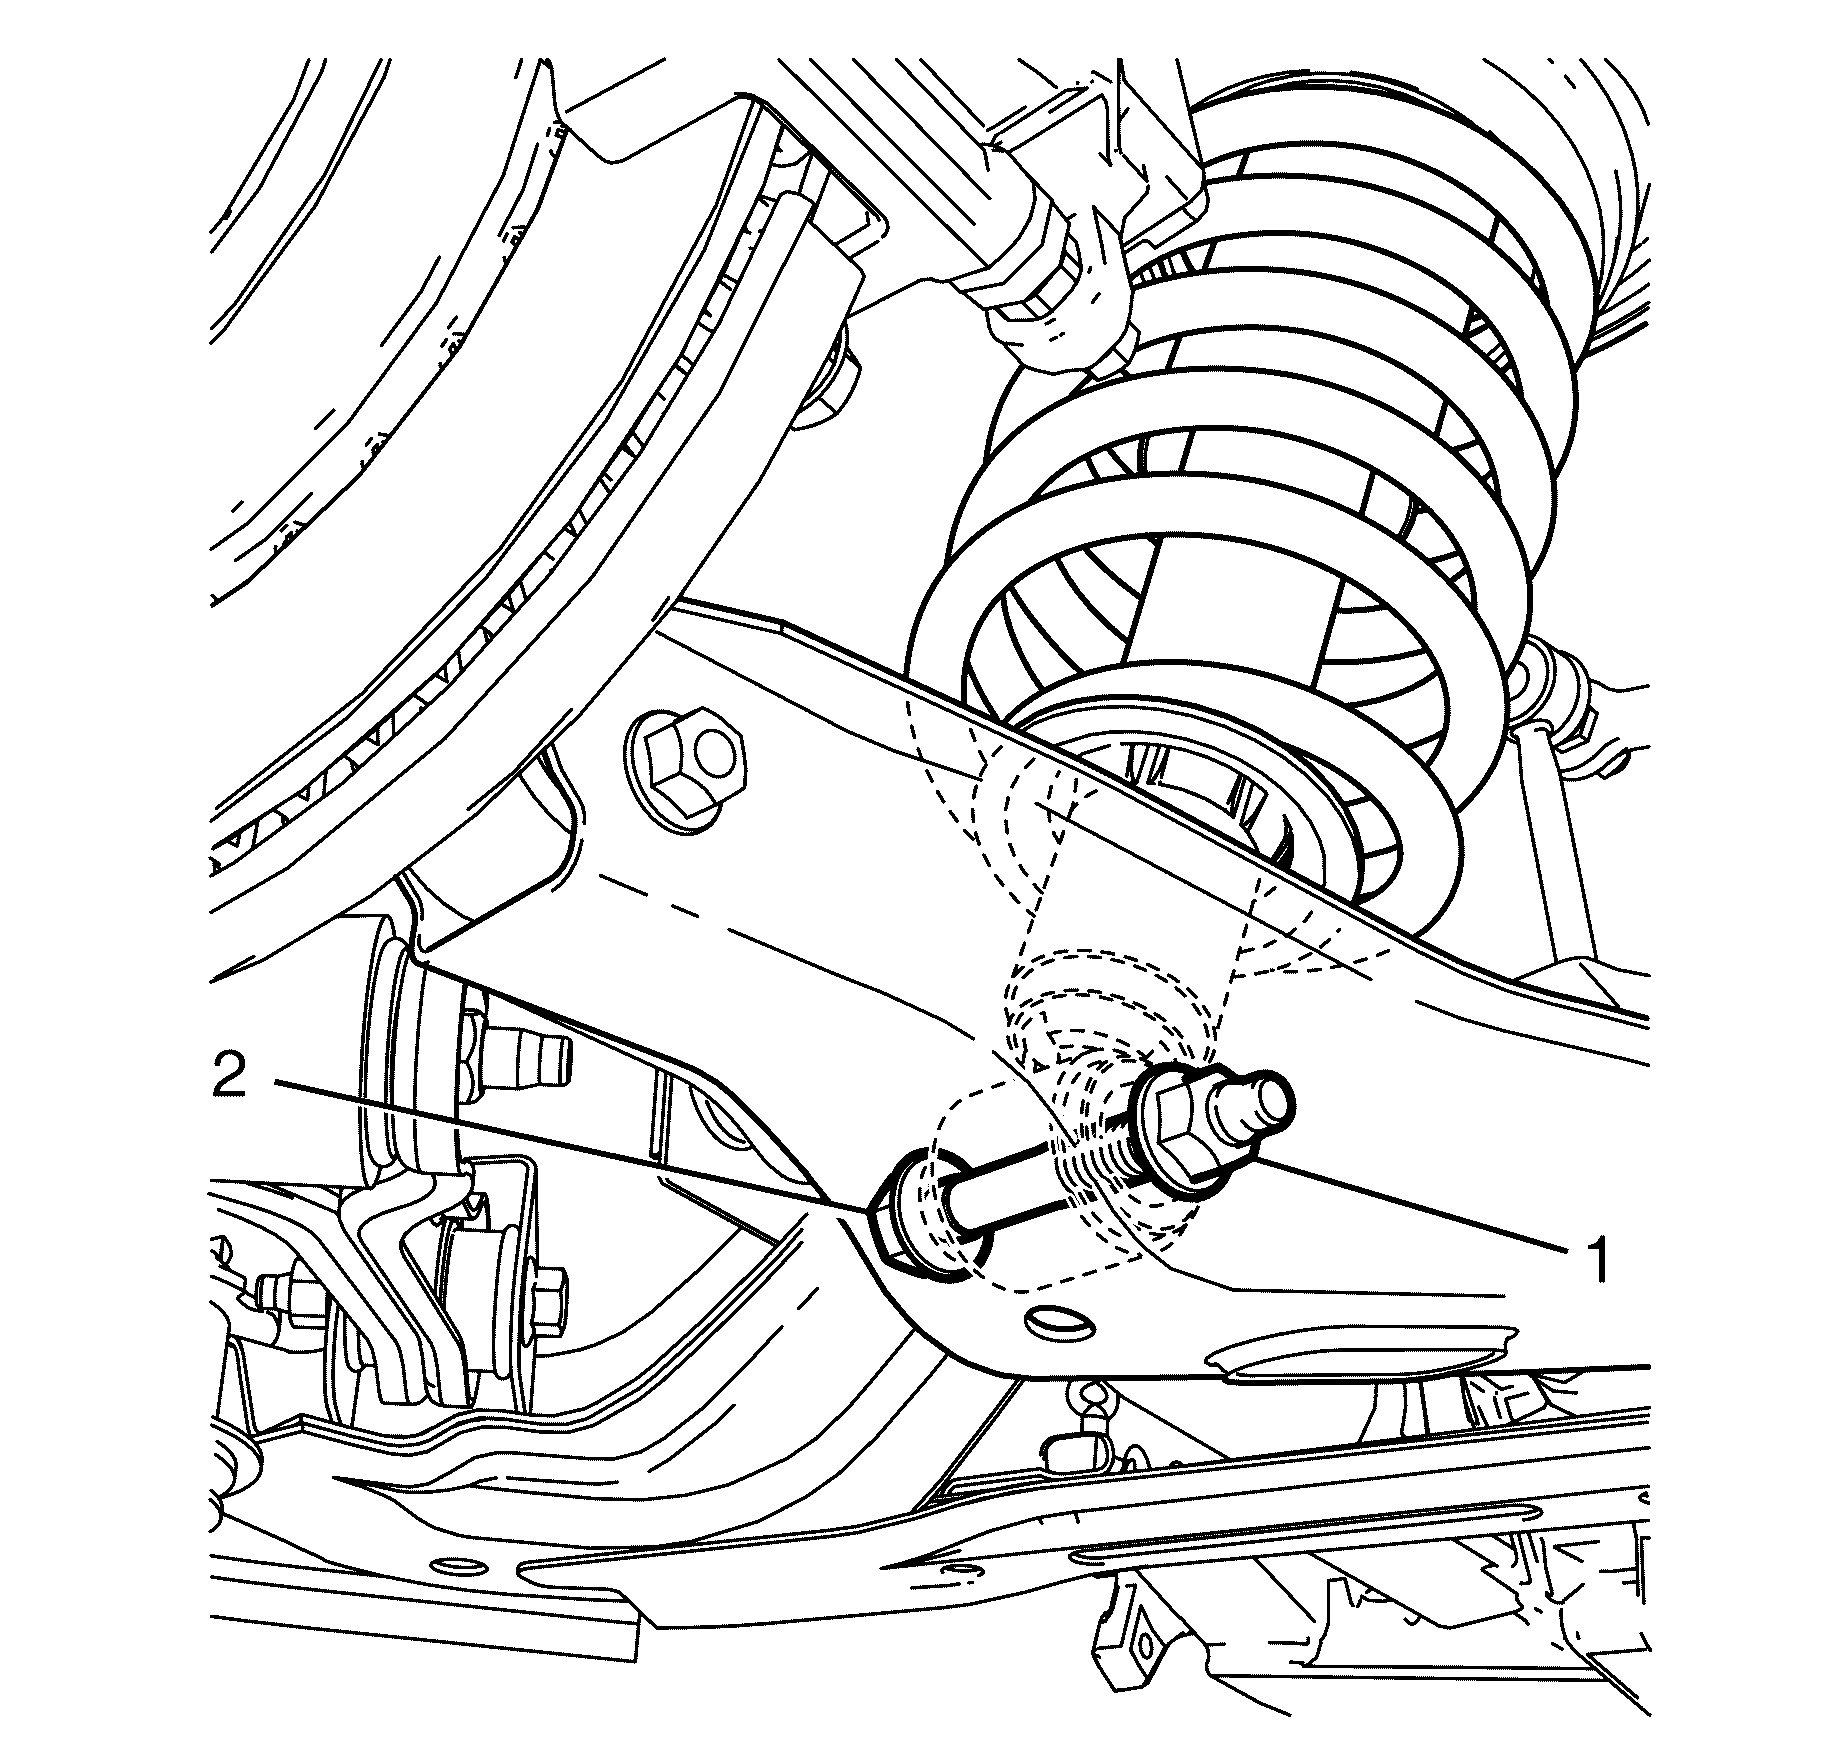
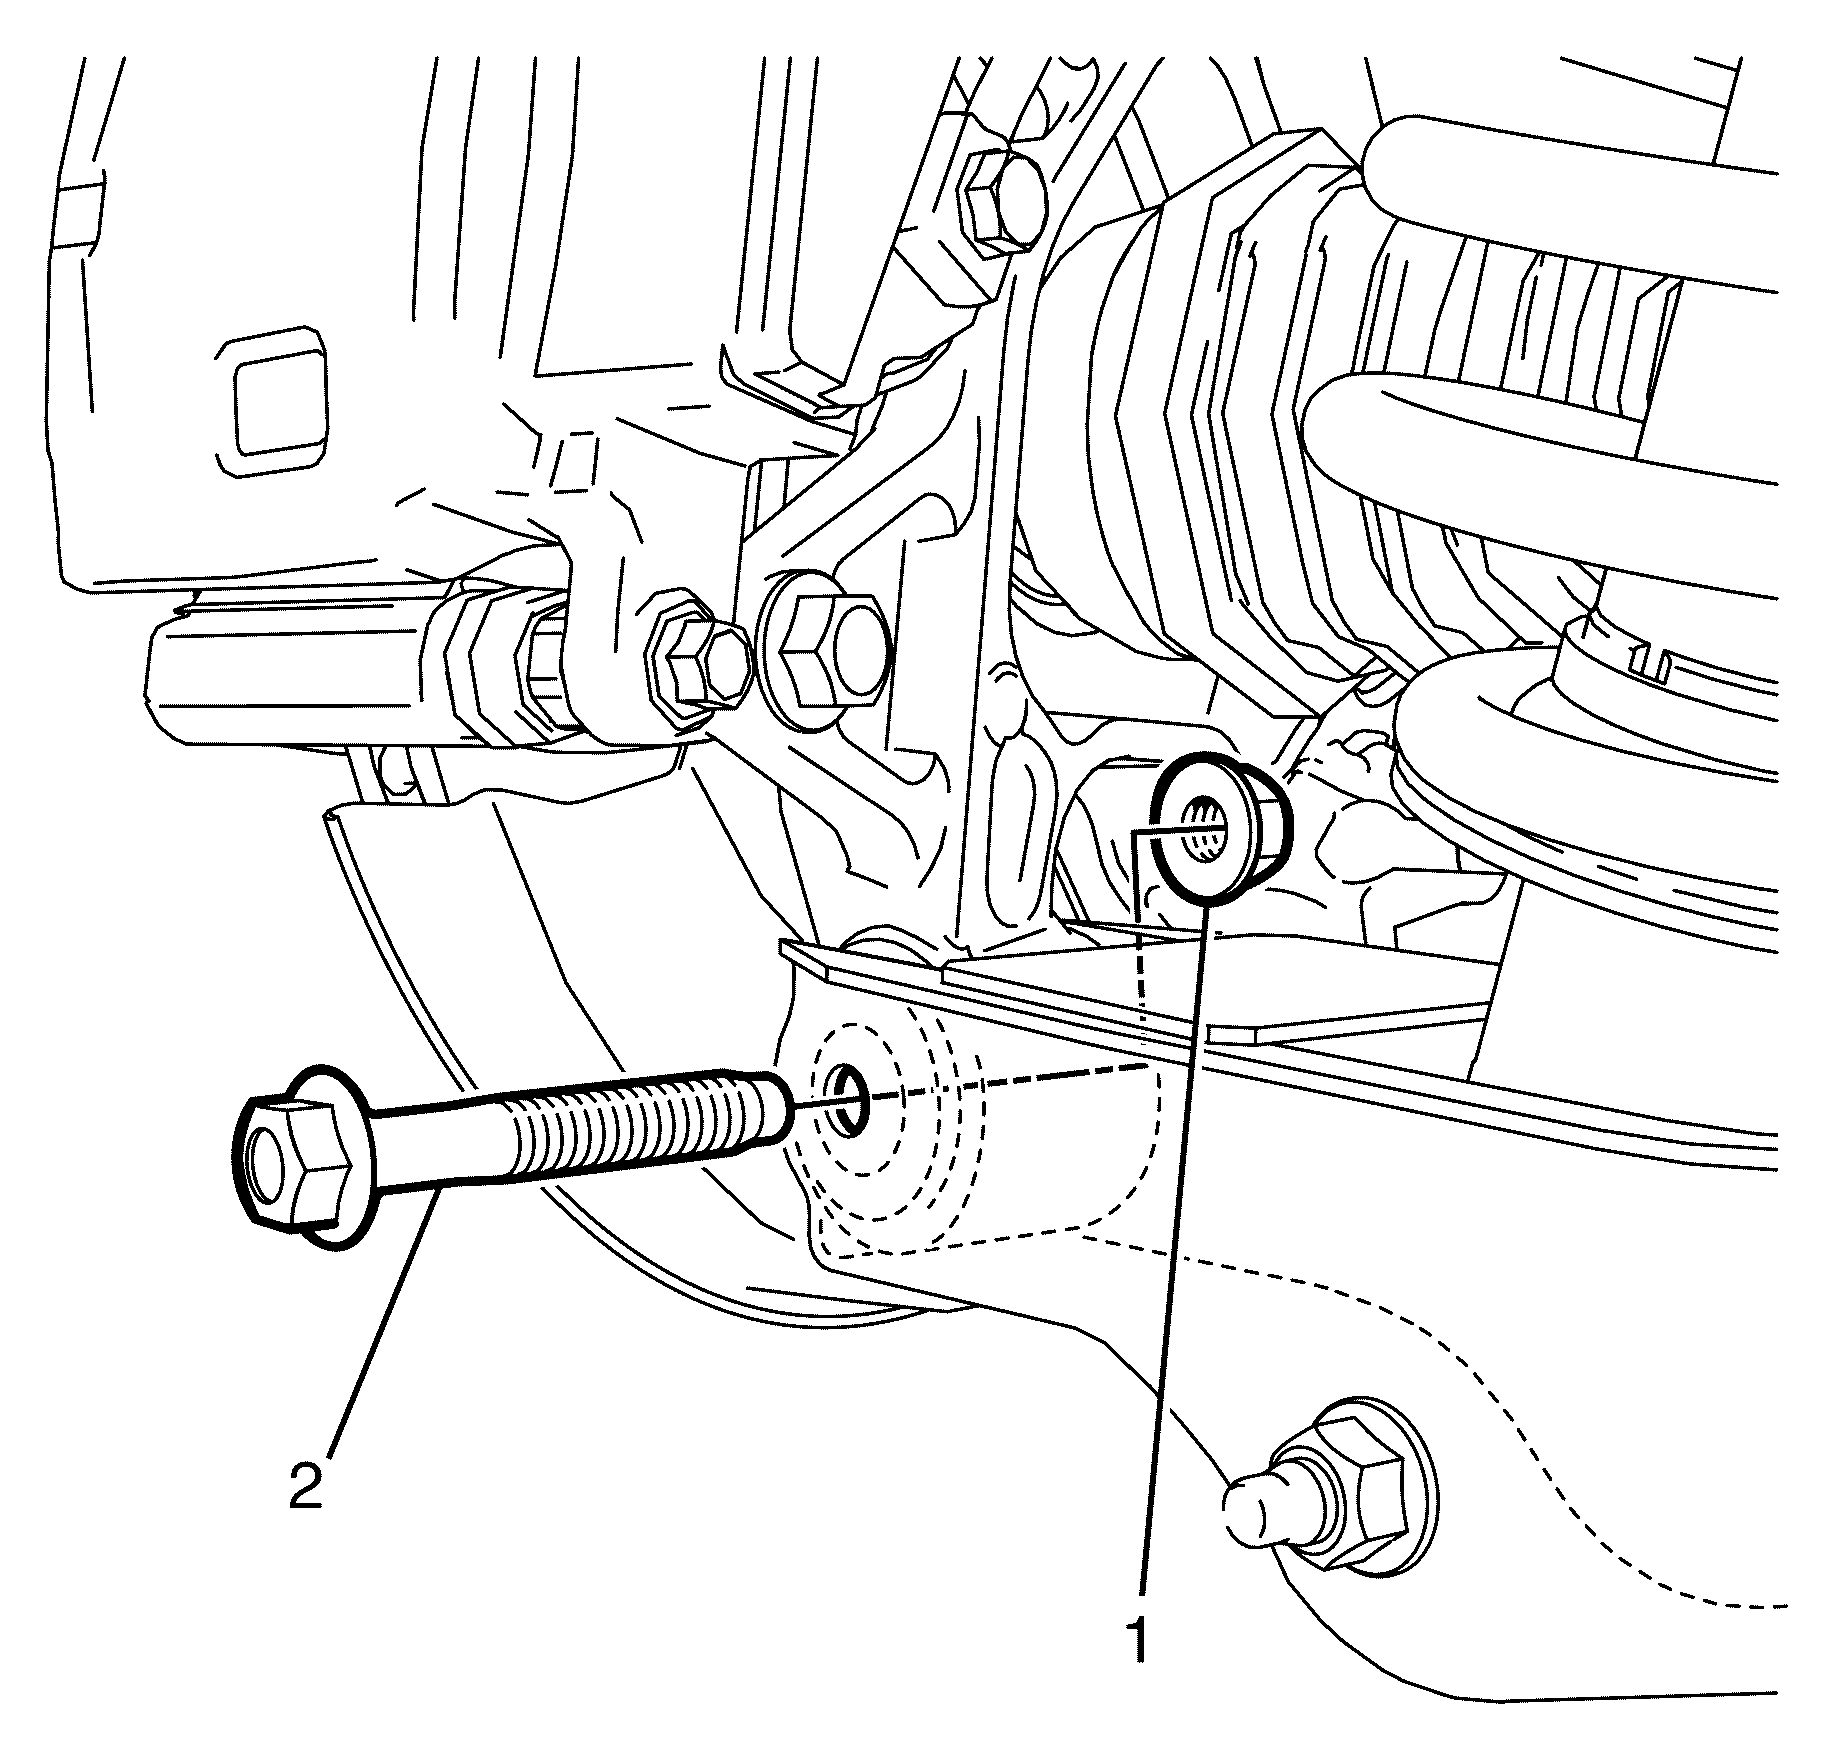
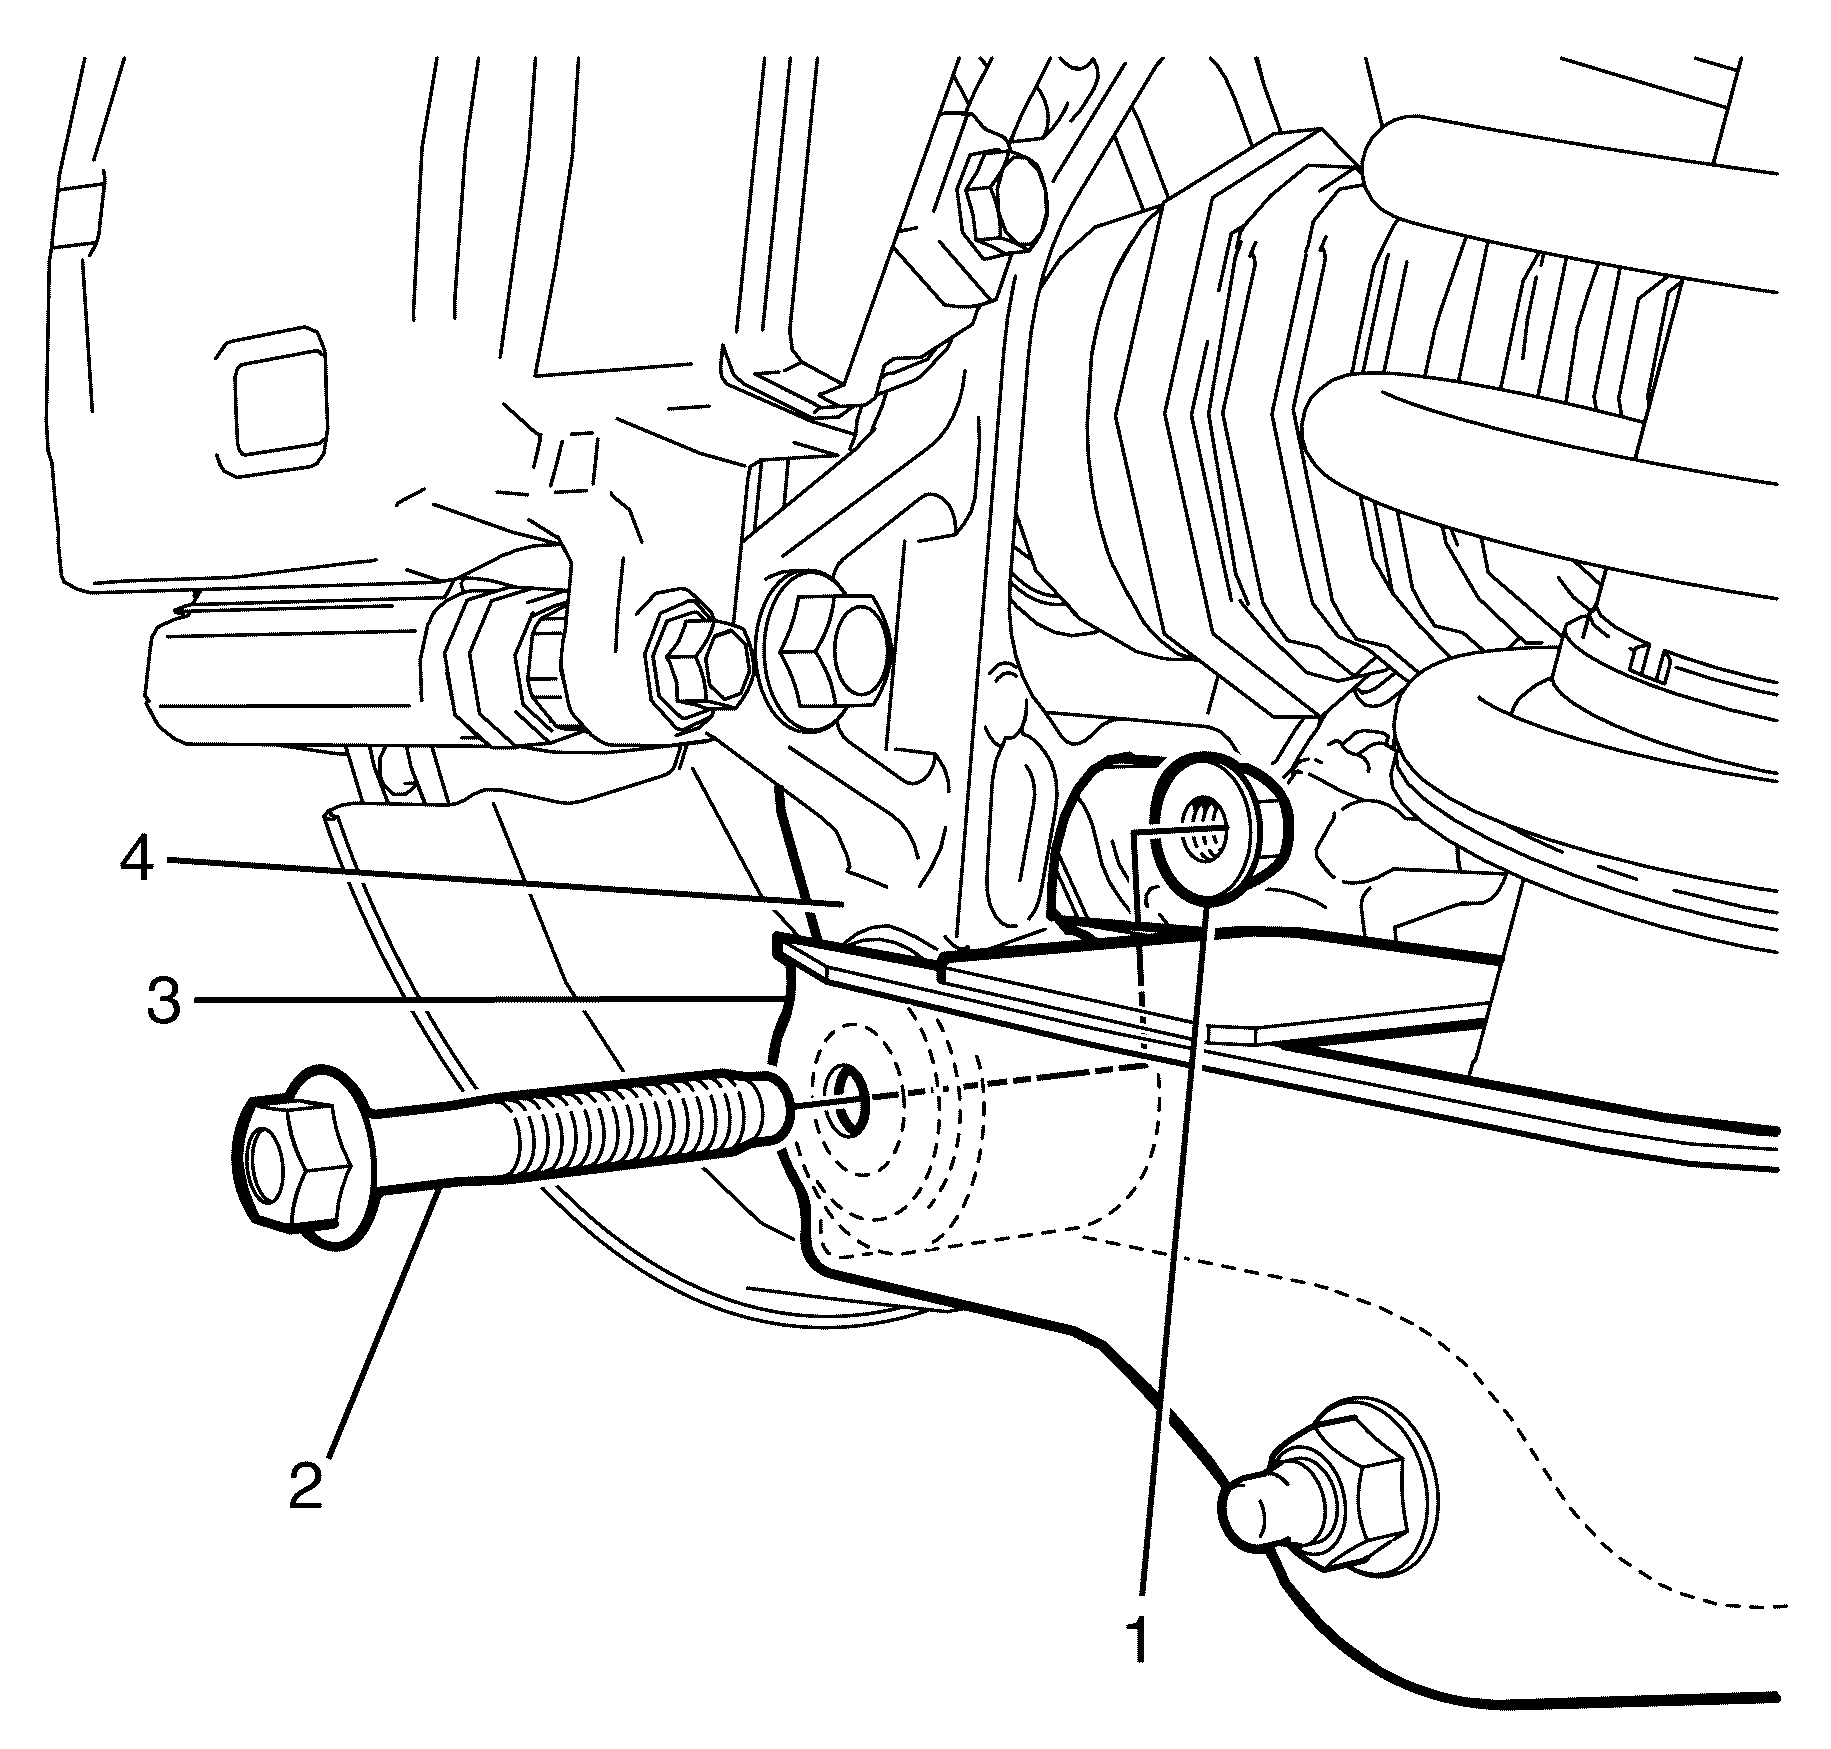
- Remove the lower control arm to knuckle retaining bolt (2) and nut (1).
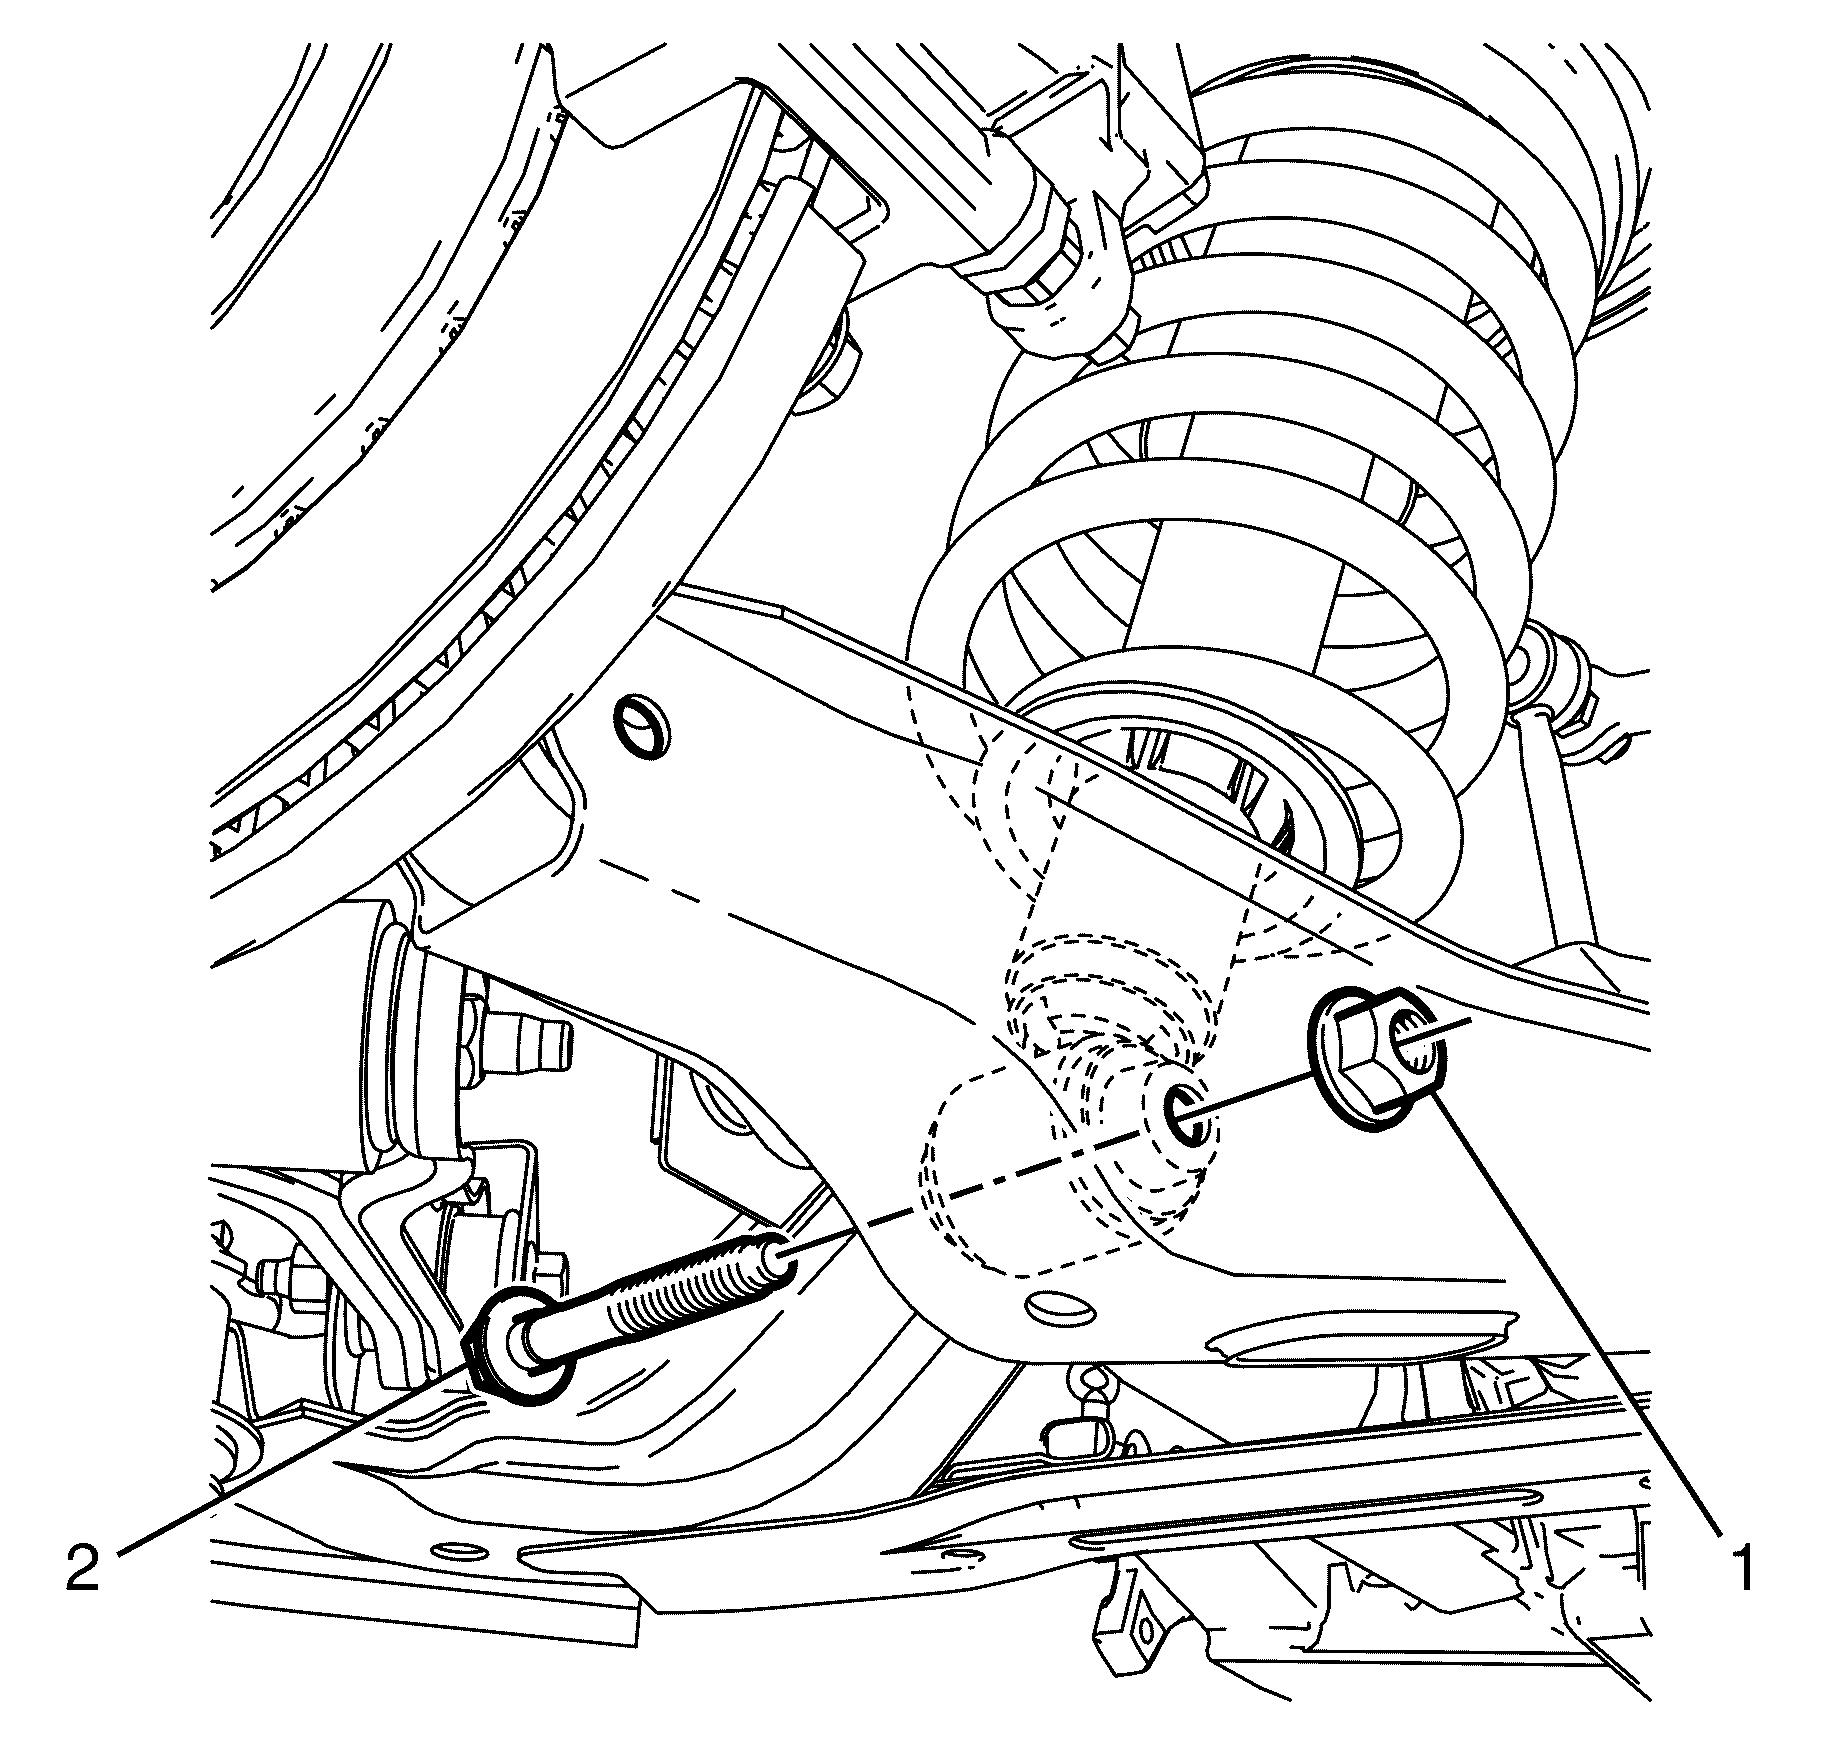
- Remove the lower control arm to rear ESC strut assembly retaining bolt (2) and nut (1).
- Detach the lower control arm (1) using a suitable pry bar.
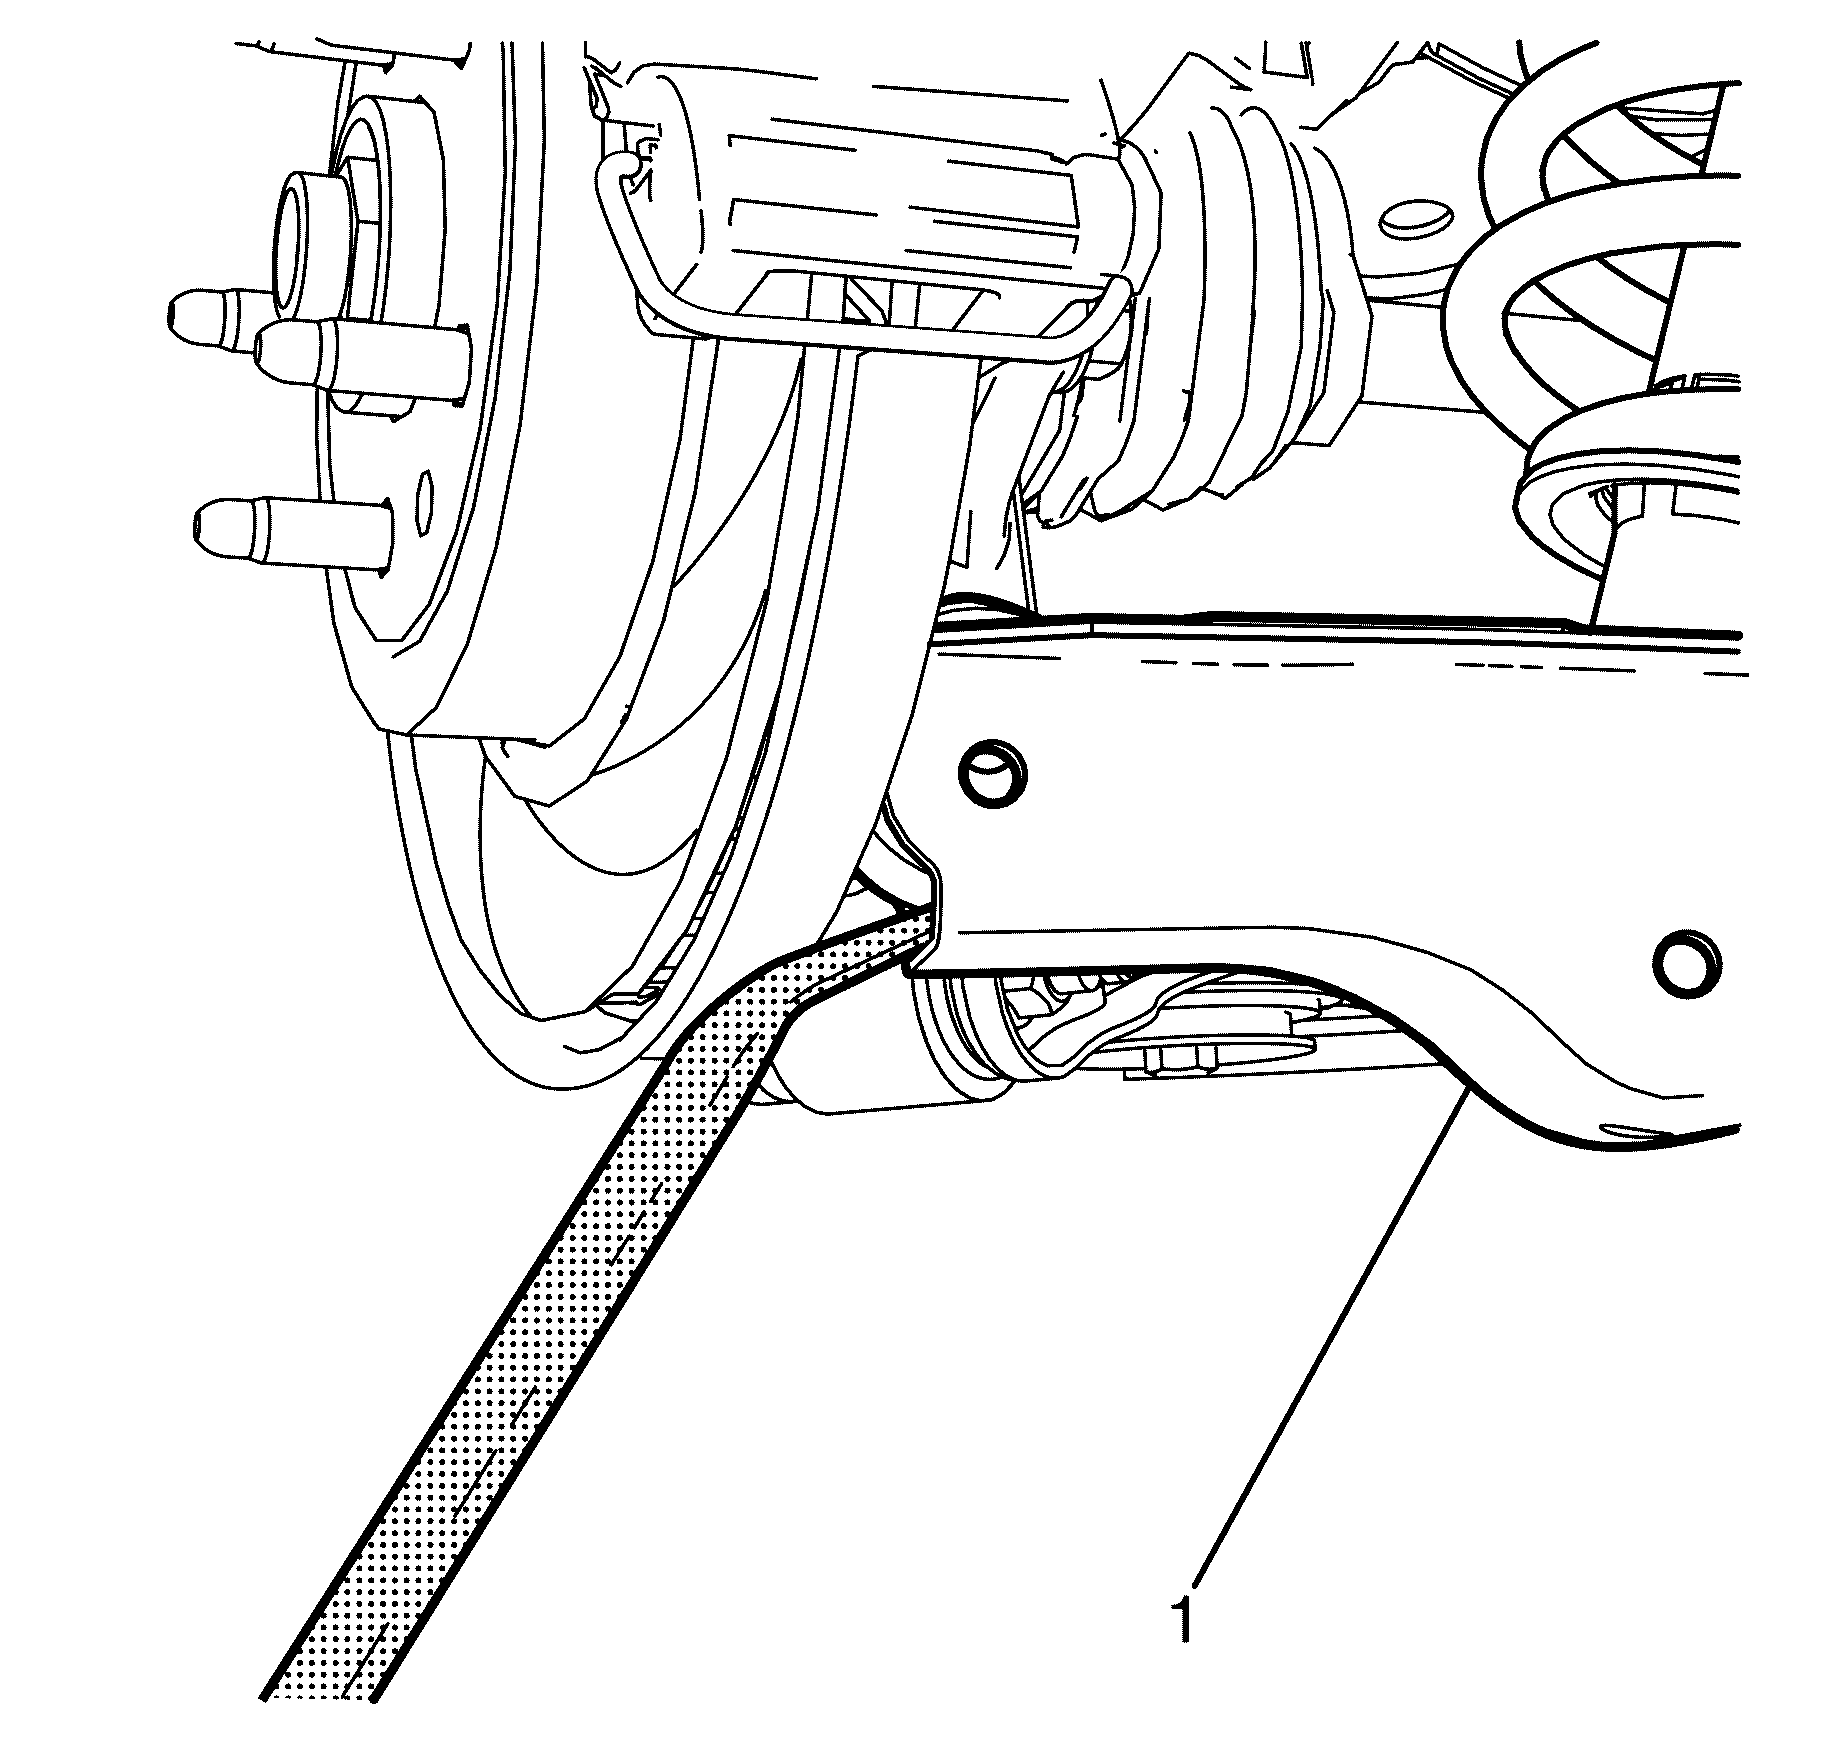
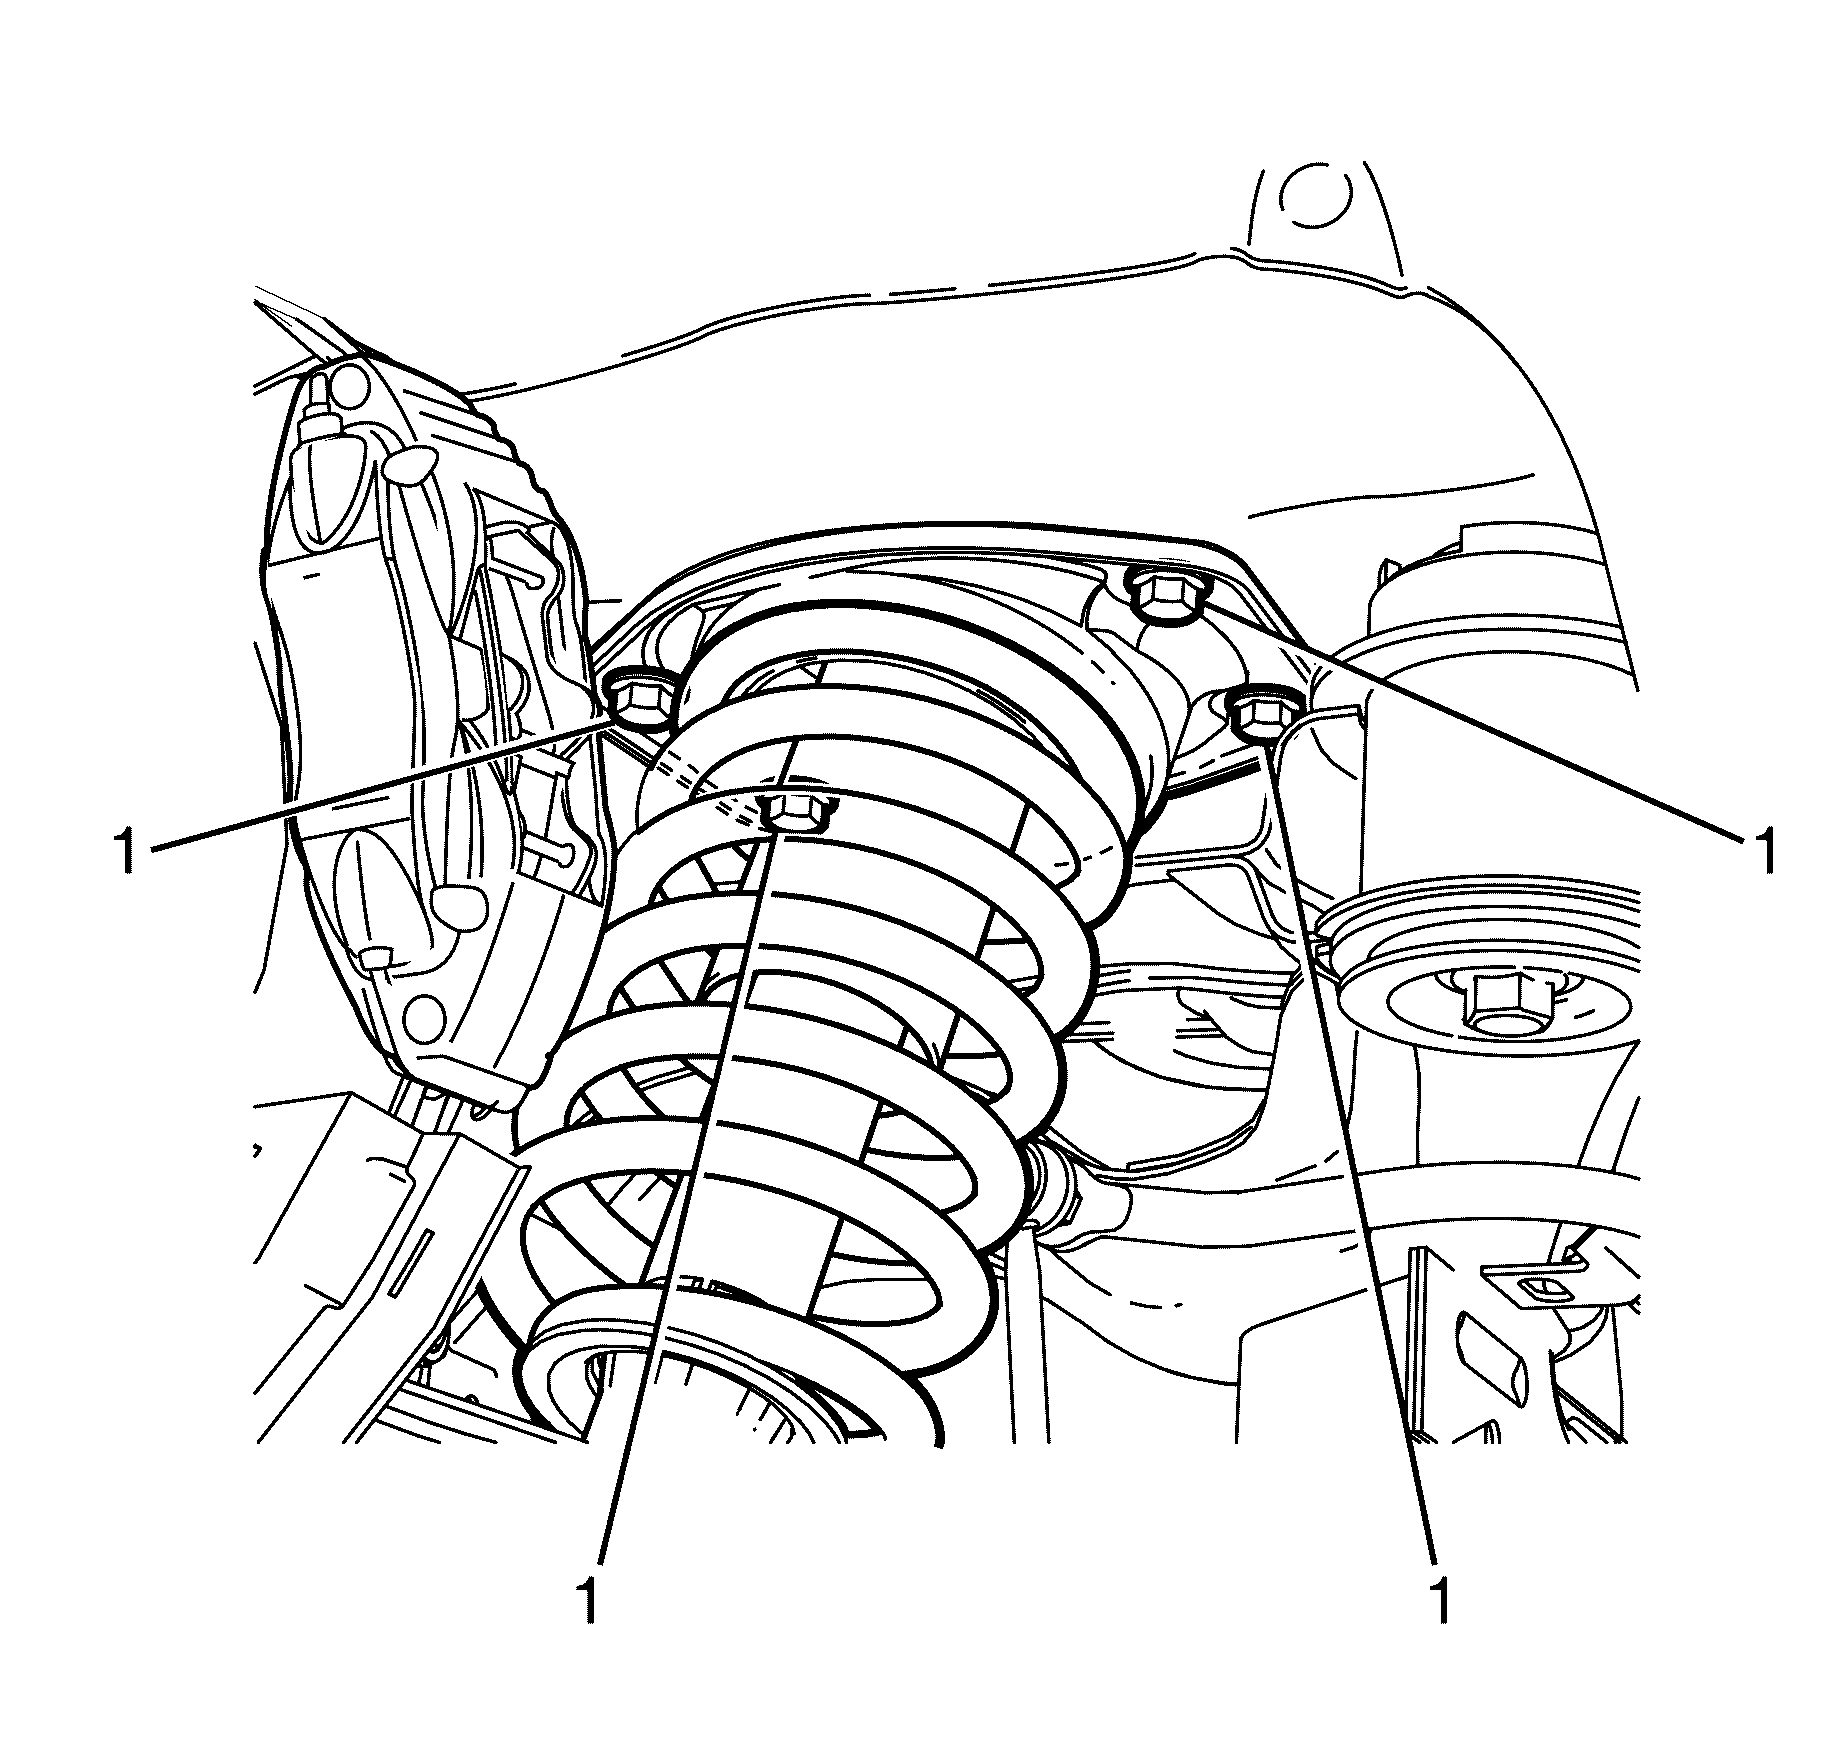
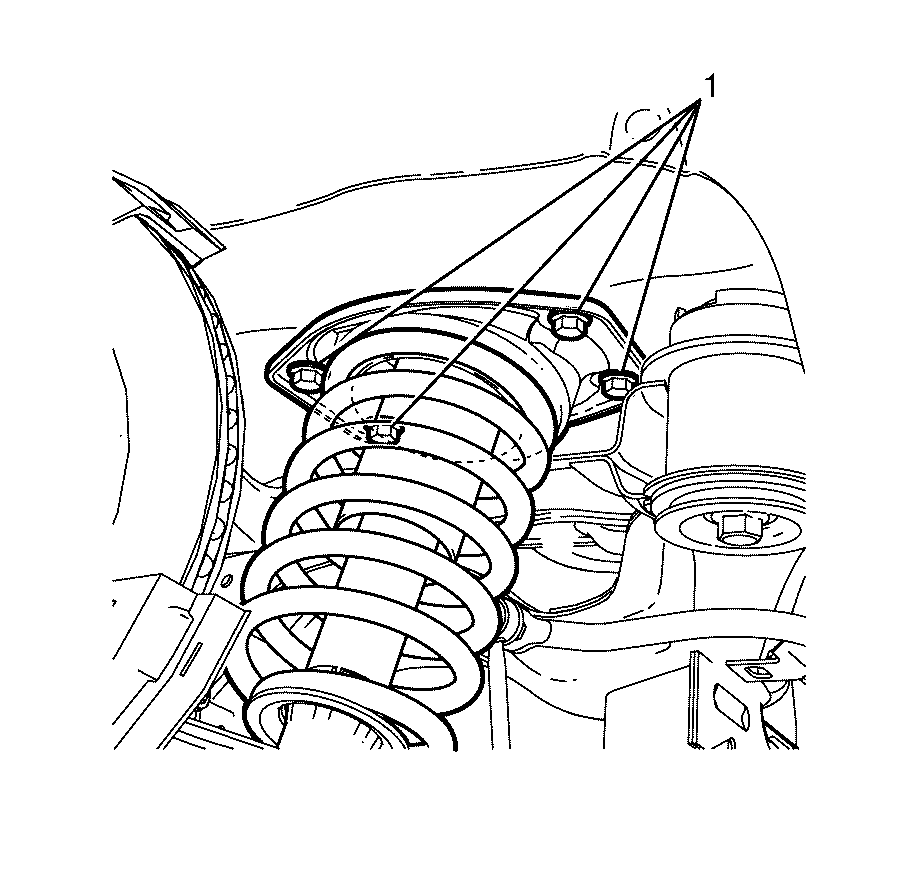
- Remove the rear ESC strut assembly to body retaining bolts (1).
- Partially lower the ESC strut assembly from the vehicle.
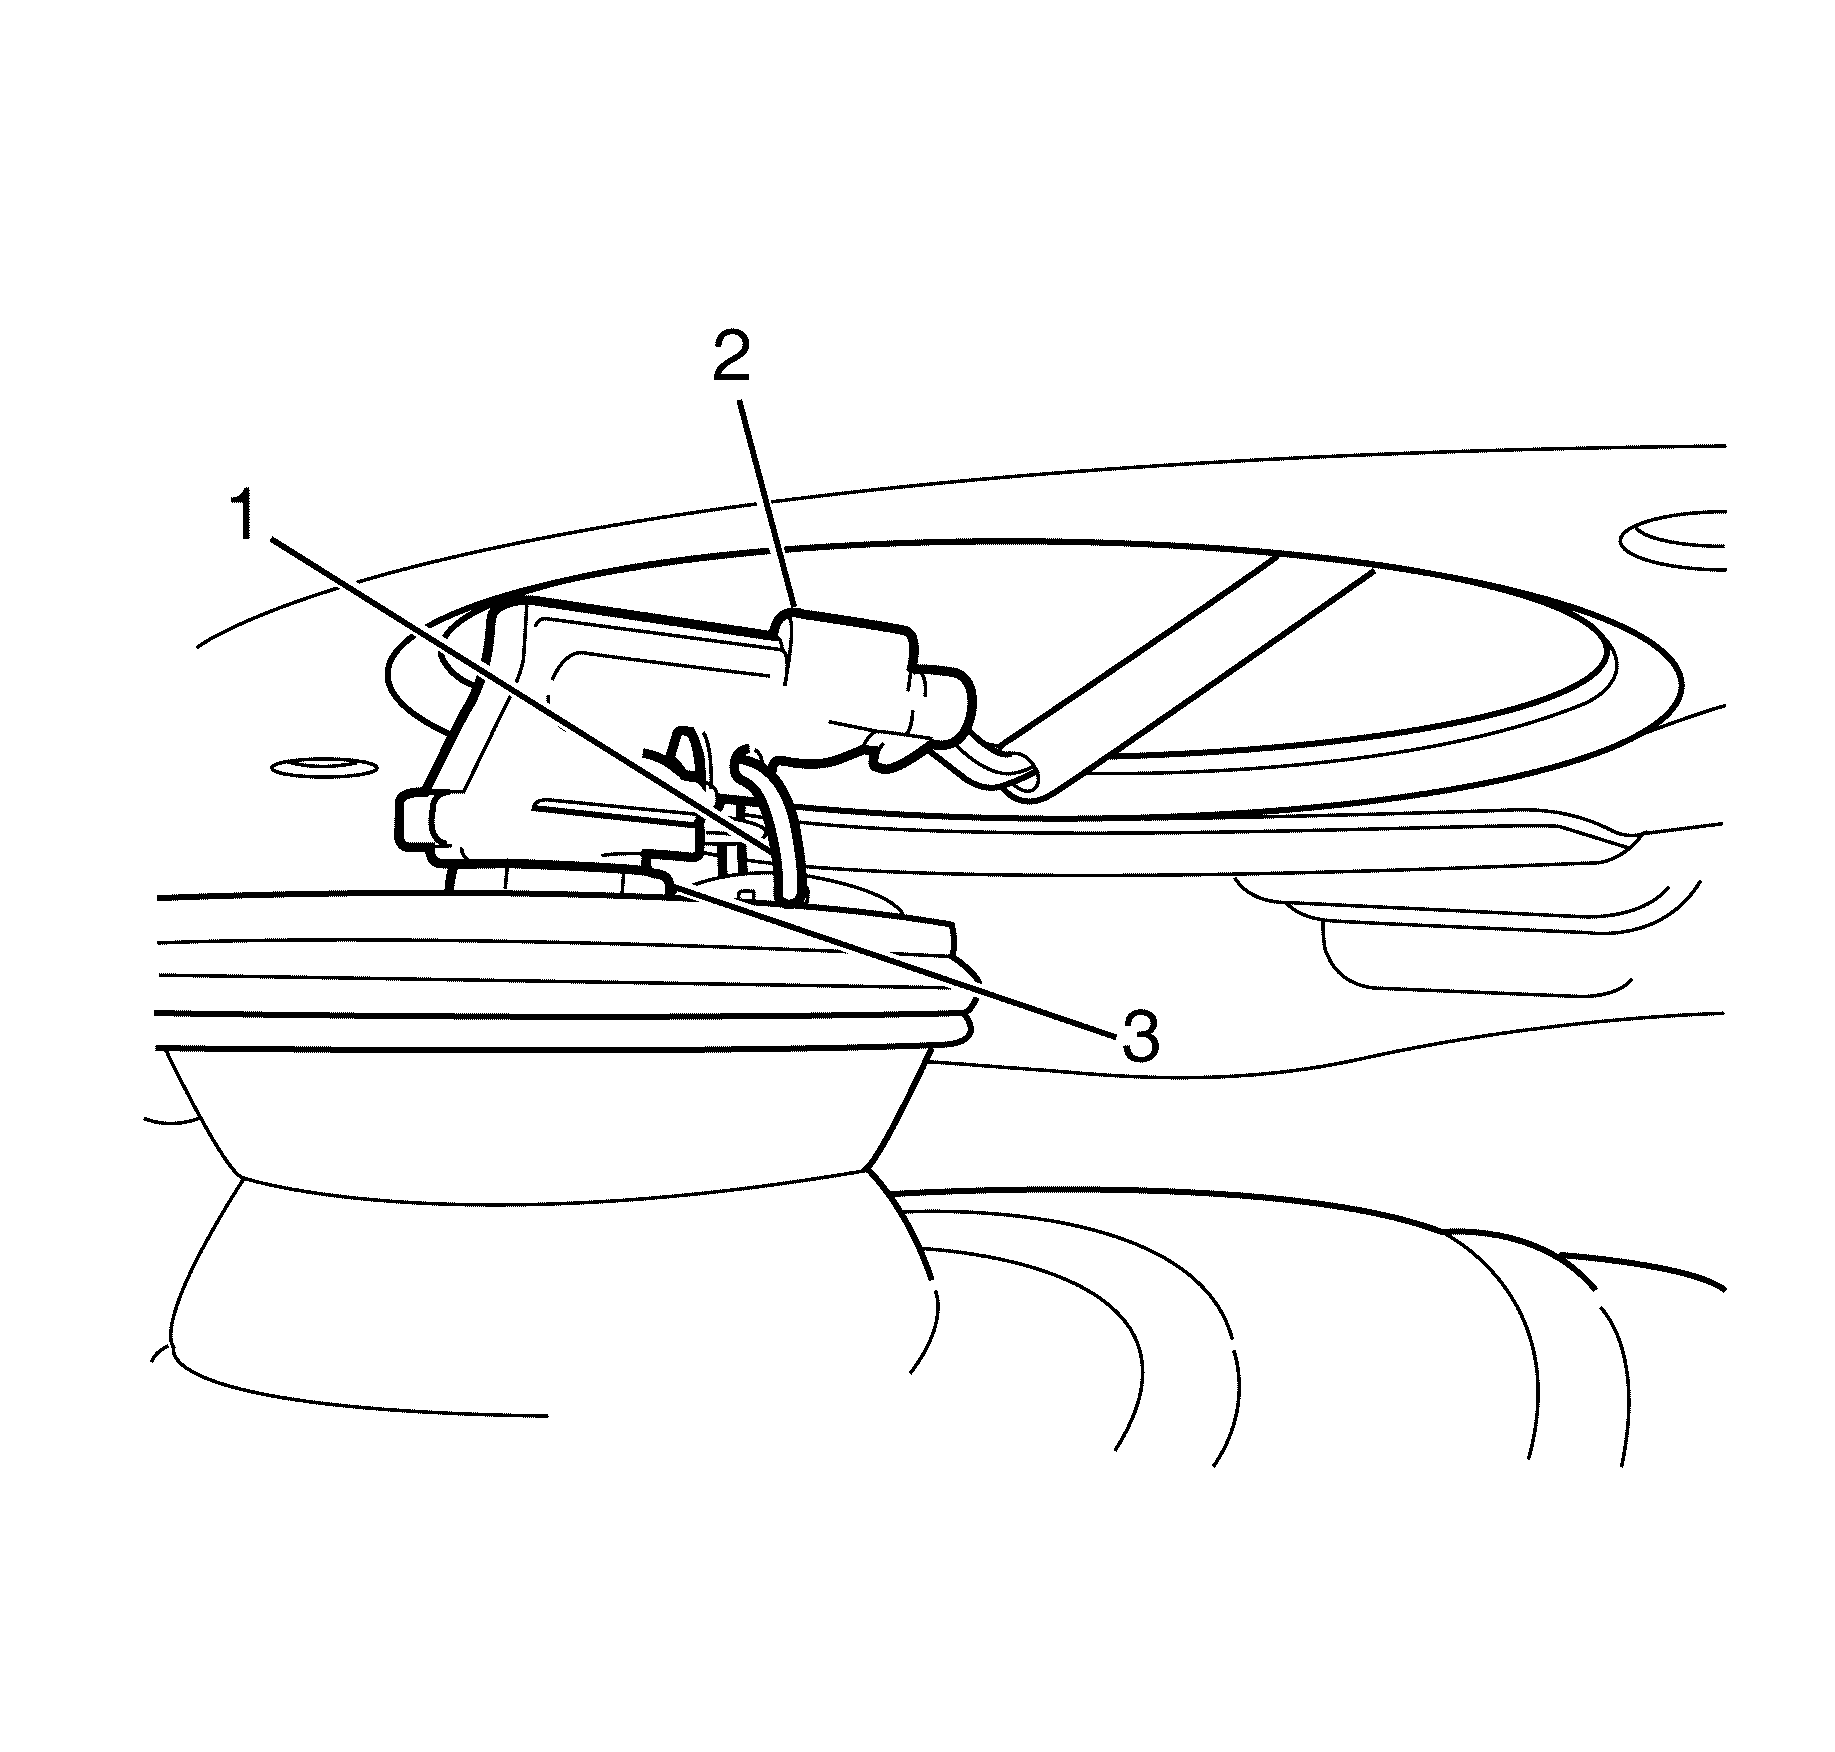
- Cut and remove the cable tie (1) then disconnect the ESC connector (2) from the top of the rear ESC strut assembly (3).
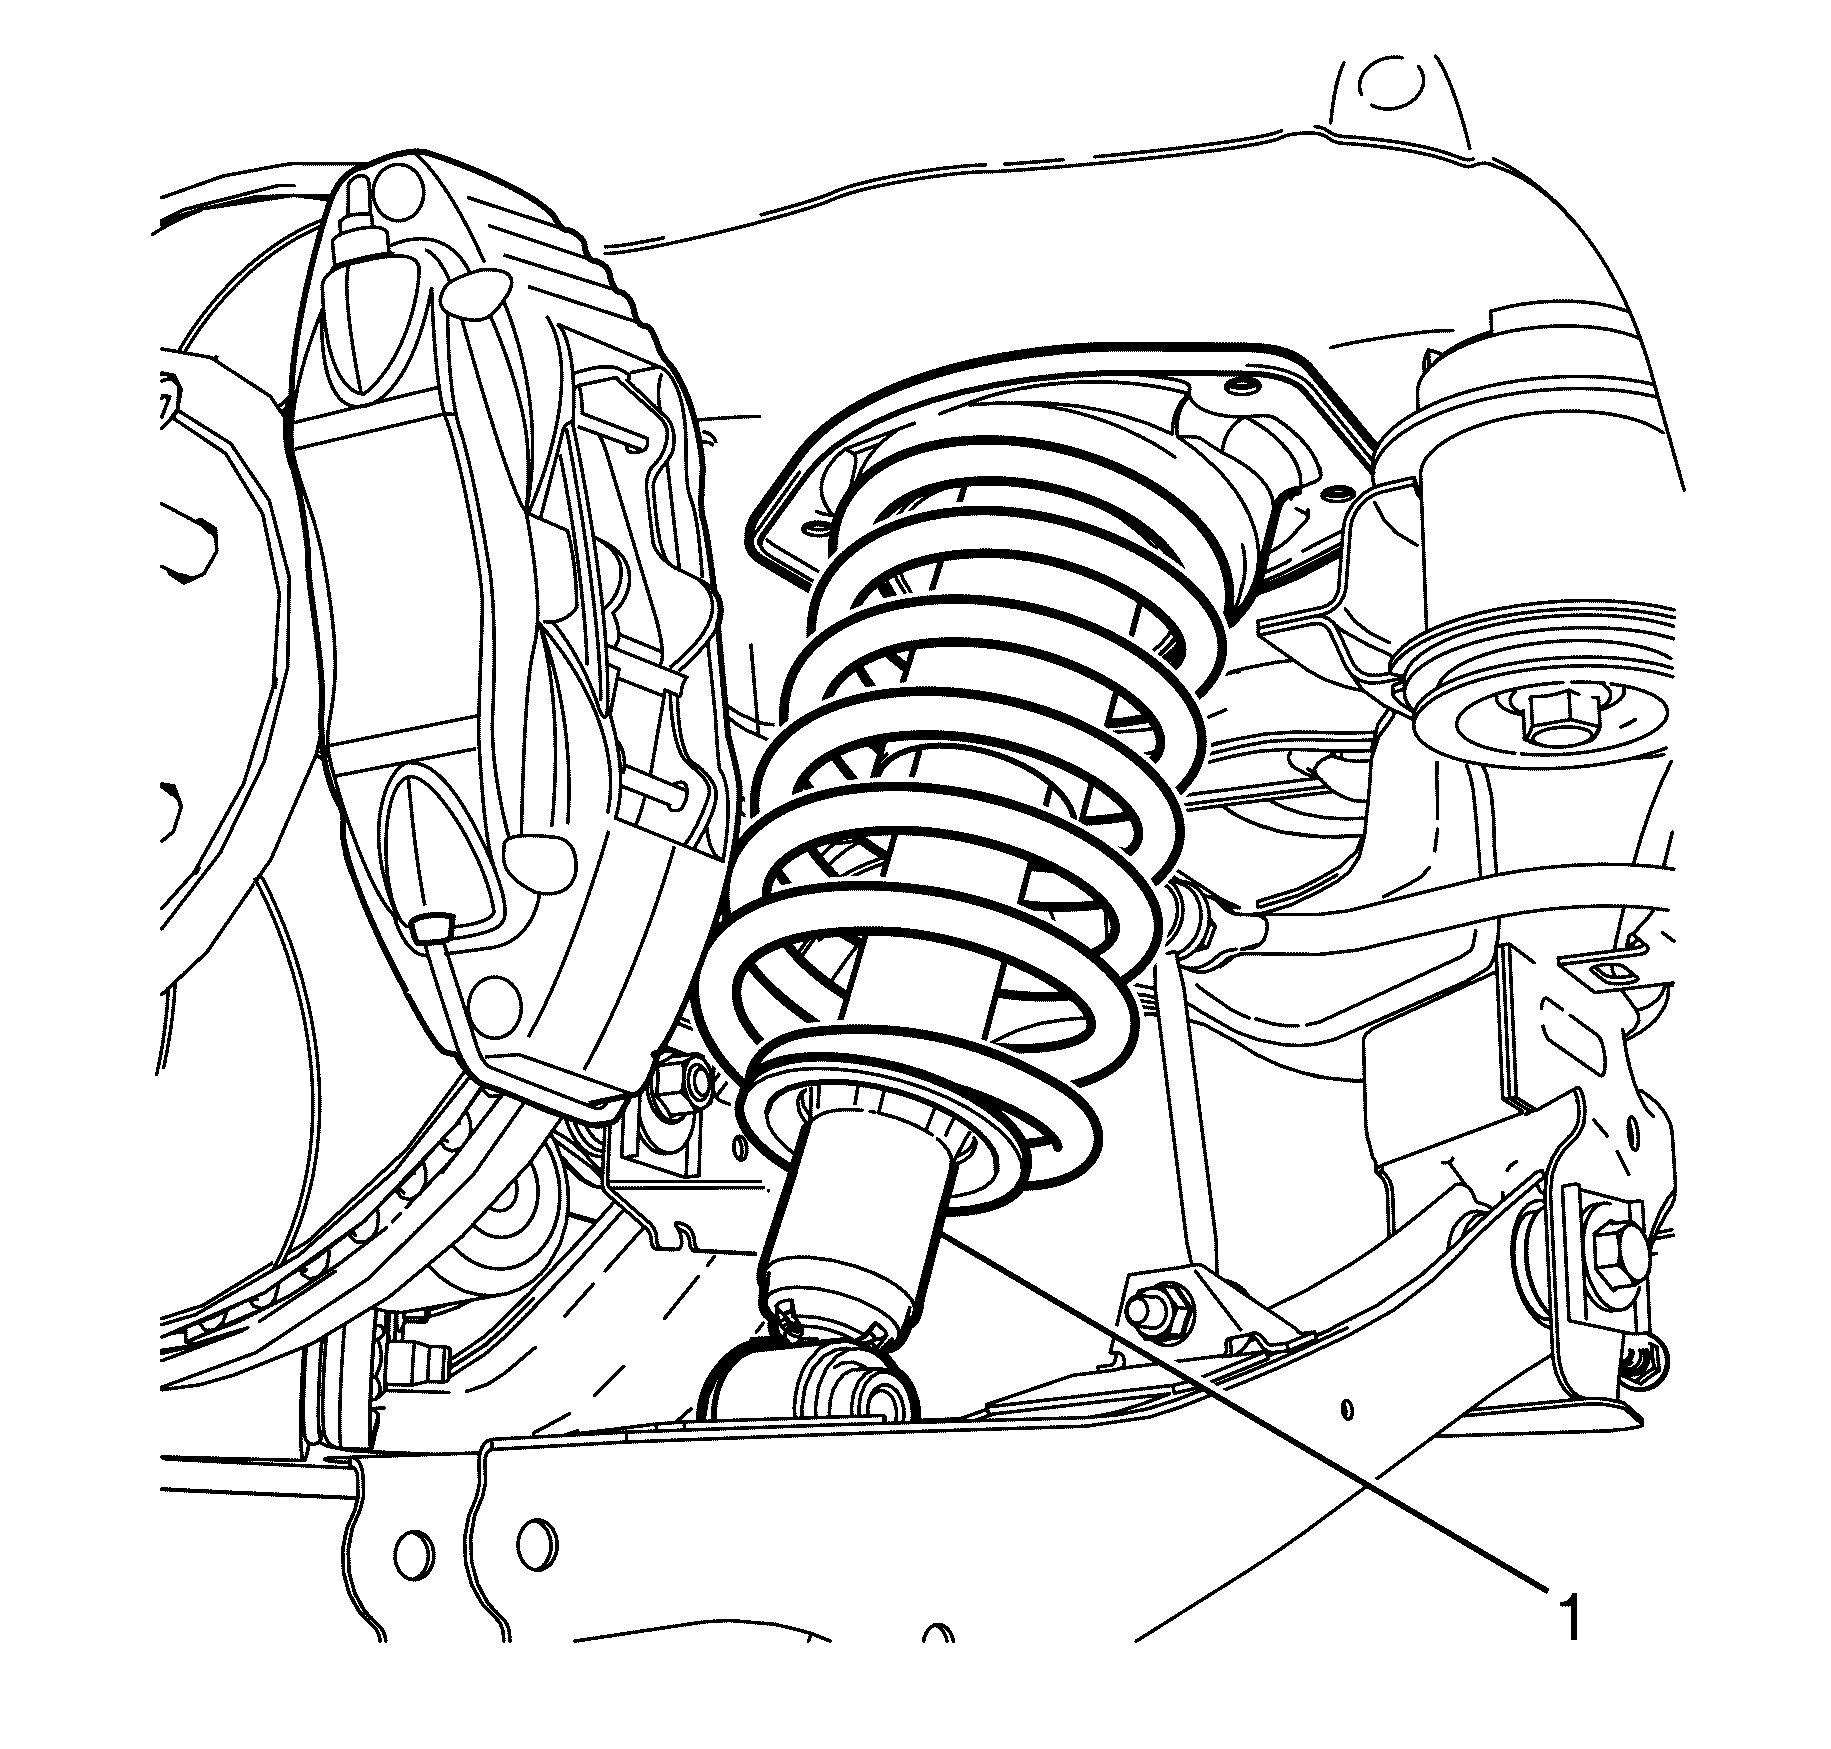
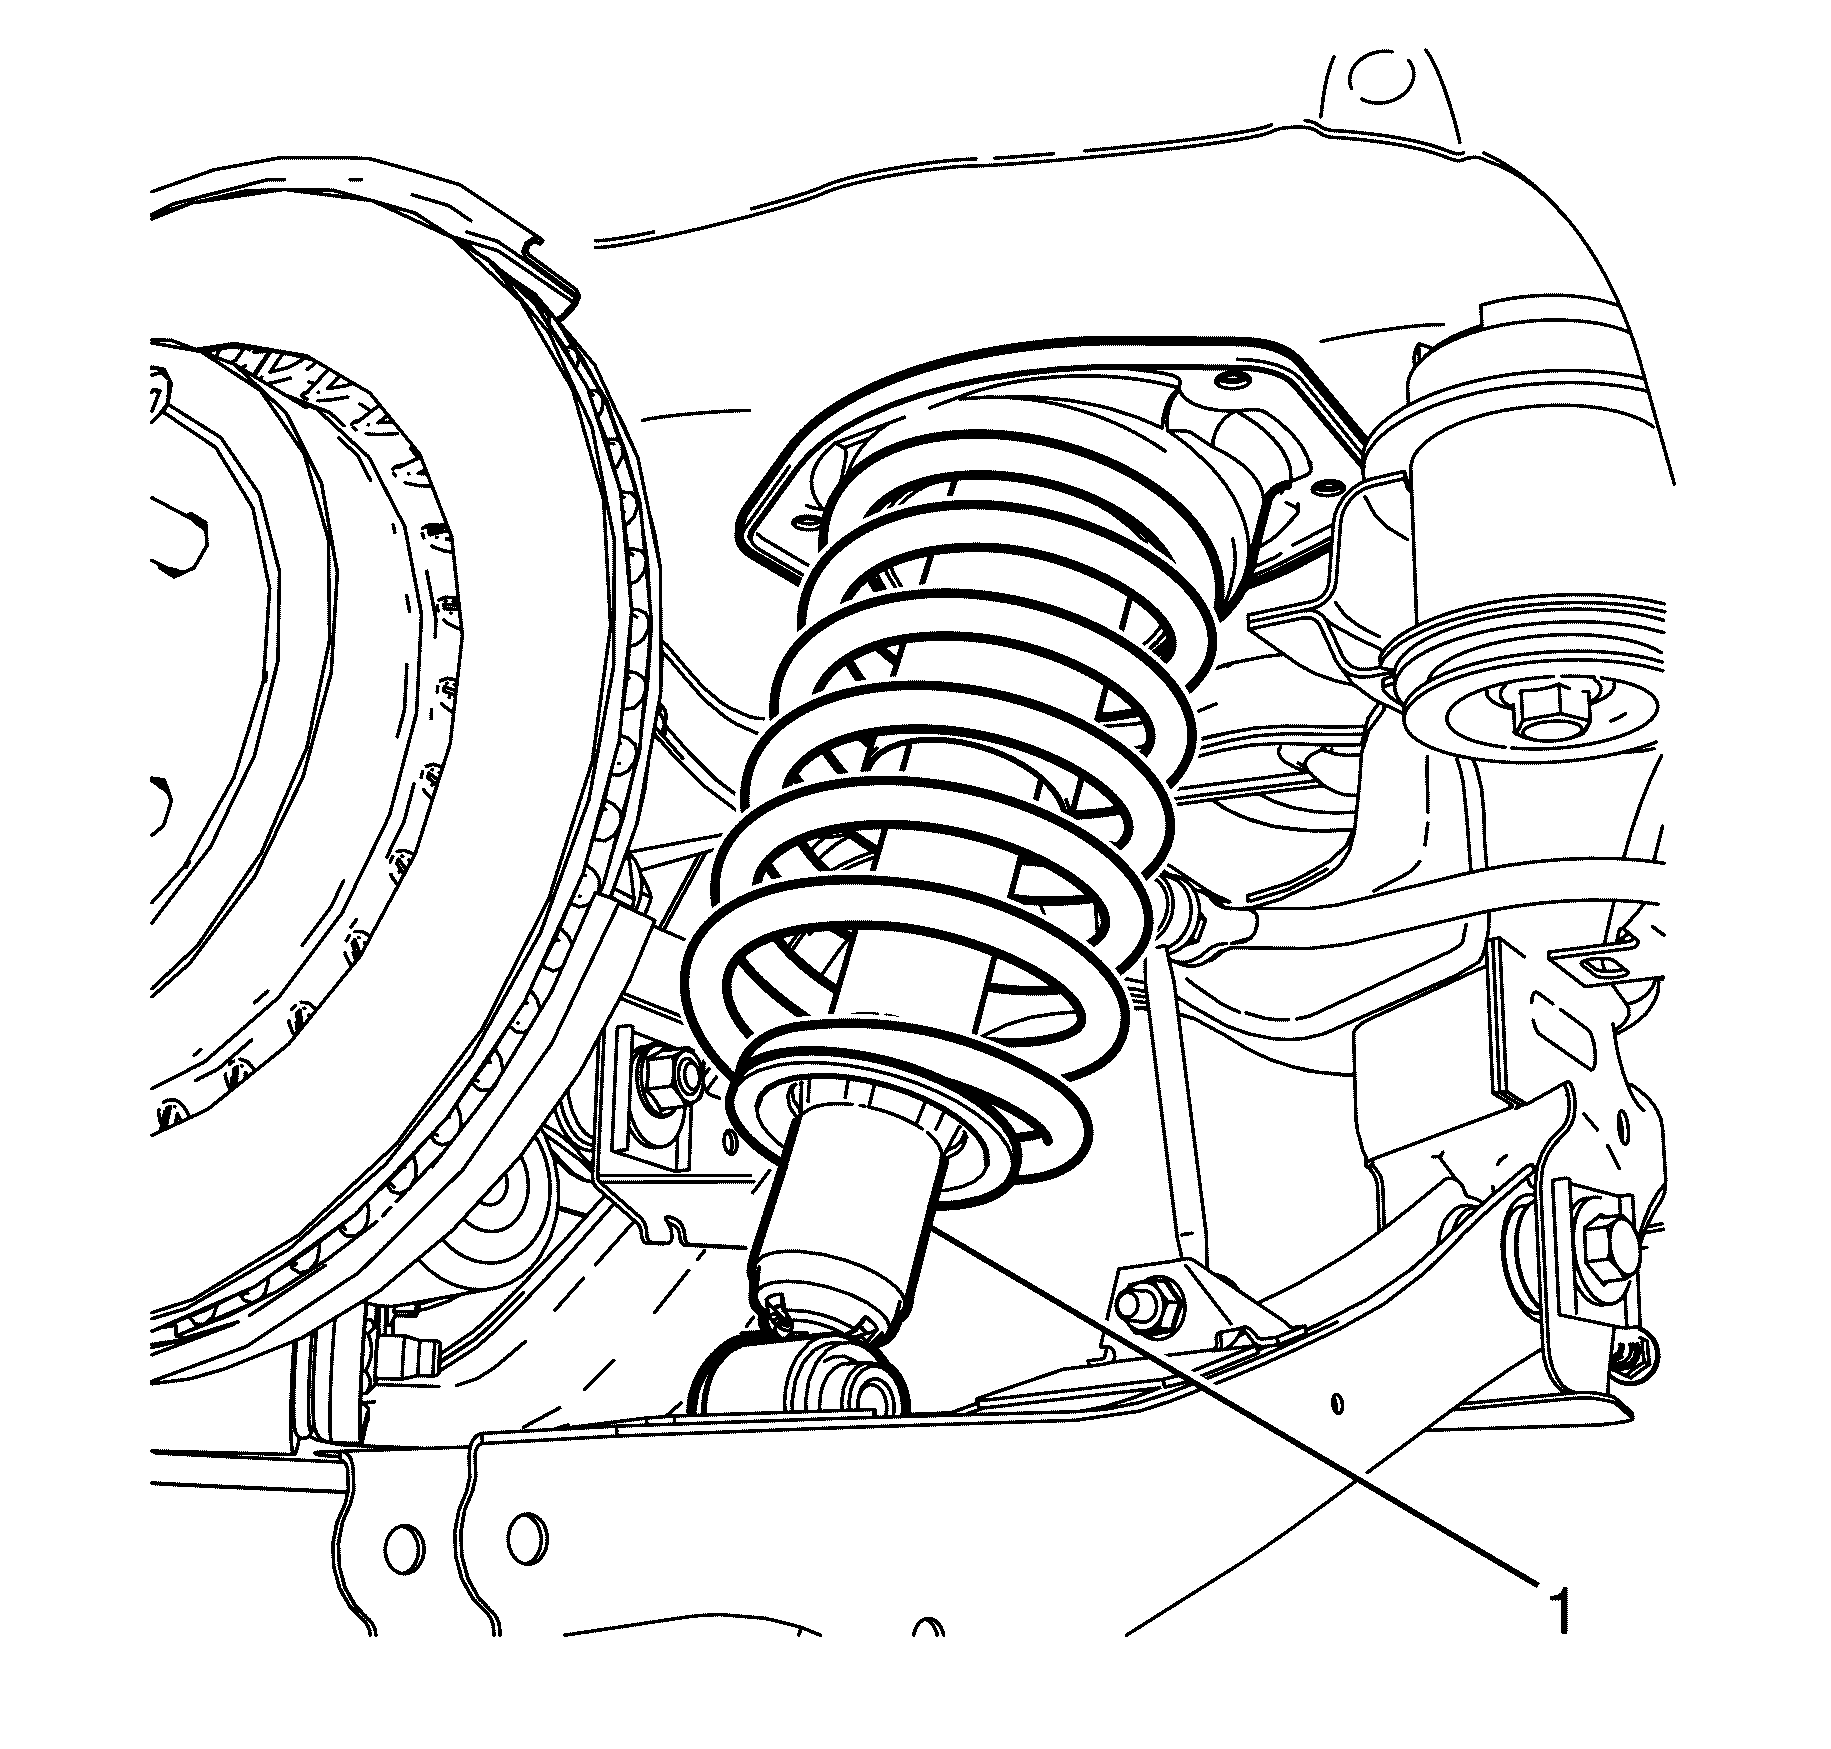
- Remove the rear ESC strut assembly (1) from the vehicle.
- Inspect all parts for wear and damage.
Caution: Refer to Safety Glasses Caution in the Preface section.
Caution: Refer to Vehicle Lifting Caution in the Preface section.
Important: Nuts with micro-encapsulated thread sealant are single use parts and must be discarded after removal.
Discard the nut.
Important: Nuts with micro-encapsulated thread sealant are single use parts and must be discarded after removal.
Discard the nut.
Important: Do not apply pressure to the rear brake disc backing plate while levering.
Reposition the jack as necessary.
Important: The ESC Strut unit has an electrical connector on top of the strut. Care must be taken not to damage the electrical connector when removing the ESC strut assembly.
Installation Procedure - Type B
- Connect the ESC electrical connector (2) to the top of the rear ESC strut (3) and secure correctly with a cable tie (1).
- Carefully raise the rear ESC strut assembly (1) into the vehicle.
- Install the rear ESC strut assembly to body retaining bolts (1).
- Connect the rear ESC strut assembly (4) to the lower control arm (3).
- Install the lower control arm to rear ESC strut assembly retaining bolt (2) and NEW nut (1).
- Connect the lower control arm (3) to the knuckle (4) using a suitable jack.
- Install the lower control arm to knuckle retaining bolt (2) and NEW nut (1).
- Install the rear wheels. Refer to Tire and Wheel Removal and Installation.
- Remove the safety stands.
- Lower the vehicle to the ground.
- Bounce the vehicle several times to settle the suspension.
- Connect the ESC link (1) to the rear lower control arm (2).
- Tighten the lower control arm to ESC strut assembly retaining bolt (2) and NEW nut (1).
- Tighten the lower control arm to knuckle retaining bolt (1) and NEW nut (2).
- Connect the negative battery cable. Refer to Battery Negative Cable Disconnection and Connection.
- Check the wheel alignment of the vehicle. Refer to Wheel Alignment Measurement.
- Correct the wheel alignment of the vehicle, if necessary. Refer to Rear Camber Adjustment, and Rear Toe Adjustment.
Important: The ESC Strut unit has an electrical connector on top of the strut. Care must be taken not to damage the electrical connector when installing the ESC strut assembly.
Notice: Refer to Fastener Notice in the Preface section.
Tighten
Tighten the bolts to 58 Nm (43 lb ft).
Important: Do not fully tighten the lower control arm to strut assembly retaining bolt (2) and nut (1) at this stage.
Do not fully tighten at this stage.
Important: Do not fully tighten the lower control arm to knuckle retaining bolt (2) and nut (1) at this stage.
Do not fully tighten at this stage.
Important: The weight of the vehicle must be on a level surface and on all four wheels before fully tightening the nuts and bolts.
Tighten
Tighten the bolt and nut to 80 Nm (59 lb ft).
Tighten
Tighten the bolt and nut to 105 Nm (77 lb ft).
Strut Assembly Replacement LWBHSV
Removal Procedure
- Raise and support the vehicle. Refer to Lifting and Jacking the Vehicle.
- Disconnect the negative battery cable. Refer to Battery Negative Cable Disconnection and Connection.
- Remove the rear wheels. Refer to Tire and Wheel Removal and Installation.
- Disconnect the ESC link (1) from the rear lower control arm ball stud (2).
- Support the lower control arm with a suitable jack.
- Remove the lower control arm to knuckle retaining bolt (2) and nut (1).
- Remove the lower control arm to rear ESC strut assembly retaining bolt (2) and nut (1).
- Detach the lower control arm (1) using a suitable pry bar.
- Reposition the jack as necessary.
- Remove the rear ESC strut assembly to body retaining bolts (1).
- Partially lower the ESC strut assembly from the vehicle.
- Cut and remove the cable tie (1) then disconnect the ESC connector (2) from the top of the rear ESC strut assembly (3).
- Remove the rear ESC strut assembly (1) from the vehicle.
- Inspect all parts for wear and damage.
Caution: Refer to Safety Glasses Caution in the Preface section.
Caution: Refer to Vehicle Lifting Caution in the Preface section.
Important: Nuts with micro-encapsulated thread sealant are single use parts and must be discarded after removal.
Discard the nut.
Important: Nuts with micro-encapsulated thread sealant are single use parts and must be discarded after removal.
Discard the nut.
Important: Do not apply pressure to the rear brake disc backing plate while levering.
Caution: Refer to General Repair Instructions in the Preface section.
Important: The ESC Strut unit has an electrical connector on top of the strut. Care must be taken not to damage the electrical connector when removing the ESC strut assembly.
Installation Procedure
- Connect the ESC electrical connector (2) to the top of the rear ESC strut (3) and secure correctly with a cable tie (1).
- Carefully raise the rear ESC strut assembly (1) into the vehicle.
- Install the rear ESC strut assembly to body retaining bolts (1).
- Connect the rear ESC strut assembly (4) to the lower control arm (3).
- Install the lower control arm to rear ESC strut assembly retaining bolt (2) and NEW nut (1).
- Connect the lower control arm (3) to the knuckle (4) using a suitable jack.
- Install the lower control arm to knuckle retaining bolt (2) and NEW nut (1).
- Connect the ESC link (1) to the rear lower control arm (2).
- Install the rear wheels. Refer to Tire and Wheel Removal and Installation.
- Remove the safety stands.
- Lower the vehicle to the ground.
- Bounce the vehicle several times to settle the suspension.
- Tighten the lower control arm to ESC strut assembly retaining bolt (2) and NEW nut (1).
- Tighten the lower control arm to knuckle retaining bolt (1) and NEW nut (2).
- Connect the negative battery cable. Refer to Battery Negative Cable Disconnection and Connection.
- Check the wheel alignment of the vehicle. Refer to Wheel Alignment Measurement.
- Correct the wheel alignment of the vehicle, if necessary. Refer to Rear Camber Adjustment, and Rear Toe Adjustment.
Important: The ESC Strut unit has an electrical connector on top of the strut. Care must be taken not to damage the electrical connector when installing the ESC strut assembly.
Notice: Refer to Fastener Notice in the Preface section.
Tighten
Tighten the bolts to 58 Nm (43 lb ft).
Important: Do not fully tighten the lower control arm to strut assembly retaining bolt (2) and nut (1) at this stage.
Do not fully tighten at this stage.
Important: Do not fully tighten the lower control arm to knuckle retaining bolt (2) and nut (1) at this stage.
Do not fully tighten at this stage.
Important: The weight of the vehicle must be on a level surface and on all four wheels before fully tightening the nuts and bolts.
Tighten
Tighten the bolt and nut to 80 Nm (59 lb ft).
Tighten
Tighten the bolt and nut to 105 Nm (77 lb ft).
Strut Assembly Replacement LWB SWB Clubsport CSV VXR8
Removal Procedure
- Raise and support the vehicle. Refer to Lifting and Jacking the Vehicle.
- Remove the rear wheel. Refer to Tire and Wheel Removal and Installation.
- Support the lower control arm with a suitable jack.
- Remove the lower control arm to knuckle retaining bolt (2) and nut (1).
- Remove the lower control arm to rear strut assembly retaining bolt (2) and nut (1).
- Detach the lower control arm (1) using a suitable pry bar.
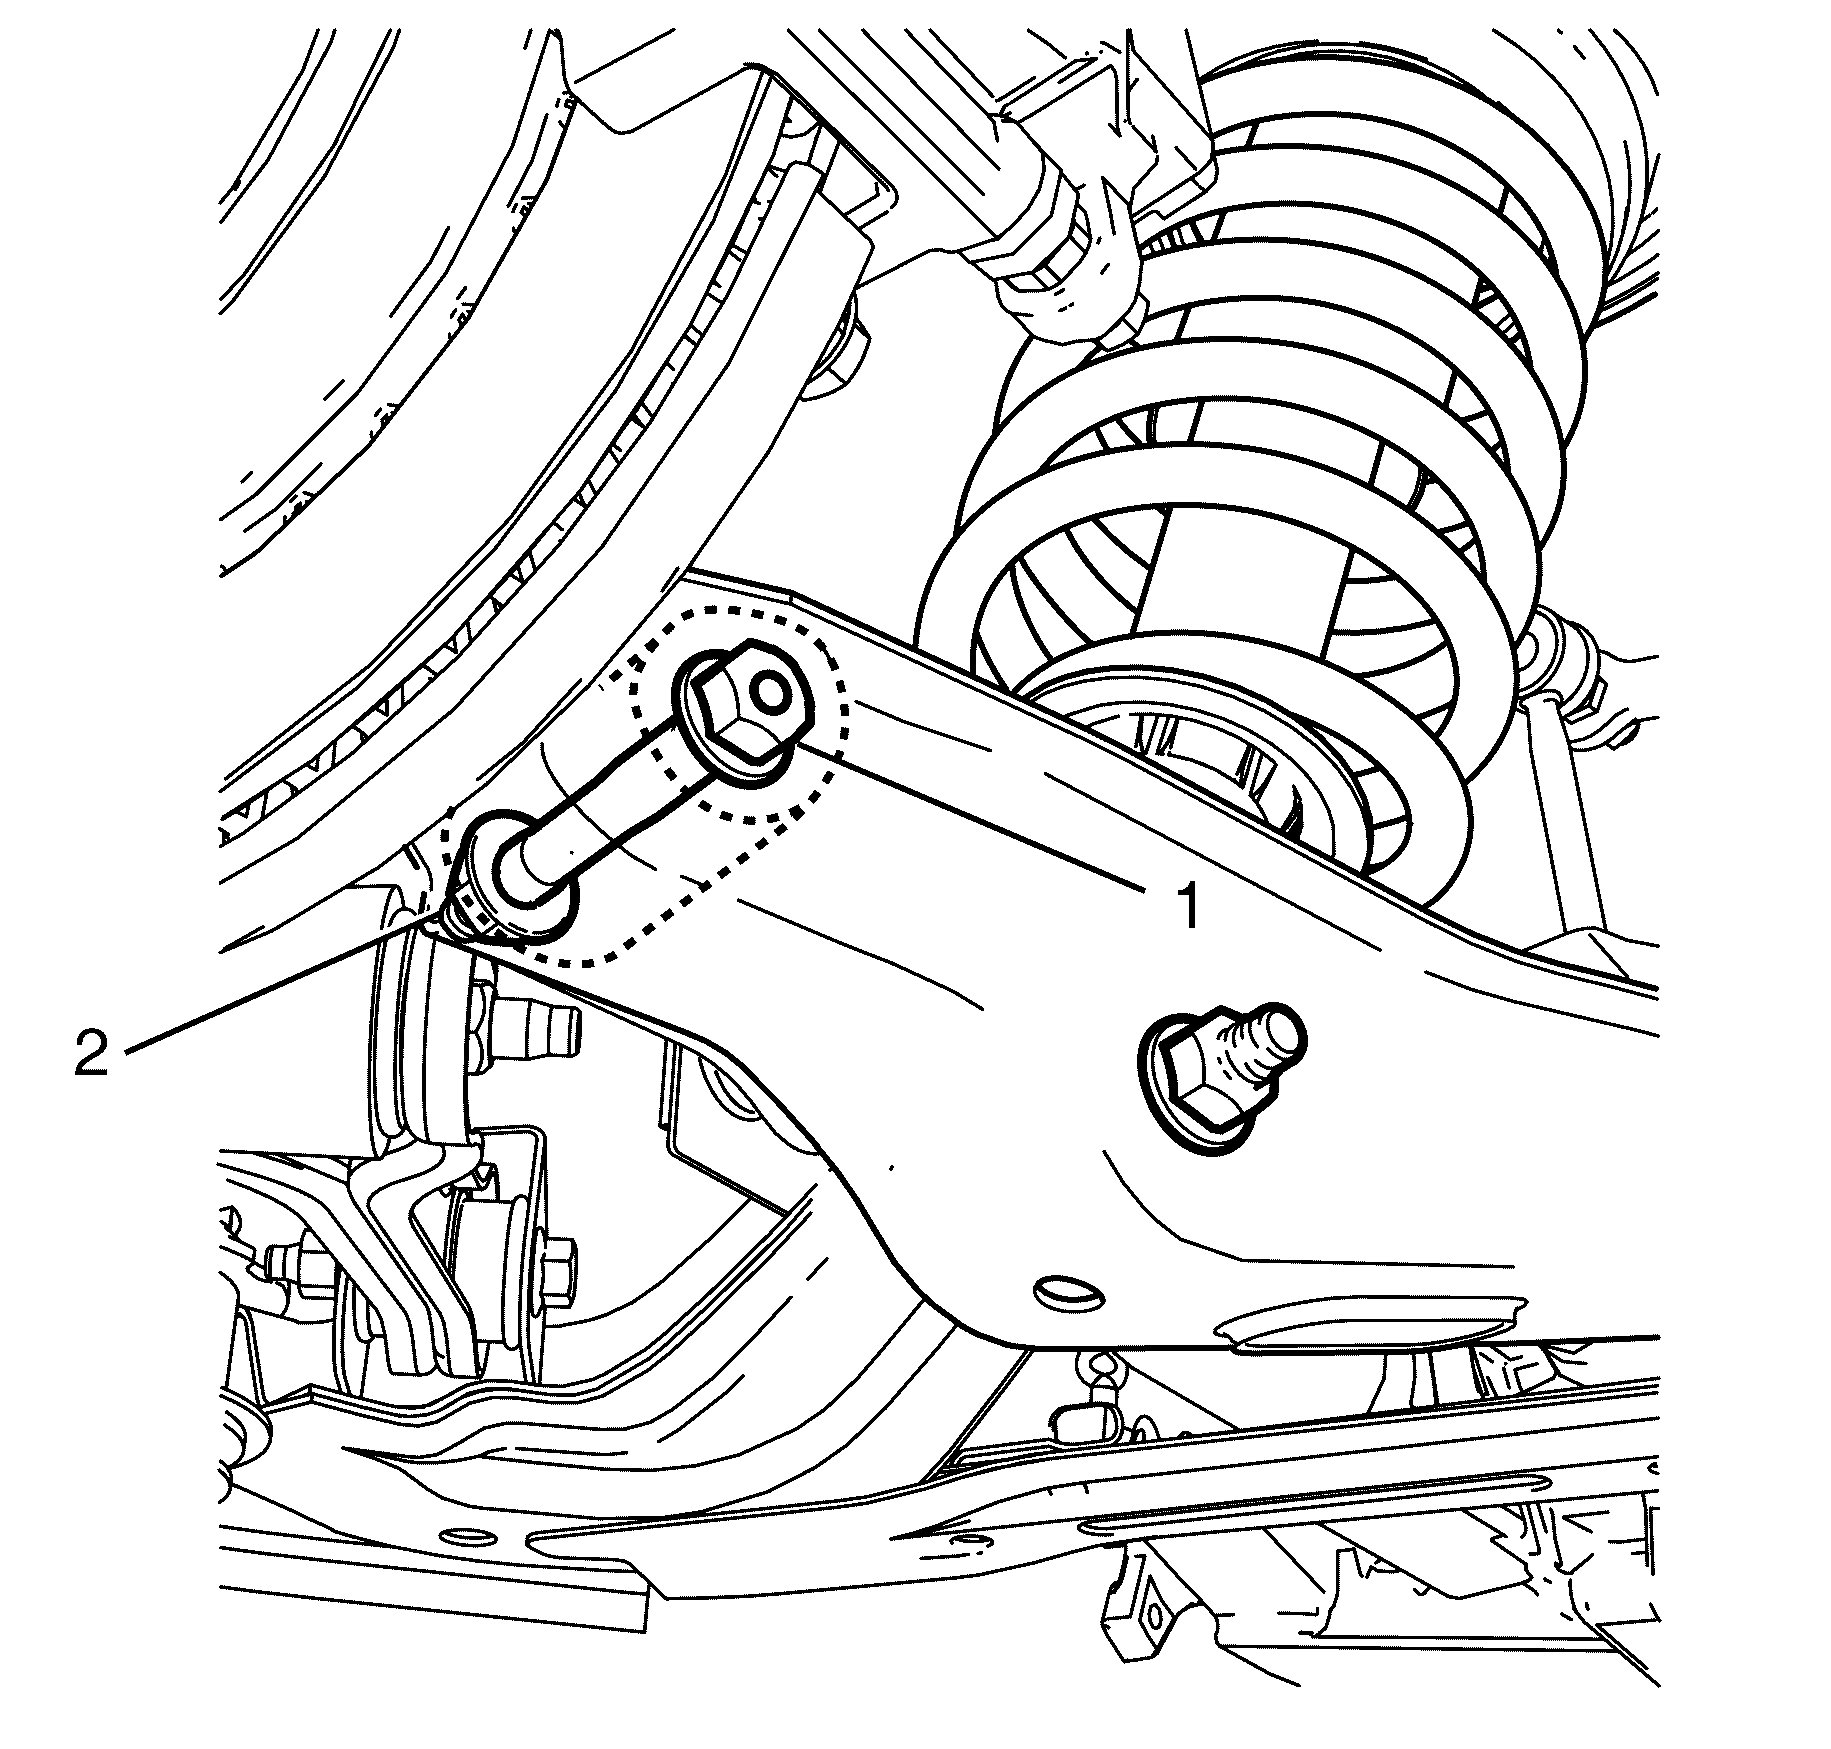
- Remove the rear strut assembly to body retaining bolts (1).
- Remove the rear strut assembly (1) from the vehicle.
- Inspect all parts for wear and damage.
Caution: Refer to Safety Glasses Caution in the Preface section.
Caution: Refer to Vehicle Lifting Caution in the Preface section.
Important: Prevailing torque nuts must be discarded after removal.
Discard the nut.
Important: Prevailing torque nuts must be discarded after removal.
Discard the nut.
Important: Do not apply pressure to the rear brake disc backing plate while levering.
Reposition the jack as necessary.
Caution: Refer to General Repair Instructions in the Preface section.
Installation Procedure
- Install the rear strut assembly (1) into the vehicle.
- Install the rear strut assembly to body retaining bolts (1).
- Connect the rear strut assembly (4) to the lower control arm (3).
- Install the lower control arm to strut assembly retaining bolt (2) and NEW nut (1).
- Connect the lower control arm (3) to the knuckle (4) using a suitable jack.
- Install the lower control arm to the knuckle retaining bolt (2) and NEW nut (1).
- Install the rear wheel. Refer to Tire and Wheel Removal and Installation.
- Remove the safety stands.
- Lower the vehicle to the ground.
- Bounce the vehicle several times to settle the suspension.
- Tighten the lower control arm to strut assembly retaining bolt (2) and NEW nut (1).
- Tighten the lower control arm to knuckle retaining bolt (2) and NEW nut (1).
- Check the wheel alignment of the vehicle. Refer to Wheel Alignment Measurement.
- Correct the wheel alignment of the vehicle, if necessary. Refer to Rear Camber Adjustment and Rear Toe Adjustment.
Notice: Refer to Fastener Notice in the Preface section.
Tighten
Tighten the bolts to 58 N·m (43 lb ft).
Important: Do not fully tighten the lower control arm to strut assembly retaining bolt (2) and nut (1) at this stage.
Do not fully tighten at this stage.
Important: Do not fully tighten the lower control arm to knuckle retaining bolt (2) and nut (1) at this stage.
Do not fully tighten at this stage.

Important: The weight of the vehicle must be on a level surface and on all four wheels before fully tightening the nuts and bolts.
Tighten
Tighten the bolt and nut a first pass to 40 N·m
(30 lb ft).
Tighten the bolt and nut a final pass 120 Degrees.
Tighten
Tighten the bolt and nut a first pass to 40 N·m
(30 lb ft).
Tighten the bolt and nut a final pass 120 Degrees.
