Front Caster and Camber Adjustment - Up to xx/xx
- Raise and support the vehicle. Refer to Lifting and Jacking the Vehicle .
- Remove the front wheel. Refer to Tire and Wheel Removal and Installation .
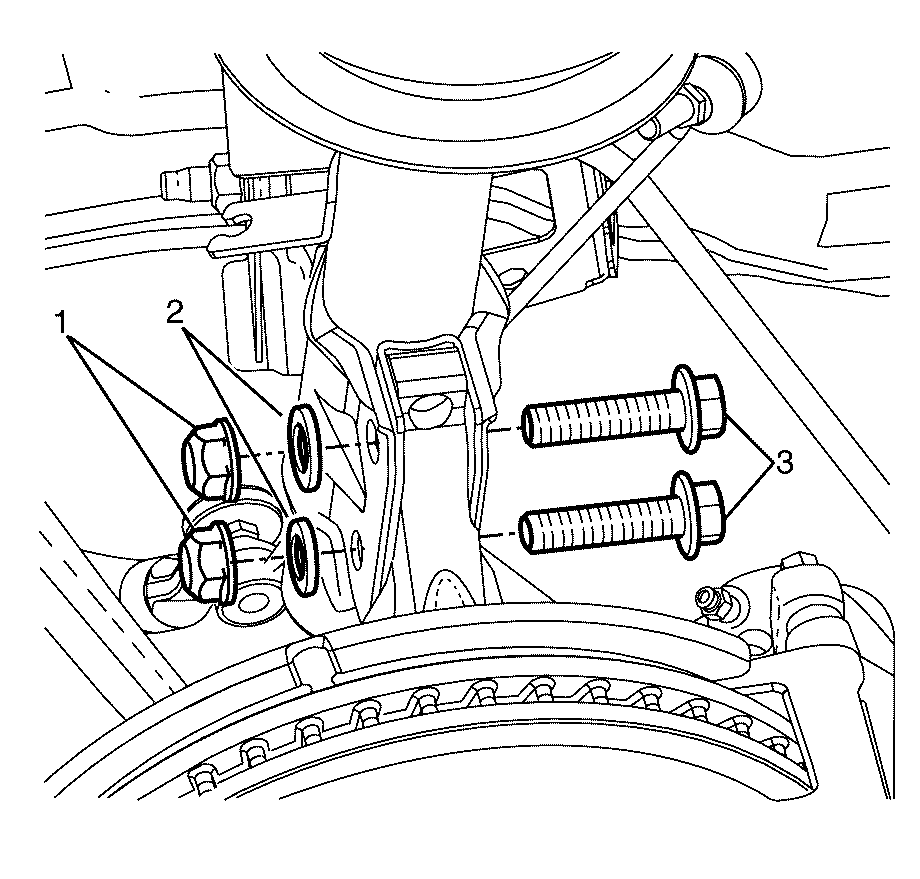
- Remove the strut assembly to steering knuckle retaining bolts (3), nuts (1) and washers (2).
- Install NEW strut assembly to steering knuckle retaining bolts (3), washers (2) and nuts (1).
- Install the front wheel. Refer to Tire and Wheel Removal and Installation .
- Remove the safety stands.
- Lower the vehicle to the ground.
- Bounce the vehicle several times to settle the suspension.
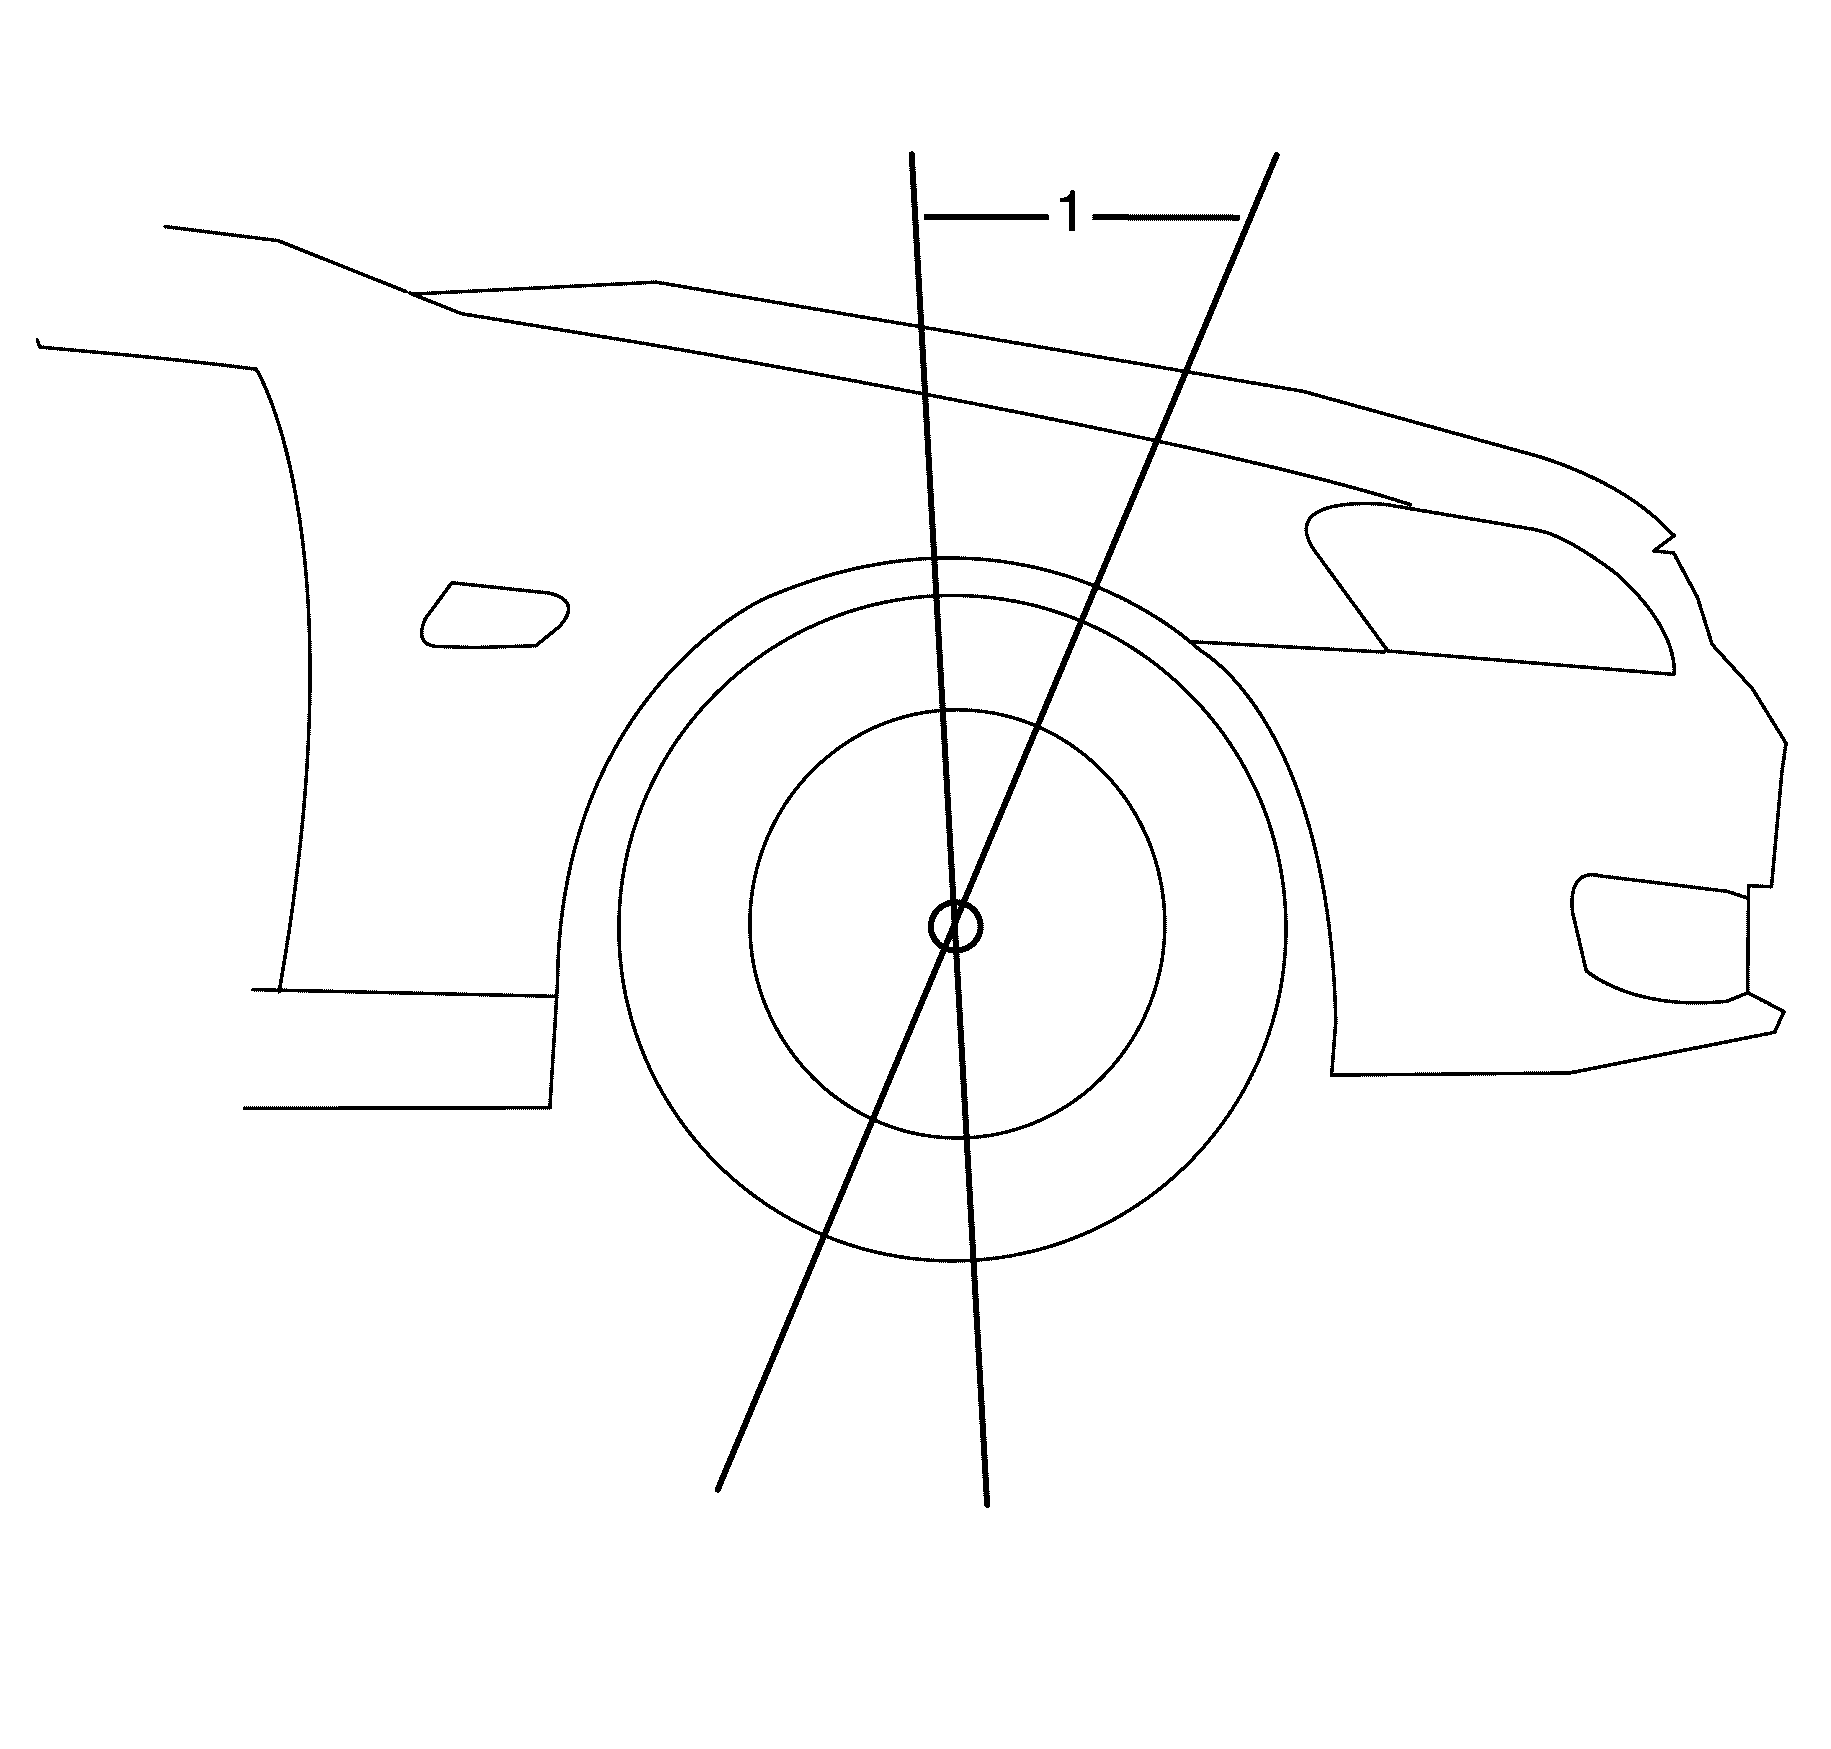
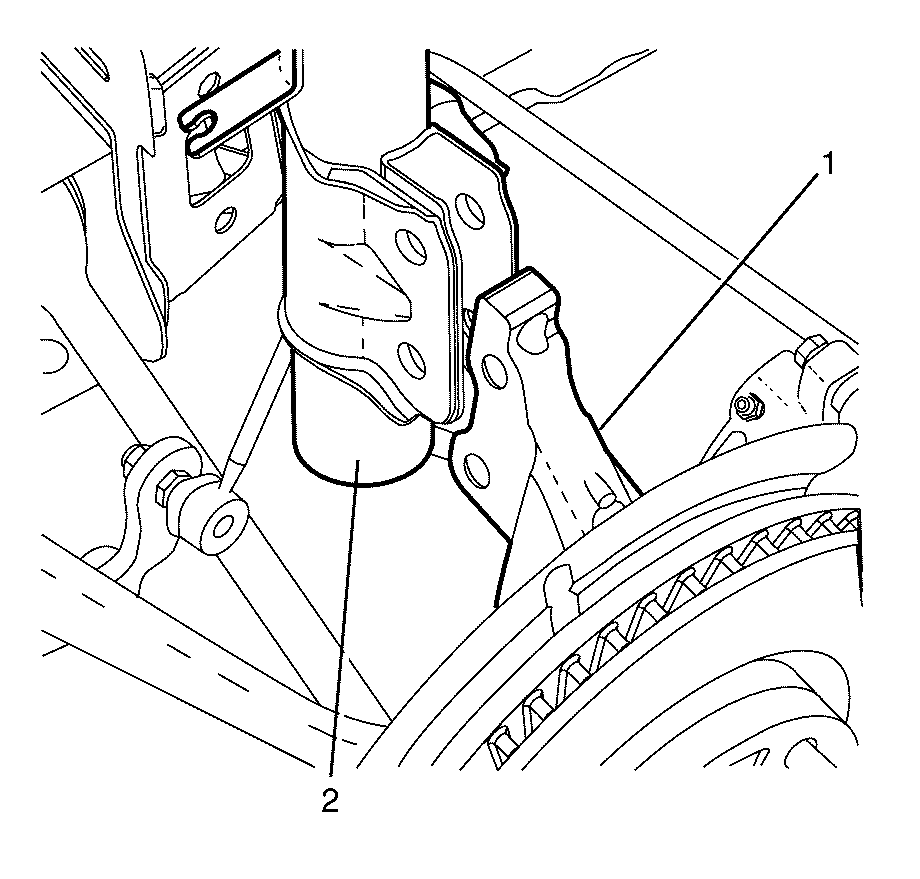
- Determine the actual caster angle (1).
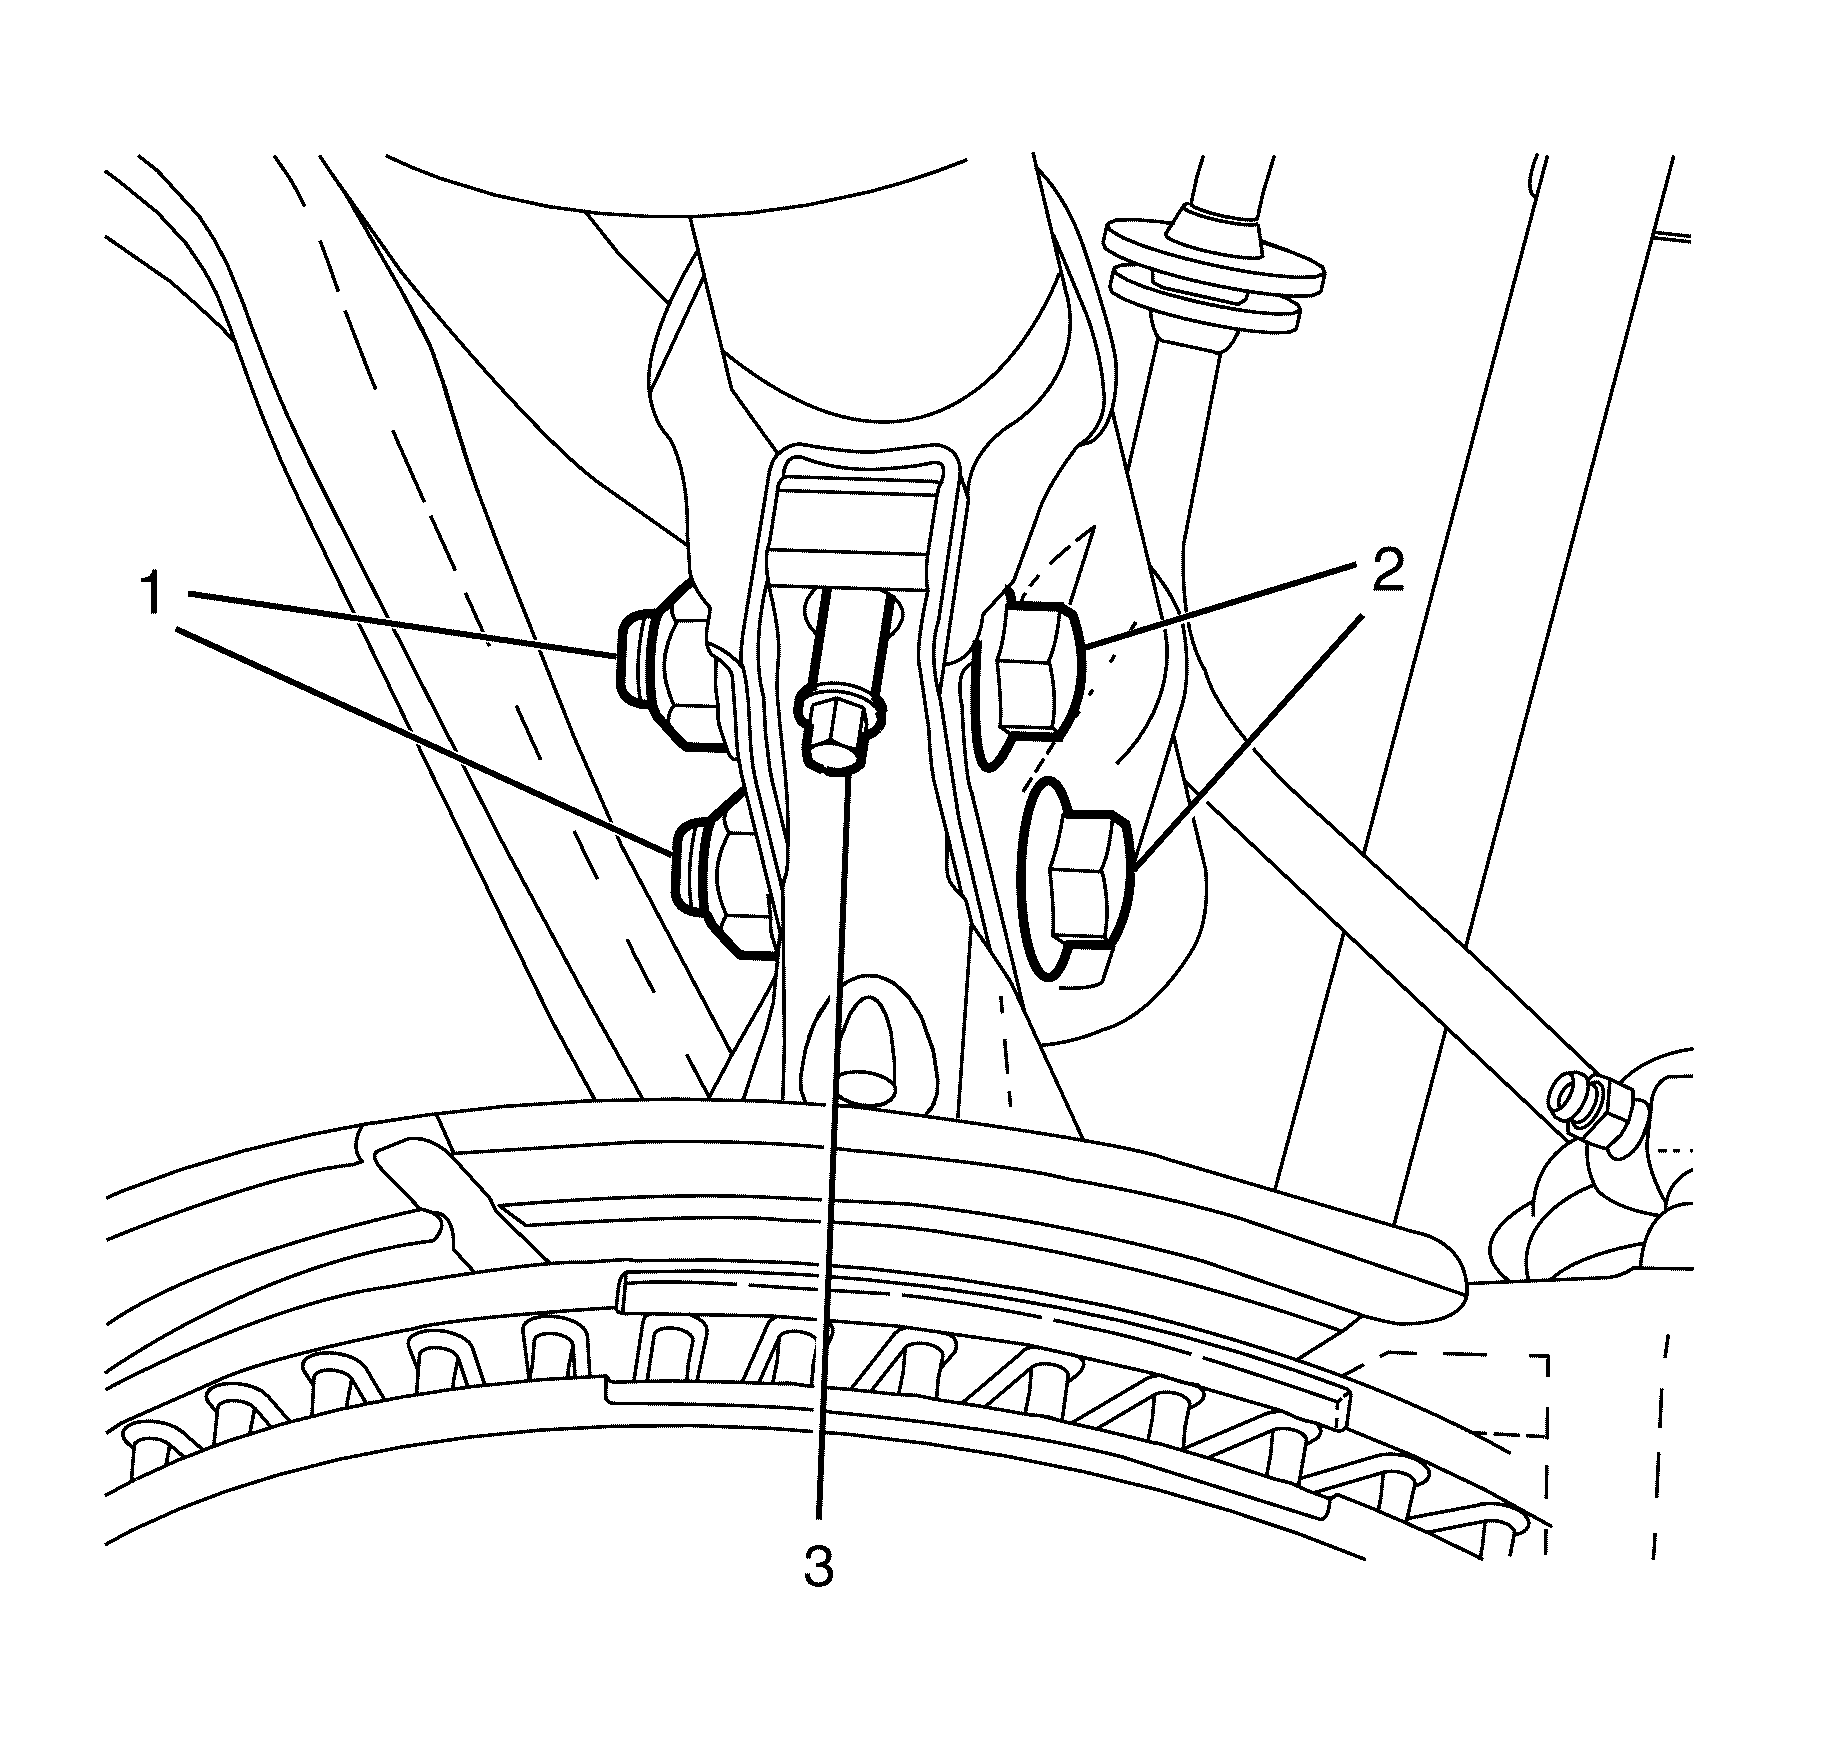
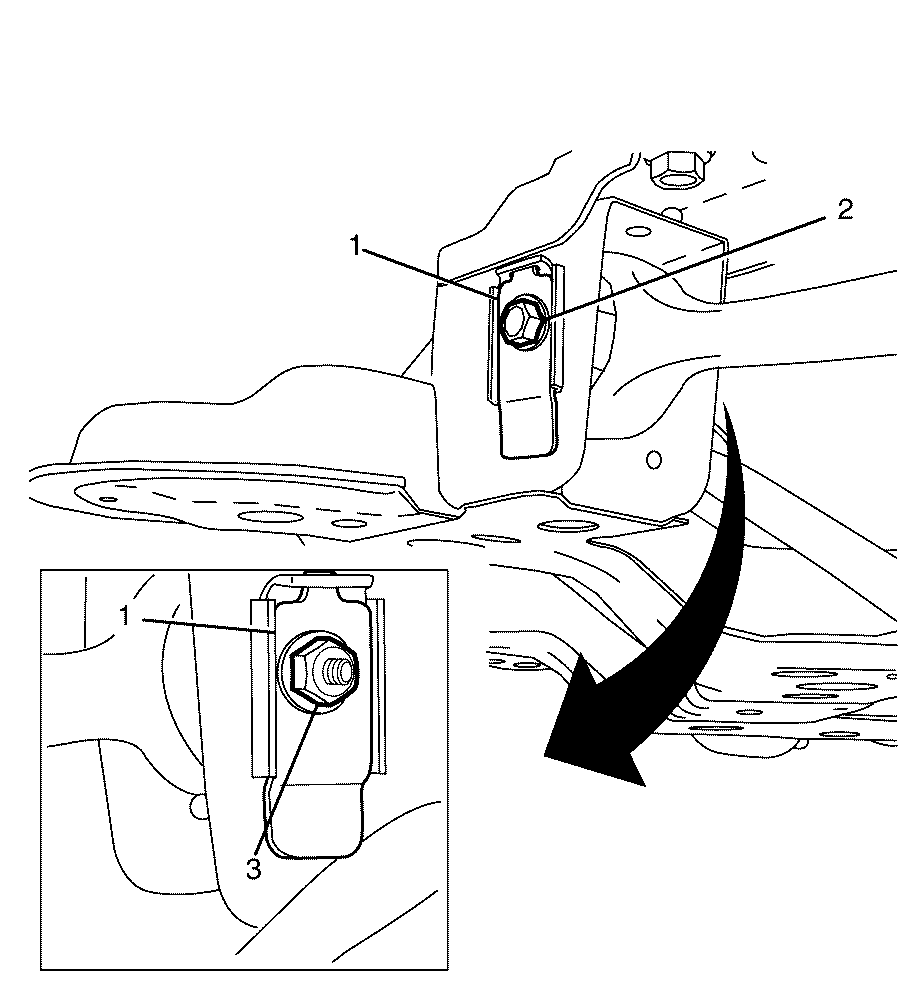
- Remove the front caster arm to subframe retaining nut (4) and bolt (2).
- Adjust the caster to specification by selecting and installing the correct front caster arm to subframe offset washer (1). For caster specifications, Refer to Wheel Alignment Specifications .
- Install the subframe offset washer to subframe retaining clips (3).
- Install the NEW lower caster arm to the subframe retaining bolt (2).
- Install the NEW lower caster arm to the subframe retaining nut (4).
- Tighten the front caster arm to subframe retaining nut (4).
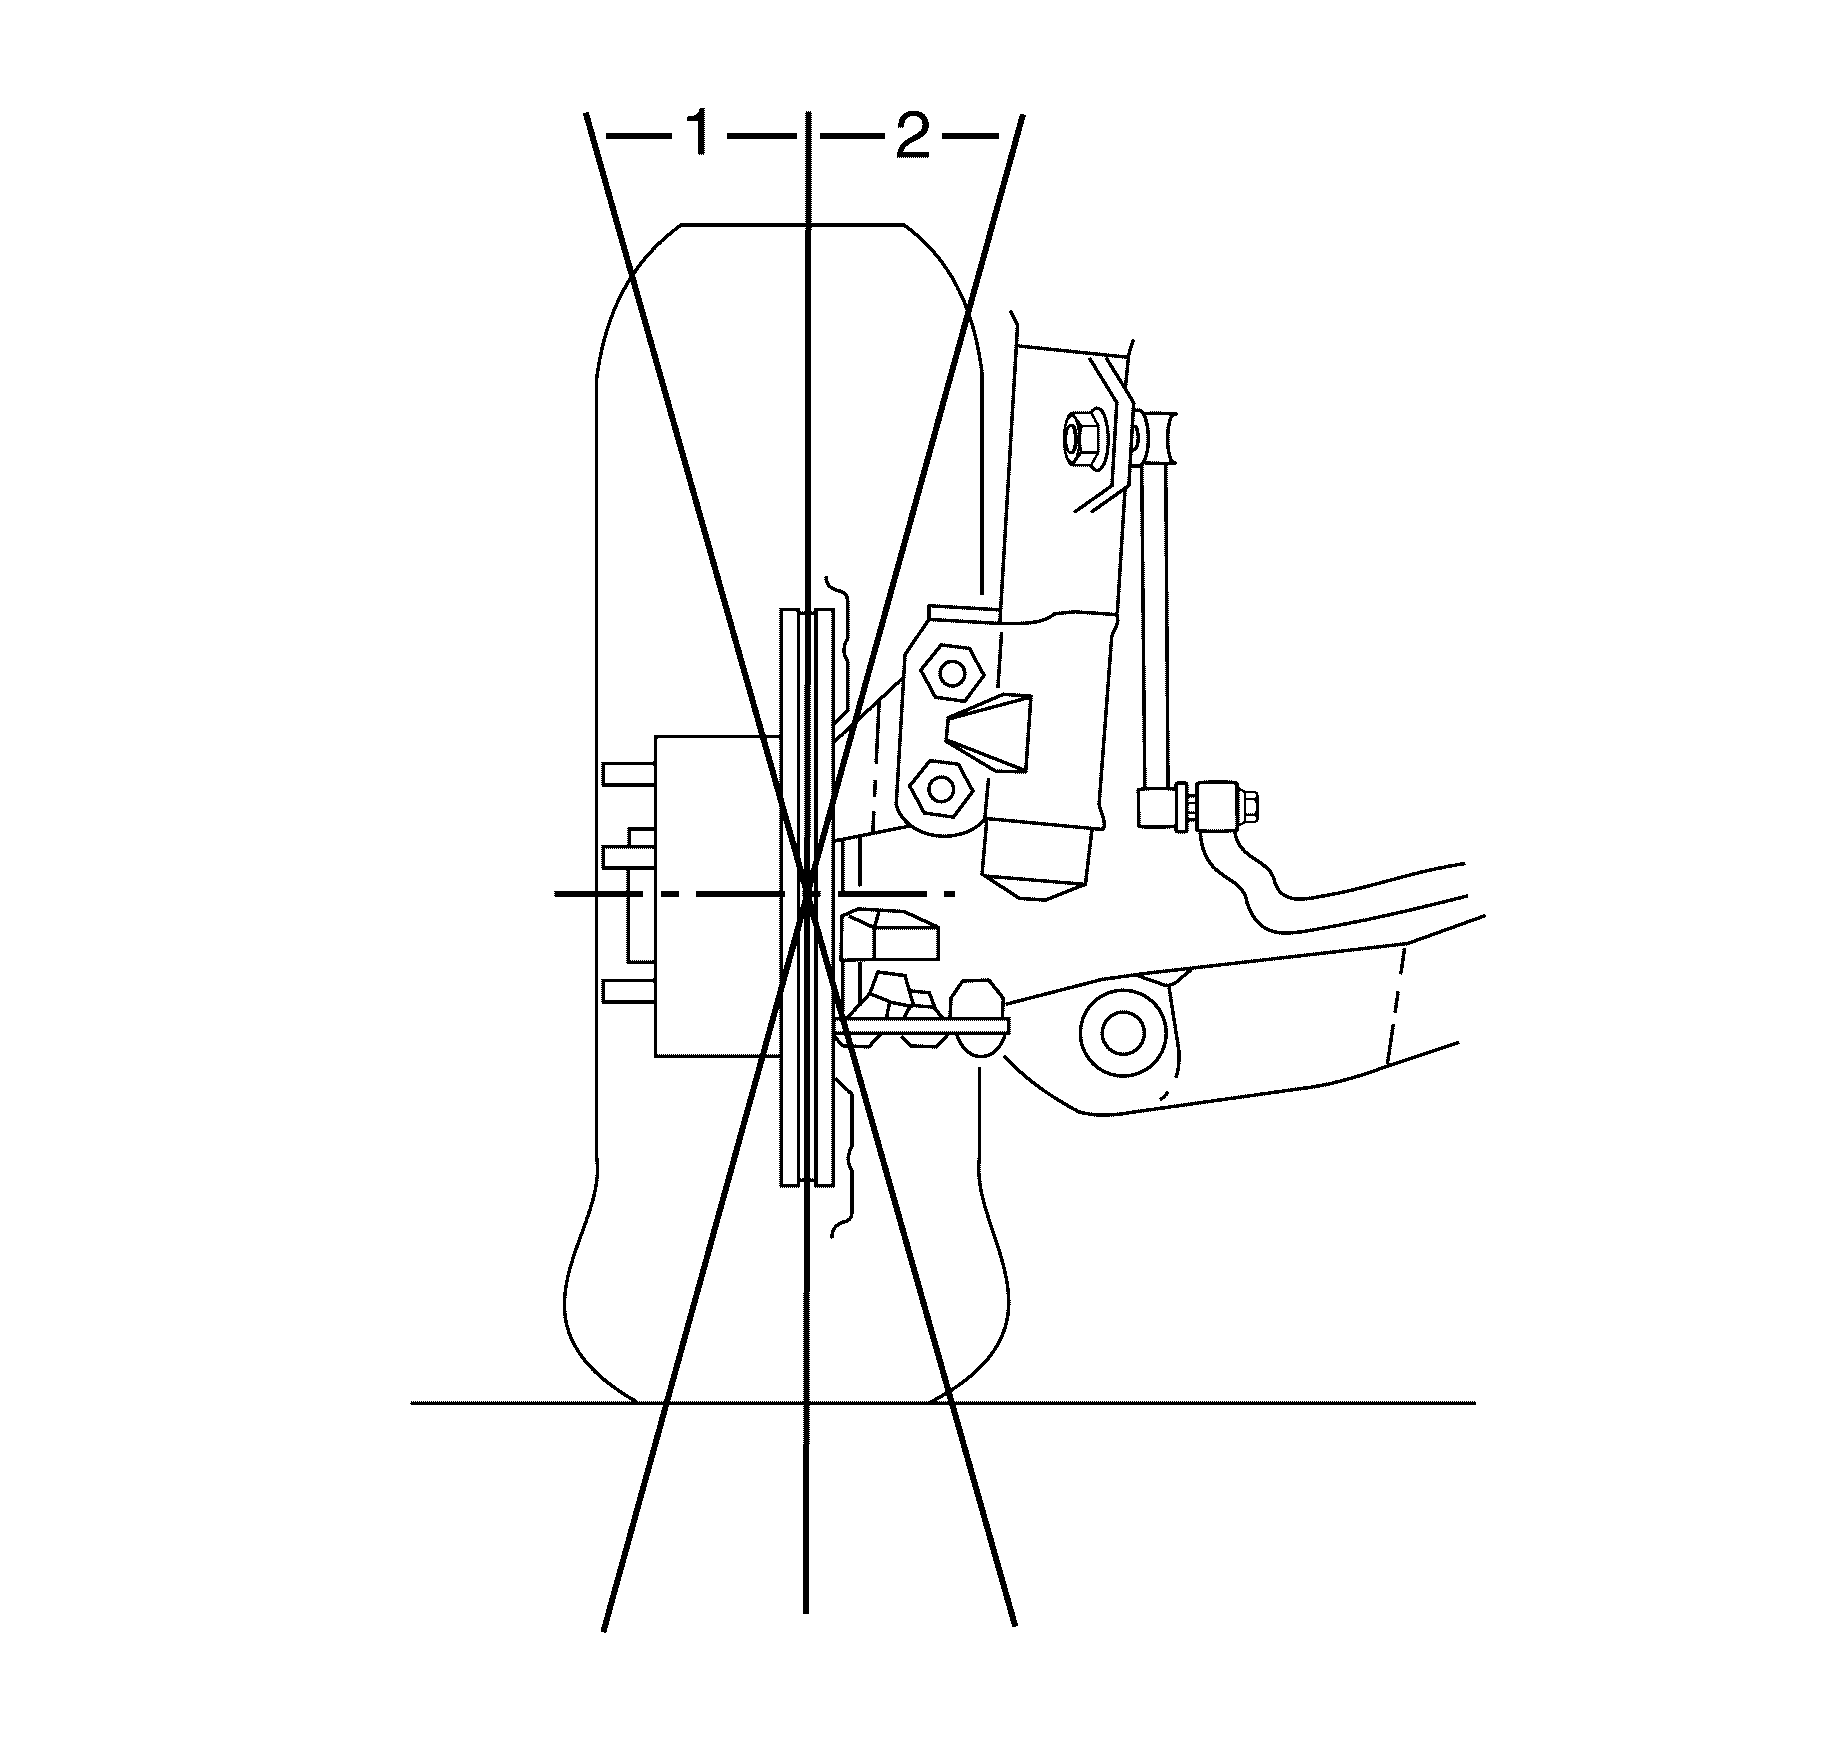
- Determine the actual camber, Positive (1) or Negative (2).
- Adjust the camber to specification using the camber adjusting bolt (3). Turning clockwise will reduce negative camber. For camber specifications, Refer to Wheel Alignment Specifications .
- Tighten the strut assembly to steering knuckle retaining bolts (2) and nuts (1).
- Verify that the caster and camber are still within specifications. Refer to Wheel Alignment Specifications .
- If further adjustment is required, adjust as necessary.
Caution: Refer to Vehicle Lifting Caution in the Preface section.
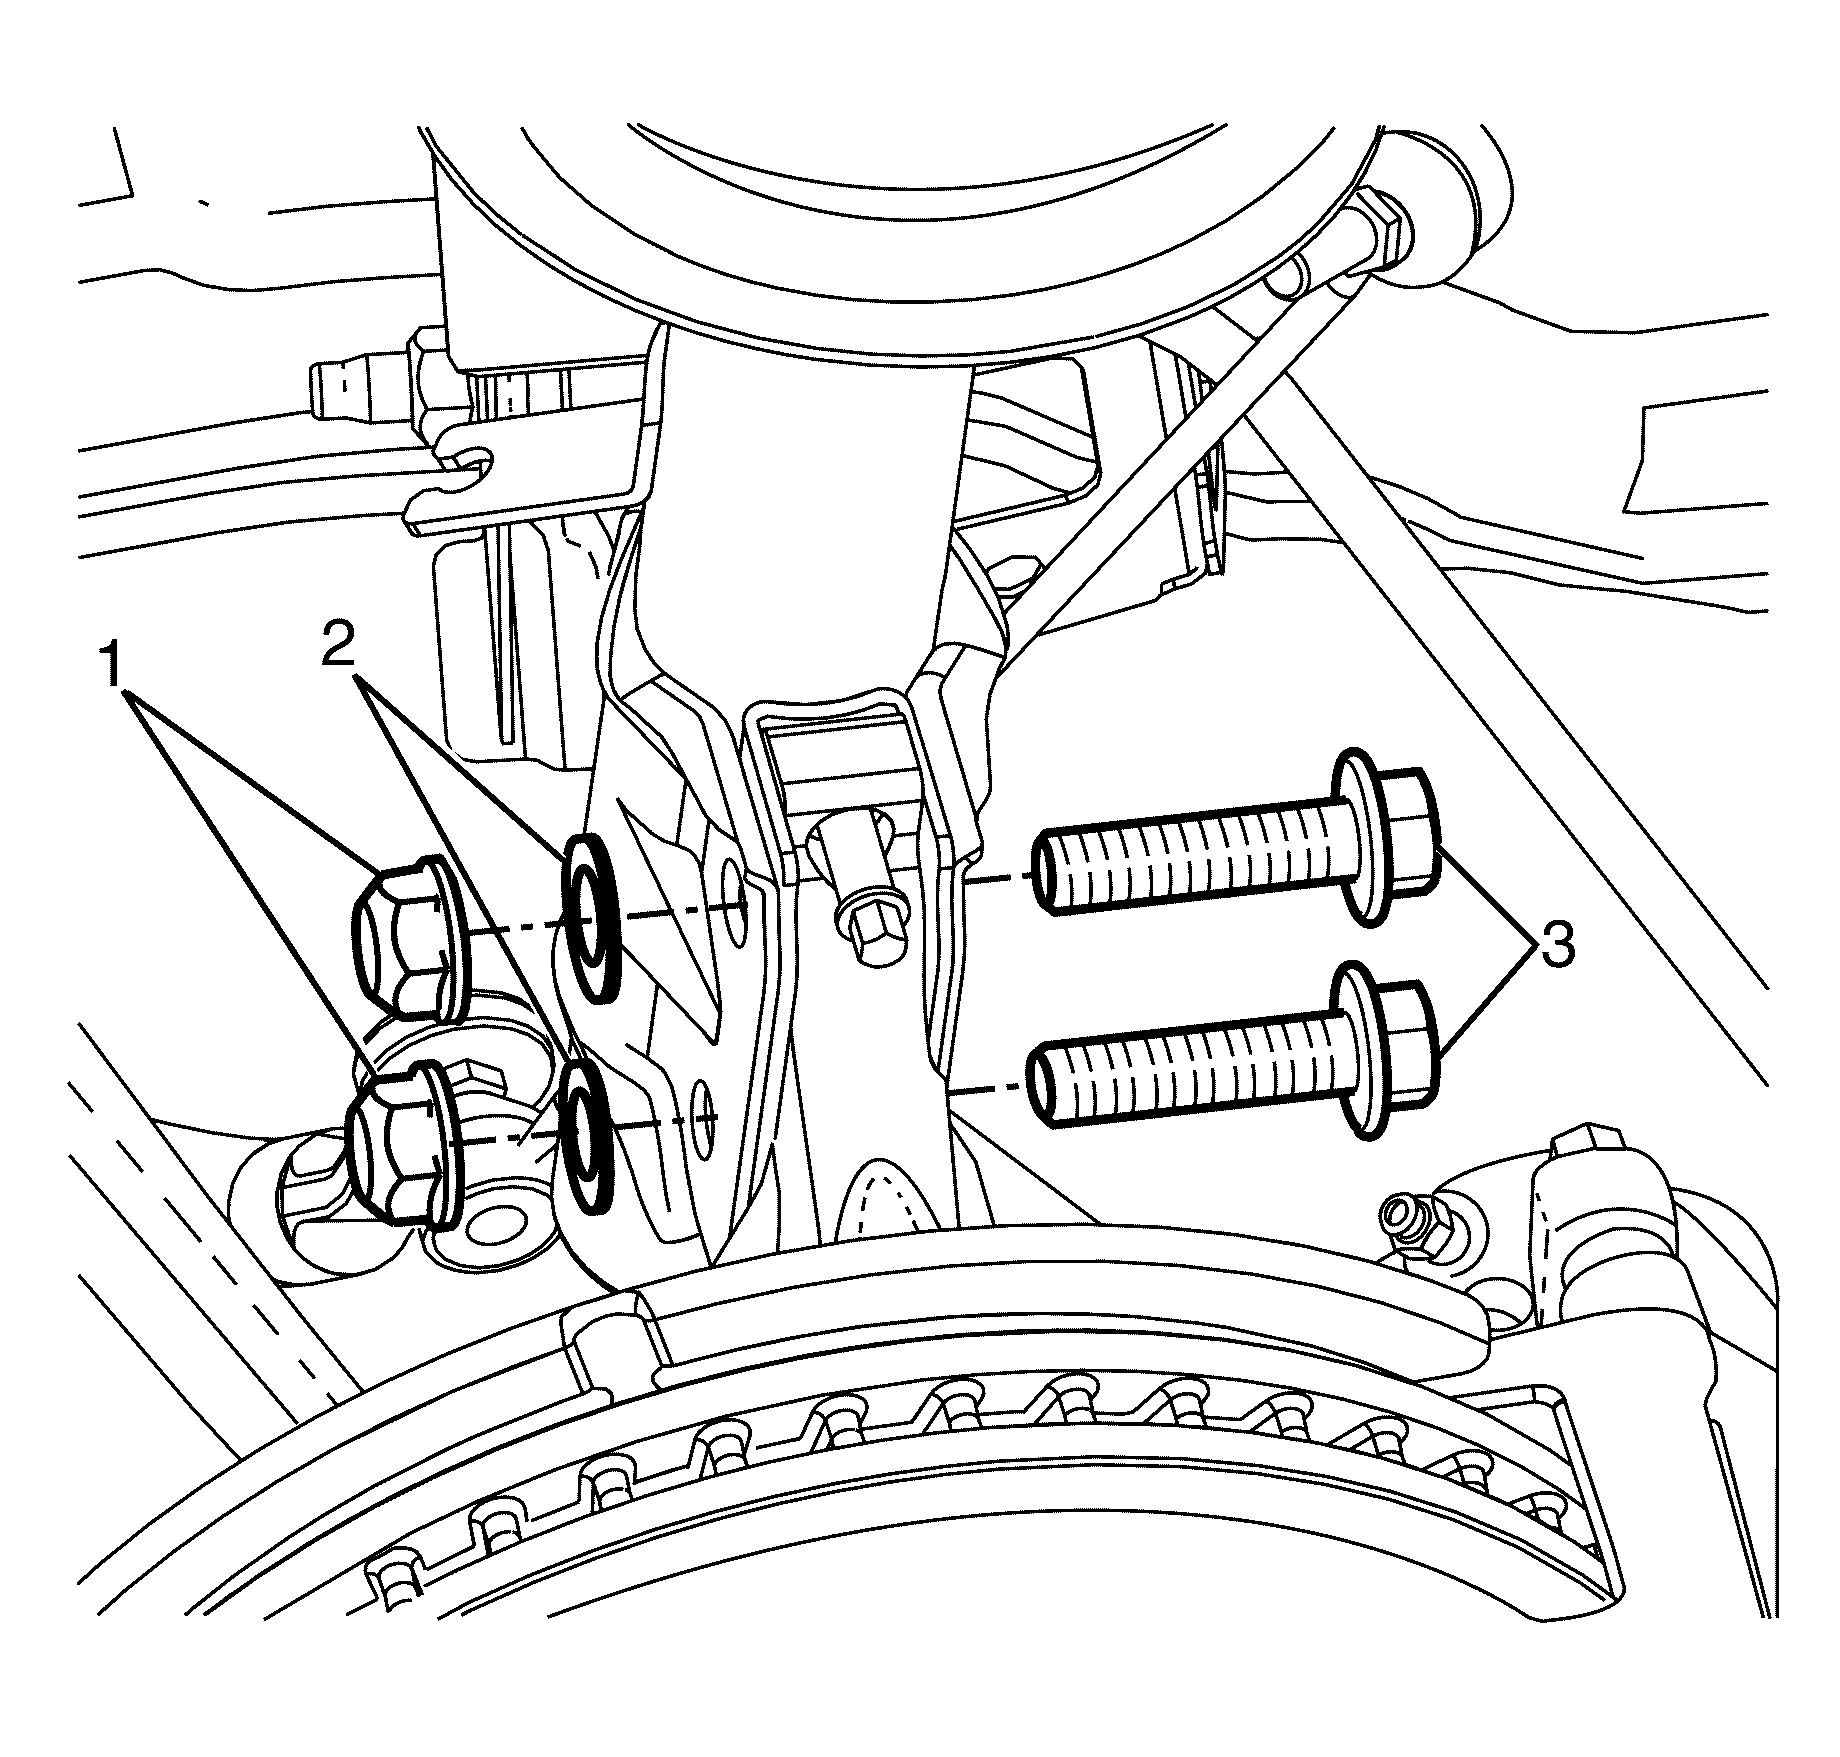
Important: The strut assembly to steering knuckle retaining bolts (3), nuts (1) and washers (2) are single use parts. They must be discarded after removal.
Discard the bolts, nuts and washers.
Important: The strut assembly to steering knuckle retaining bolts (2) and nuts (1) are not to be fully tightened until after the front camber has been adjusted.
Do not fully tighten at this stage.
Important: Before checking and adjusting any wheel alignment angles bounce the vehicle to settle the suspension to normal ride height.
Important: For accurate readings do not push or pull on the tyre and wheel assembly during the alignment process.

Discard the bolts and nuts.
Important: The front caster arm to subframe offset washers (1) are used to adjust the caster of the front suspension.
Do not fully tighten at this stage.
Notice: Refer to Fastener Notice in the Preface section.
Tighten
Tighten the nut to 50 N·m+ 120°
(30 lb ft + 120°).
Important: For accurate readings do not push or pull on the tyre and wheel assembly during the alignment process.
Tighten
| • | Tighten the bolts a first pass to 85 N·m (63 lb ft). |
| • | Tighten the bolts a second pass to 100 N·m (74 lb ft). |
| • | Tighten the bolts an additional 90 degrees. |
Front Caster and Camber Adjustment - From xx/xx
- Raise and support the vehicle. Refer to Lifting and Jacking the Vehicle .
- Remove the front wheel. Refer to Tire and Wheel Removal and Installation .
- Remove the strut assembly to steering knuckle retaining bolts (3), nuts (1) and washers (2).
- Install NEW strut assembly to steering knuckle retaining bolts (3), washers (2) and nuts (1).
- Install the front wheel. Refer to Tire and Wheel Removal and Installation .
- Remove the safety stands.
- Lower the vehicle to the ground.
- Bounce the vehicle several times to settle the suspension.
- Determine the actual caster angle (1).
- Remove the front caster arm to subframe retaining nut (3) and bolt (2).
- For caster specifications, Refer to Wheel Alignment Specifications .
- Install the NEW lower caster arm to the subframe retaining bolt (2).
- Install the NEW lower caster arm to the subframe retaining nut (4).
- Tighten the front caster arm to subframe retaining nut (4).
- Determine the actual camber, Positive (1) or Negative (2).
- For camber specifications, Refer to Wheel Alignment Specifications .
- Tighten the strut assembly to steering knuckle retaining bolts (2) and nuts (1).
- Verify that the caster and camber are still within specifications. Refer to Wheel Alignment Specifications .
- If further adjustment is required, adjust as necessary.
Caution: Refer to Vehicle Lifting Caution in the Preface section.
Important: The strut assembly to steering knuckle retaining bolts (3), nuts (1) and washers (2) are single use parts. They must be discarded after removal.
Discard the bolts, nuts and washers.
Important: The strut assembly to steering knuckle retaining bolts (2) and nuts (1) are not to be fully tightened until after the front camber has been adjusted.
Do not fully tighten at this stage.
Important: Before checking and adjusting any wheel alignment angles bounce the vehicle to settle the suspension to normal ride height.
Important: For accurate readings do not push or pull on the tyre and wheel assembly during the alignment process.
Discard the bolts and nuts.
Do not fully tighten at this stage.
Notice: Refer to Fastener Notice in the Preface section.
Tighten
Tighten the nut to 50 N·m+ 120°
(30 lb ft + 120°).
Important: For accurate readings do not push or pull on the tyre and wheel assembly during the alignment process.
Tighten
| • | Tighten the bolts a first pass to 85 N·m (63 lb ft). |
| • | Tighten the bolts a second pass to 100 N·m (74 lb ft). |
| • | Tighten the bolts an additional 90 degrees. |
