Because the runout of a tyre and wheel assembly will directly affect the amount of imbalance and radial force variation, it should be minimised. The smaller the amount of runout, the less imbalance and force variation. Radial and lateral runout can be corrected at the same time. There are two methods to measure runout of the tyre and wheel assemblies:
| • | On the vehicle (mounted to the hub), the wheel bearing must be in good condition. |
| • | Off the vehicle (mounted on a spin-type wheel balancer). Refer to Tire and Wheel Assembly Runout Measurement - Off Vehicle . |
Measuring the tyre and wheel runout off the vehicle is most accurate. It is usually easier to mount a dial indicator in the correct position and possibilities of inaccuracies are decreased. Once the runout has been measured and corrected off the vehicle, a quick visual check of runout on the vehicle will indicate if any further problems exist.
If there is a large difference in the runout measurements from on-vehicle to off-vehicle, then the runout problem is due to hub flange runout, refer to Front Wheel Hub Assembly Inspection , or a mounting problem between the wheel and the vehicle.
Before measuring or attempting to correct excessive runout, carefully check the tyre for an uneven bead seat. The distance from the edge of the ring to the concentric rim locating-ring should be equal around the entire circumference. If the beads are not seated correctly, the tyre should be remounted. Otherwise, excessive runout and imbalance will result.
If the runout of the wheel is within tolerance, and the tyre and wheel assembly runout cannot be reduced to an acceptable level by using the match-mounting technique, the tyre must be replaced. ALWAYS MEASURE THE TYRE AND WHEEL ASSEMBLY runout AFTER REPLACING THE TYRE.
The tolerances listed are to serve as guidelines. If runout measurements are within tolerance but are marginal, some sensitive vehicles may still be affected. It is always advisable to reduce runout to as little as possible in order to attain optimum results under all conditions.
Important: If the vehicle has been sitting in one place for a long time, flat spots may exist in the area where the tyre is in contact with ground. As the flat spots affect runout readings, they should be removed by driving the vehicle until the tyres reach normal operating temperature before conducting any runout measurements.
Tire and Wheel Runout Measurement - On-Vehicle
- Raise and support the vehicle. Refer to Lifting and Jacking the Vehicle .
- Inspect each tyre for correct and even bead seating.
- If any of the tyre beads are not correctly or evenly seated, reseat the tyre bead. Refer to Tire Dismounting and Mounting , then proceed to step 4.
- Wrap the circumference of each tyre with tape (1) in the center of the tread area.
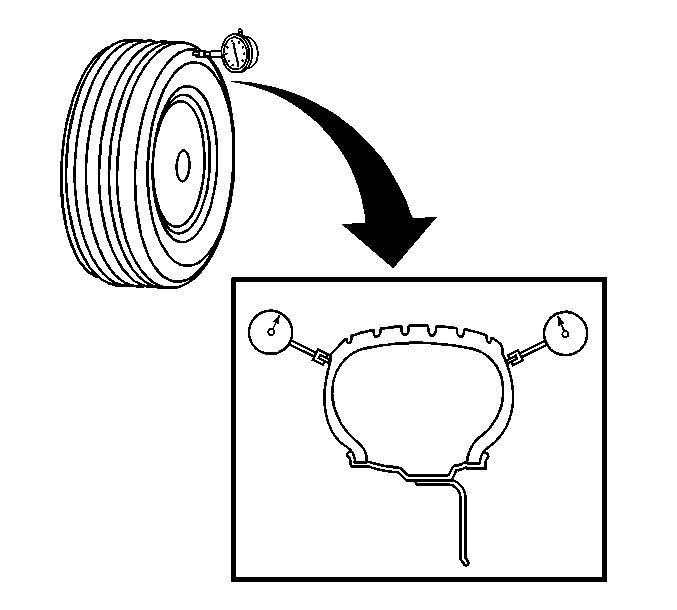
- Position a dial indicator fitted with a roller, on the taped portion of the tyre tread perpendicular to the surface.
- Slowly rotate the tyre and wheel assembly one complete revolution in order to find the low point.
- Set the dial indicator to zero at the low point.
- Slowly rotate the tyre and wheel assembly one more complete revolution and measure the total amount of radial runout.
- Position the dial indicator fitted with a roller on a smooth portion of the tyre sidewall, perpendicular to the surface, as close as possible to the tread area.
- Slowly rotate the tyre and wheel assembly one complete revolution in order to find the low point. Ignore any jumps or dips due to sidewall splices.
- Set the dial indicator to zero at the low point.
- Slowly rotate the tyre and wheel assembly one more complete revolution and measure the total amount of lateral runout. Ignore any jumps or dips due to sidewall splices and attain an average runout measurement.
- If required repeat steps 4 through 12 until all tyre and wheel assemblies, radial and lateral runout measurements have been taken.
- Remove the dial indicator
- Remove the safety stands.
- Lower the vehicle.
Caution: Refer to Safety Glasses Caution in the Preface section.
Caution: Refer to Vehicle Lifting Caution in the Preface section.
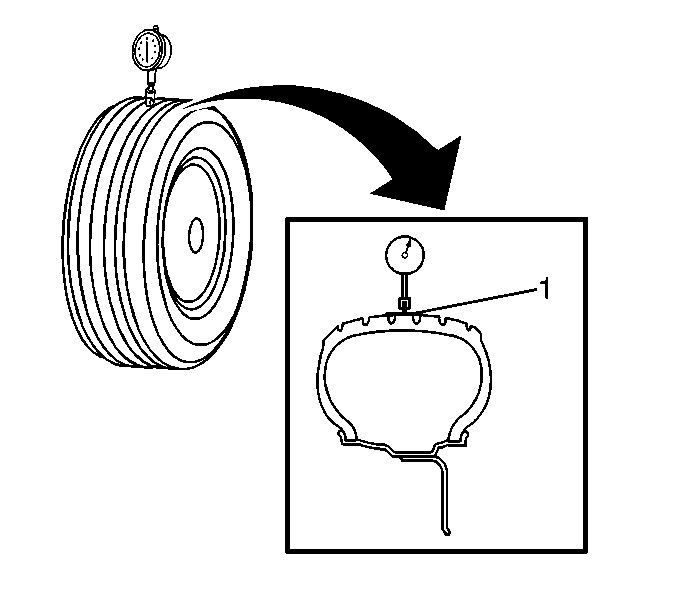
Important: Wrapping the tread with tape allows for a smooth and accurate reading of radial runout to be obtained.
Specification
Maximum tyre and wheel assembly radial runout -
measured on-vehicle: 1.52 mm (0.060 in)
Specification
Maximum tyre and wheel assembly lateral runout -
measured on-vehicle: 1.52 mm (0.060 in)
