Removal Procedure - (Omega)
- Remove the knee bolster. Refer to Knee Bolster Replacement .
- Remove the instrument panel (I/P) compartment. Refer to Instrument Panel Compartment Replacement .
- Remove the infotainment unit. Refer to Radio Replacement .
- Remove the centre console trim plate. Refer to Console Trim Plate Replacement .
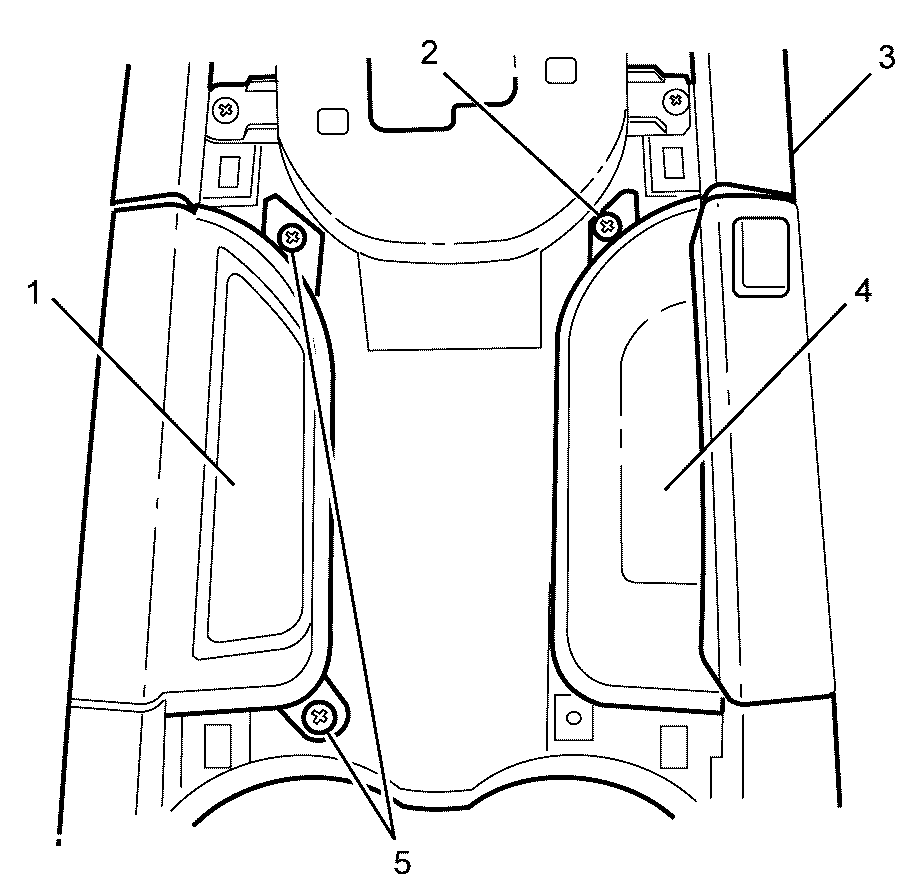
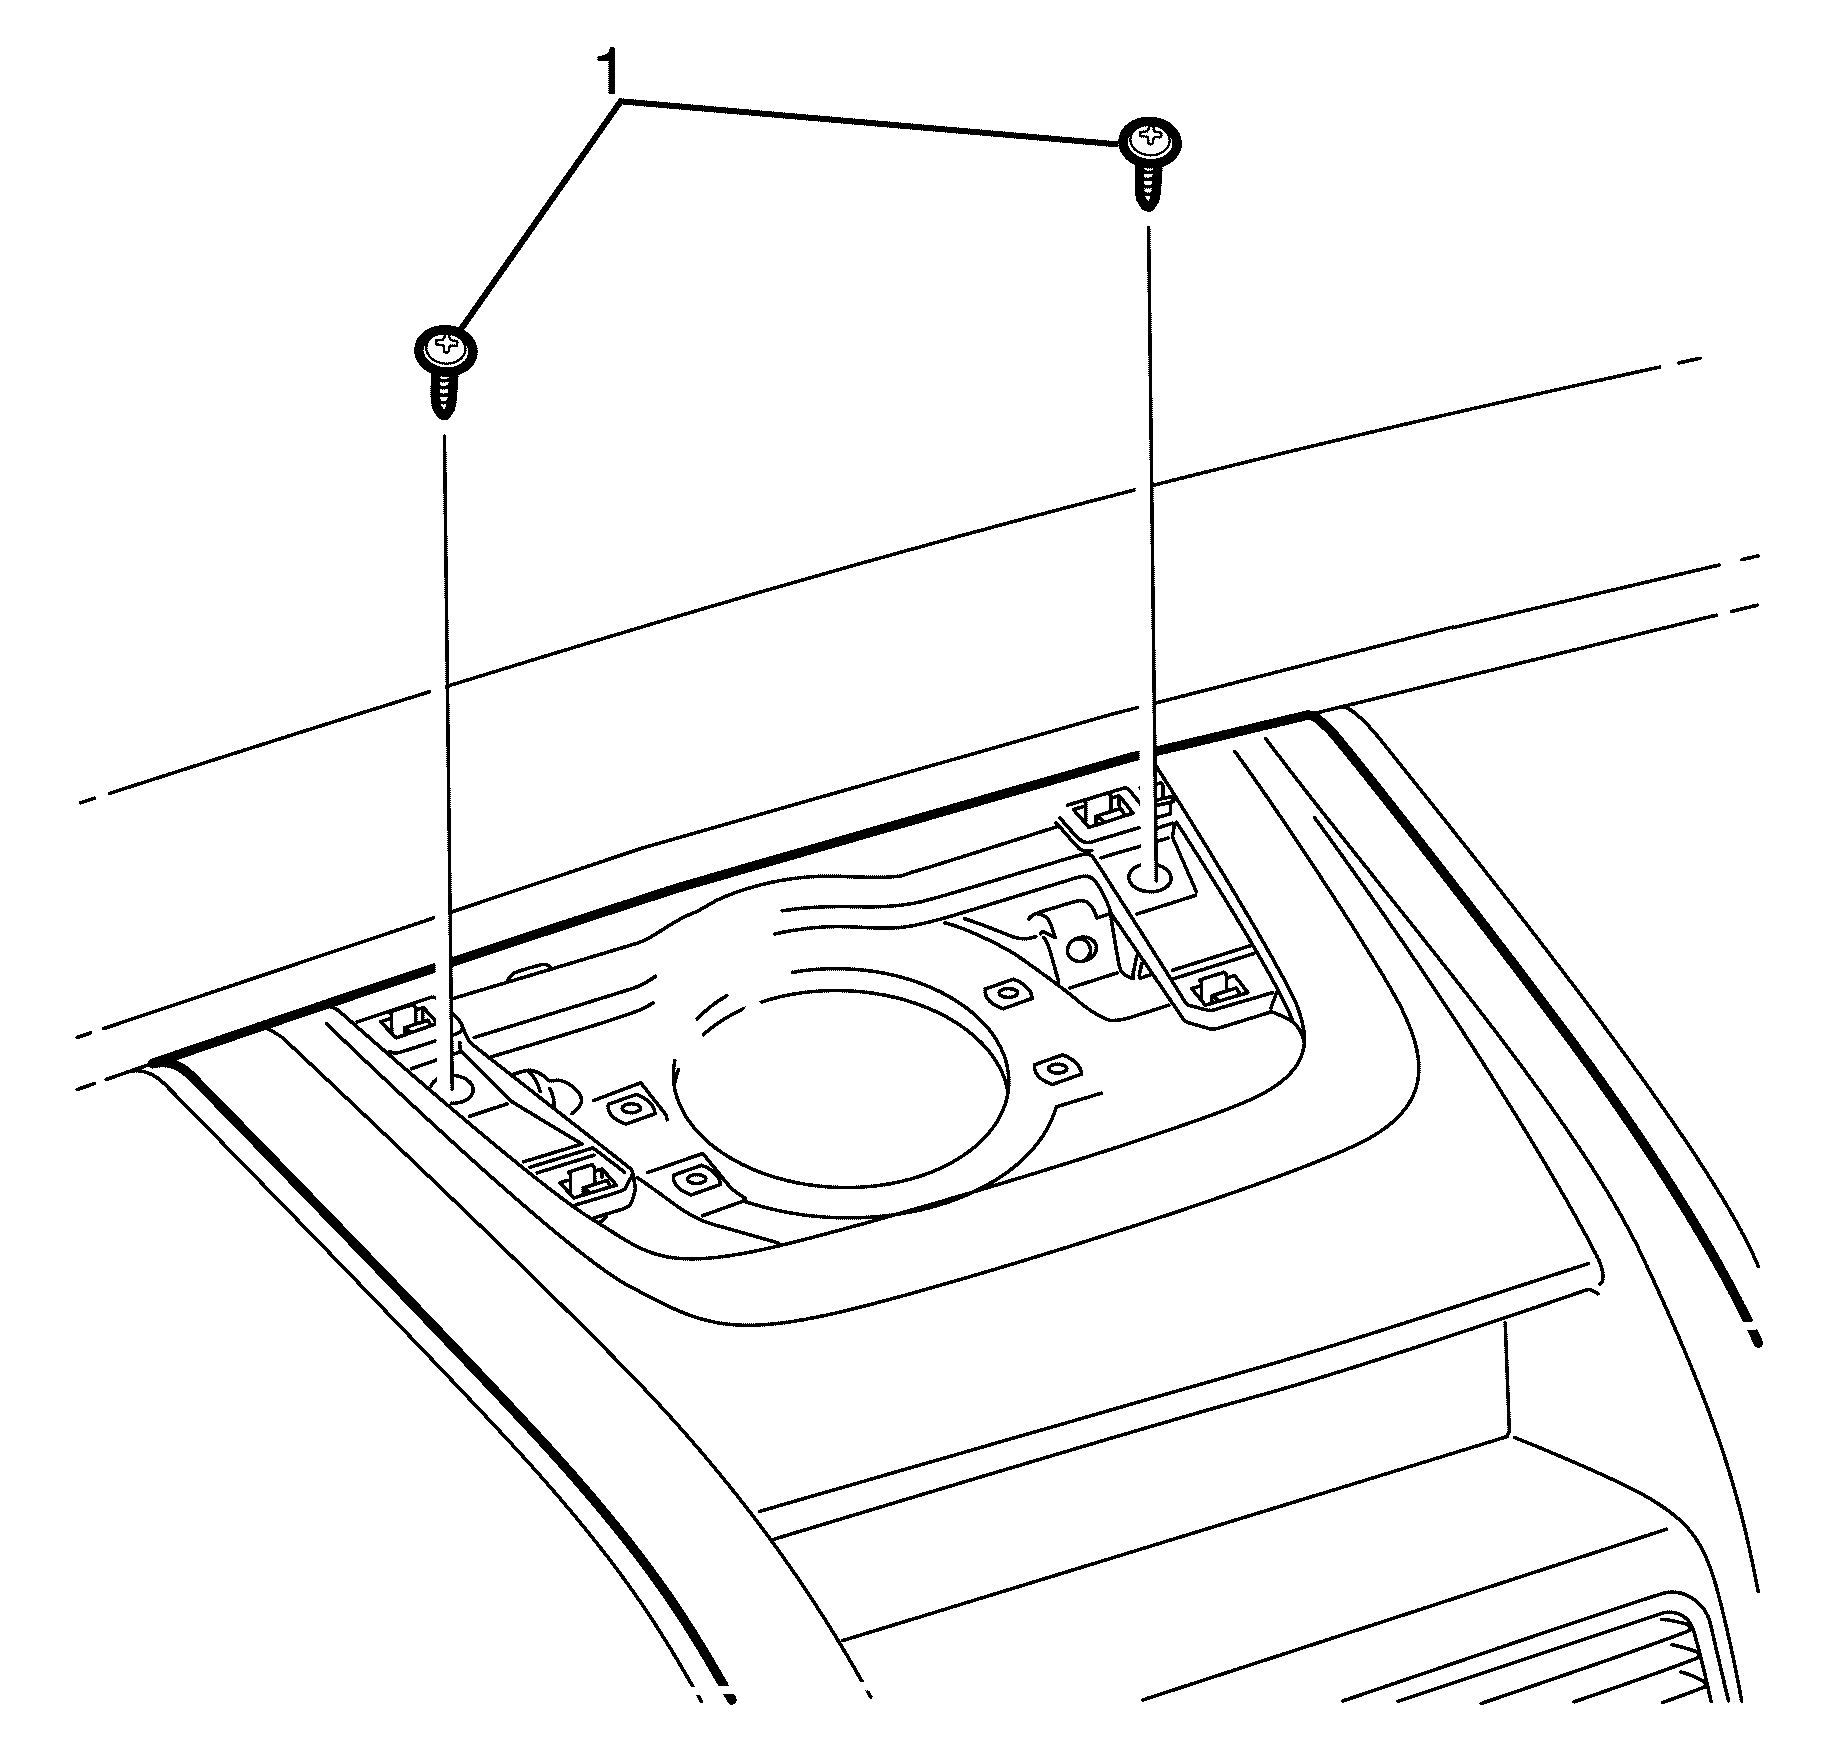
- Remove the coin holder upper retaining screws (5).
- Remove the coin holder (1) from the centre console (3).
- Remove the park brake recess tray upper retaining screw (2).
- Remove the recess trim (4) from the centre console (3).
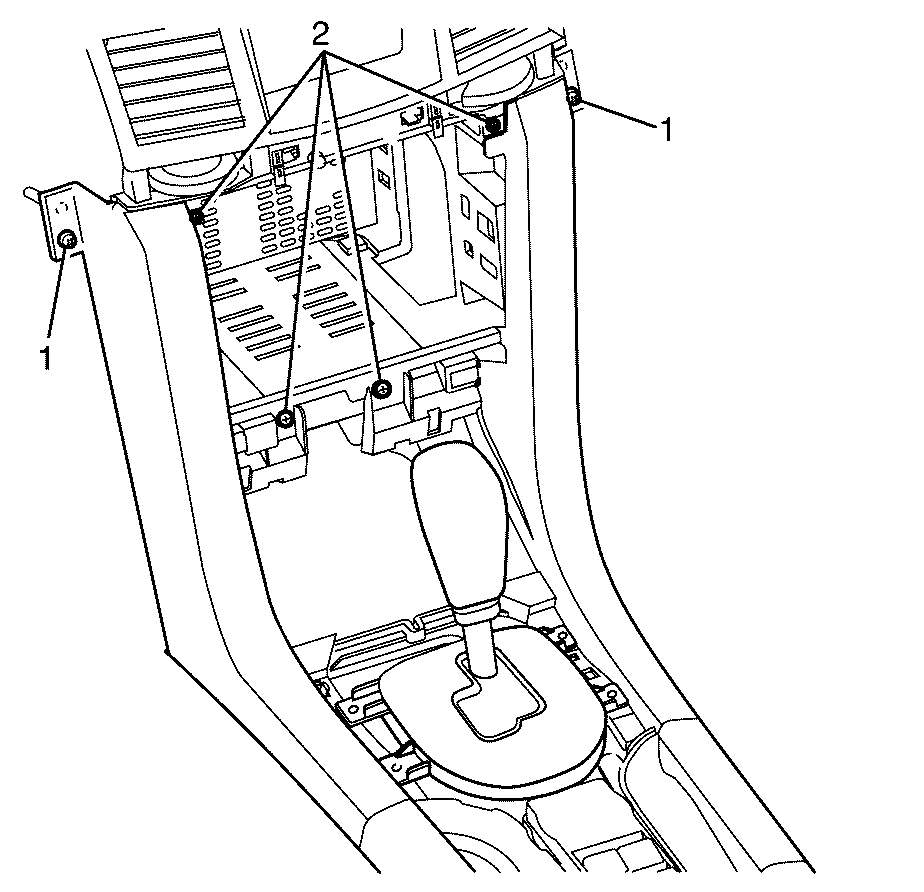
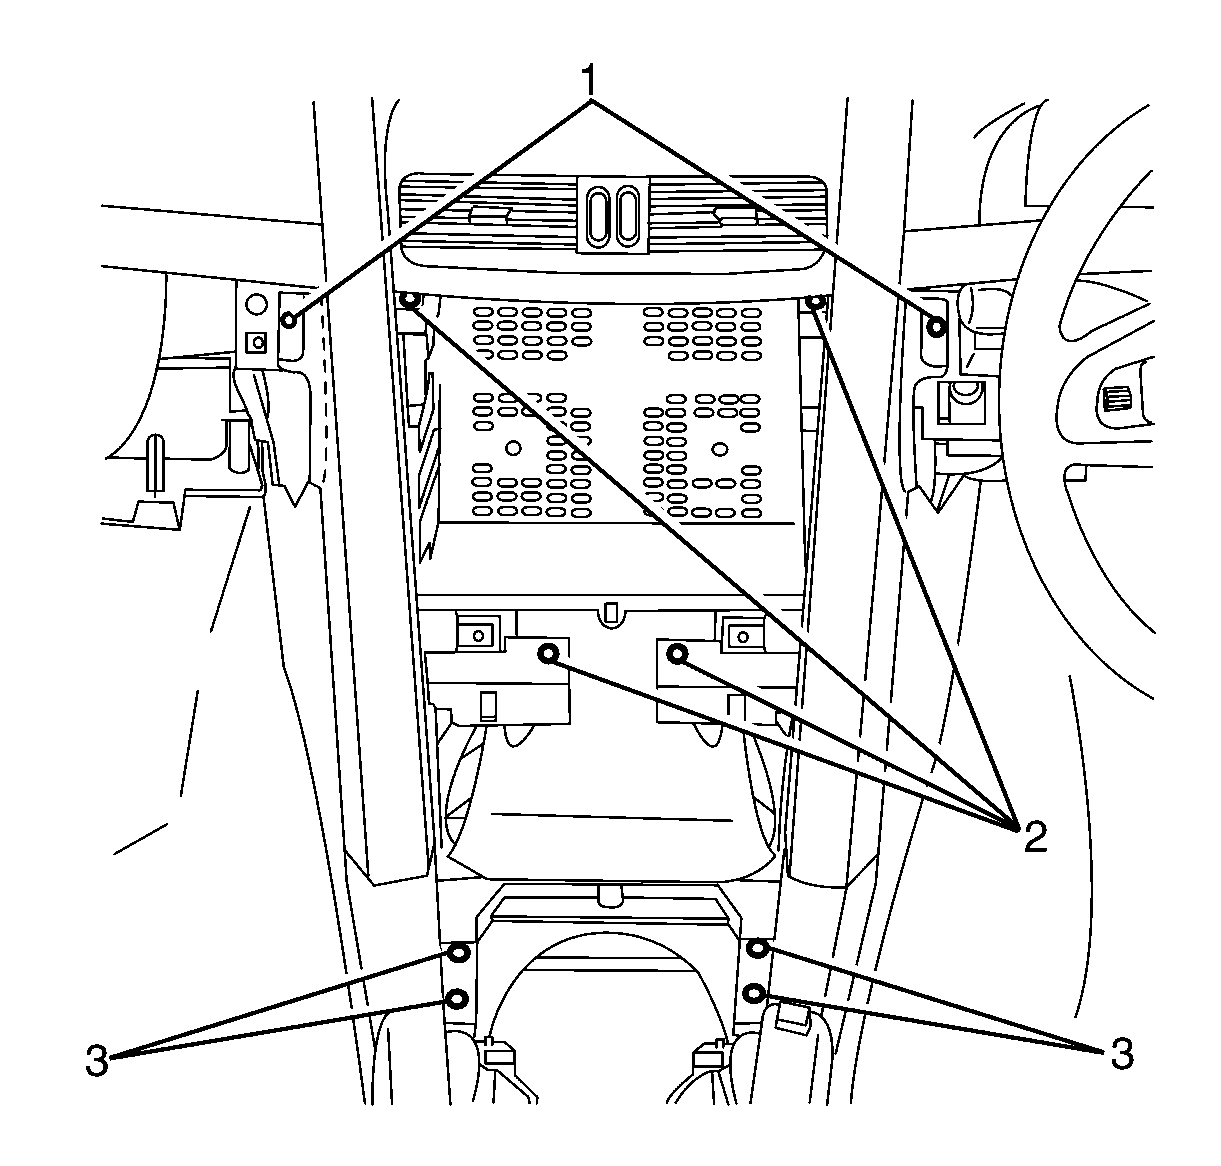
- Remove the I/P centre trim panel to I/P retaining screws (1).
- Remove the I/P centre trim panel to I/P retaining screws (2).
- Remove the I/P centre trim panel to floor shift selector retaining screws (1).
- Remove the I/P centre trim panel to floor shift selector retaining screws (2).
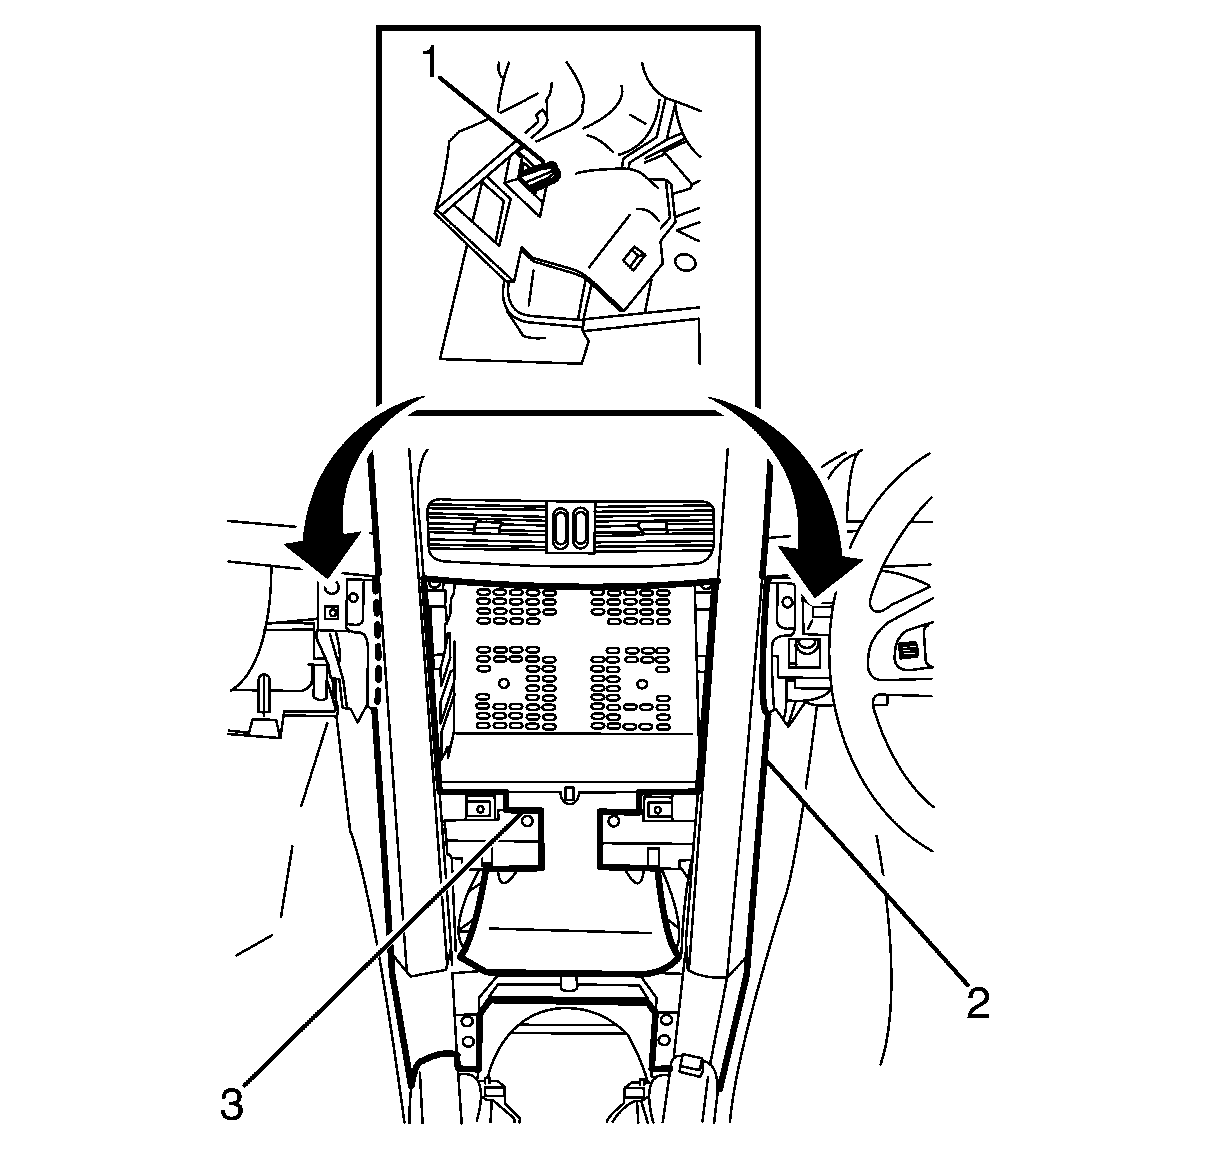
- Detach the I/P centre trim panel (2) from the I/P (3).
- Remove the I/P centre trim panel (2) from the vehicle.

Important: Step 11 is only to be performed for vehicles fitted with an automatic transmission.
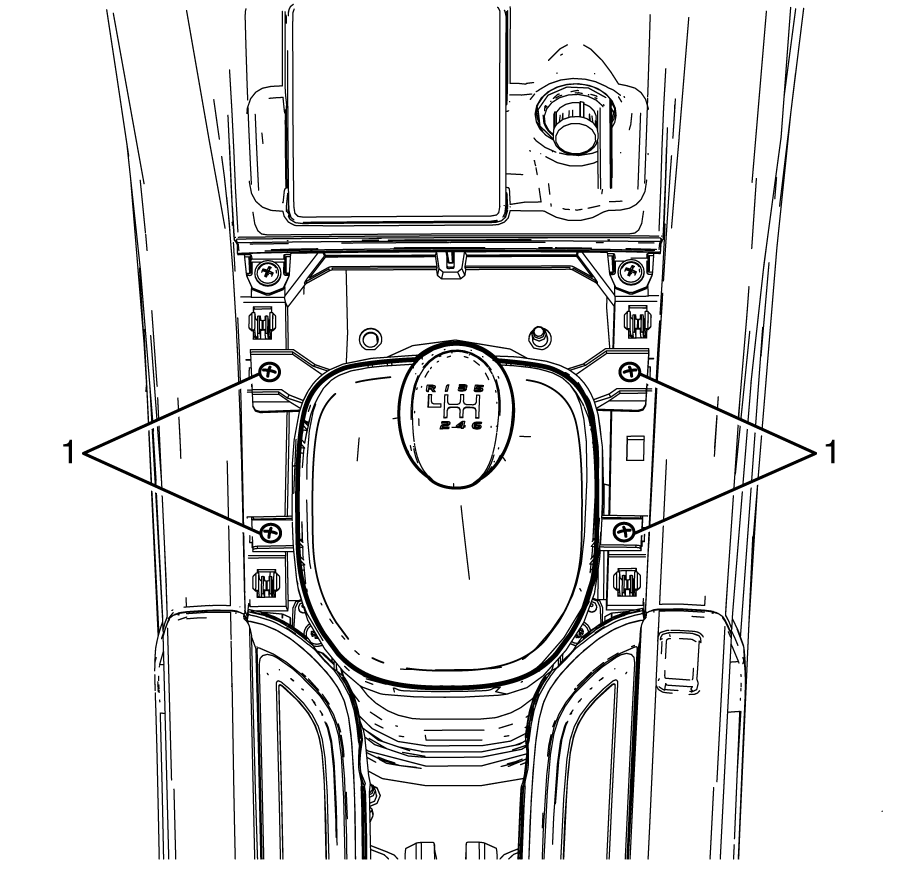
Important: Step 12 is only to be performed for vehicles fitted with a manual transmission.
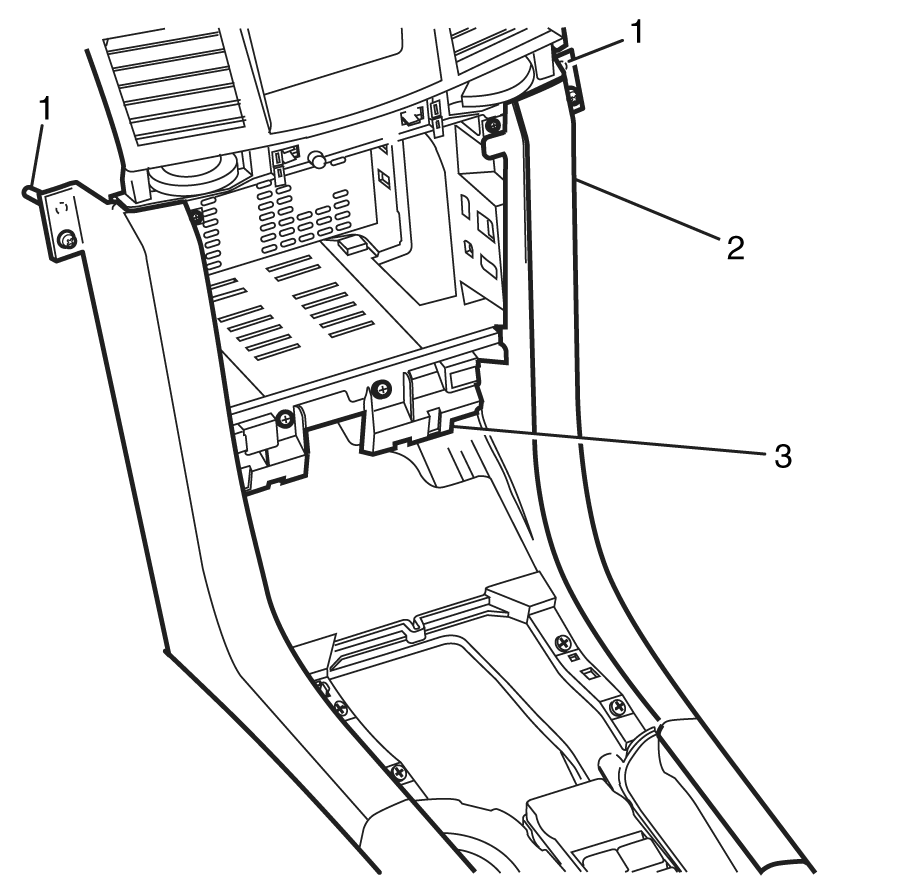
Important: Use care when detaching the I/P centre trim panel (2) from the I/P (3). Failure to do so may result in damage to the I/P centre trim panel to I/P locating pins (1).
Installation Procedure - (Omega)
- Install the I/P centre trim panel (2) to the I/P (3).
- Attach the I/P centre trim panel (2) to the I/P (3).
- Install the I/P centre trim panel to floor shift selector retaining screws (1).
- Install the I/P centre trim panel to floor shift selector retaining screws (2).
- Install the I/P centre trim panel to I/P retaining screws (1).
- Install the I/P centre trim panel to I/P retaining screws (2).
- Install the coin holder (1) to the centre console (3).
- Install the coinholder upper retaining screws (5).
- Install the park brake recess trim (4) to the centre console (3).
- Install the park brake recess trim upper retaining screw (2).
- Install the infotainment unit. Refer to Radio Replacement .
- Install the instrument panel compartment. Refer to Instrument Panel Compartment Replacement .
- Install the knee bolster. Refer to Knee Bolster Replacement .
- Install the centre console trim plate. Refer to Console Trim Plate Replacement .
Important: Make sure the I/P centre trim panel to I/P locating pins (1) are correctly aligned with the I/P (3) when attaching the I/P centre trim panel (2) to the I/P (3). Failure to do so may result in damage to the I/P centre trim panel to I/P locating pins (1).
Notice: Refer to Fastener Notice in the Preface section.
Important: Step 3 is only to be performed for vehicles fitted with an automatic transmission.
Tighten
Tighten the screws to 2 N·m (18 lb in).
Important: Step 4 is only to be performed for vehicles fitted with a manual transmission.
Tighten
Tighten the screws to 2 N·m (18 lb in).
Tighten
Tighten the screws to 2 N·m (18 lb in).
Tighten
Tighten the screws to 2 N·m (18 lb in).
Tighten
Tighten the screws to 2 N·m (18 lb in).
Tighten
Tighten the screw to 2 N·m (18 lb in).
Removal Procedure - (SV6, SS and SS-V)
- Remove the knee bolster. Refer to Knee Bolster Replacement .
- Remove the instrument panel (I/P) compartment. Refer to Instrument Panel Compartment Replacement .
- Remove the infotainment unit. Refer to Customer Concern Verification Sheets .
- Remove the centre console trim plate. Refer to Console Trim Plate Replacement .
- Remove the coin holder upper retaining screws (5).
- Remove the coin holder (1) from the centre console (3).
- Remove the park brake recess tray upper retaining screw (2).
- Remove the recess trim (4) from the centre console (3).
- Remove the upper I/P centre trim panel to I/P pad retaining screws (1).
- Remove the I/P centre trim panel to I/P retaining screws (1).
- Remove the I/P centre trim panel to I/P retaining screws (2).
- Remove the I/P centre trim panel to centre console retaining screws (3).
- Detach the I/P centre trim panel (2) from the I/P (3).
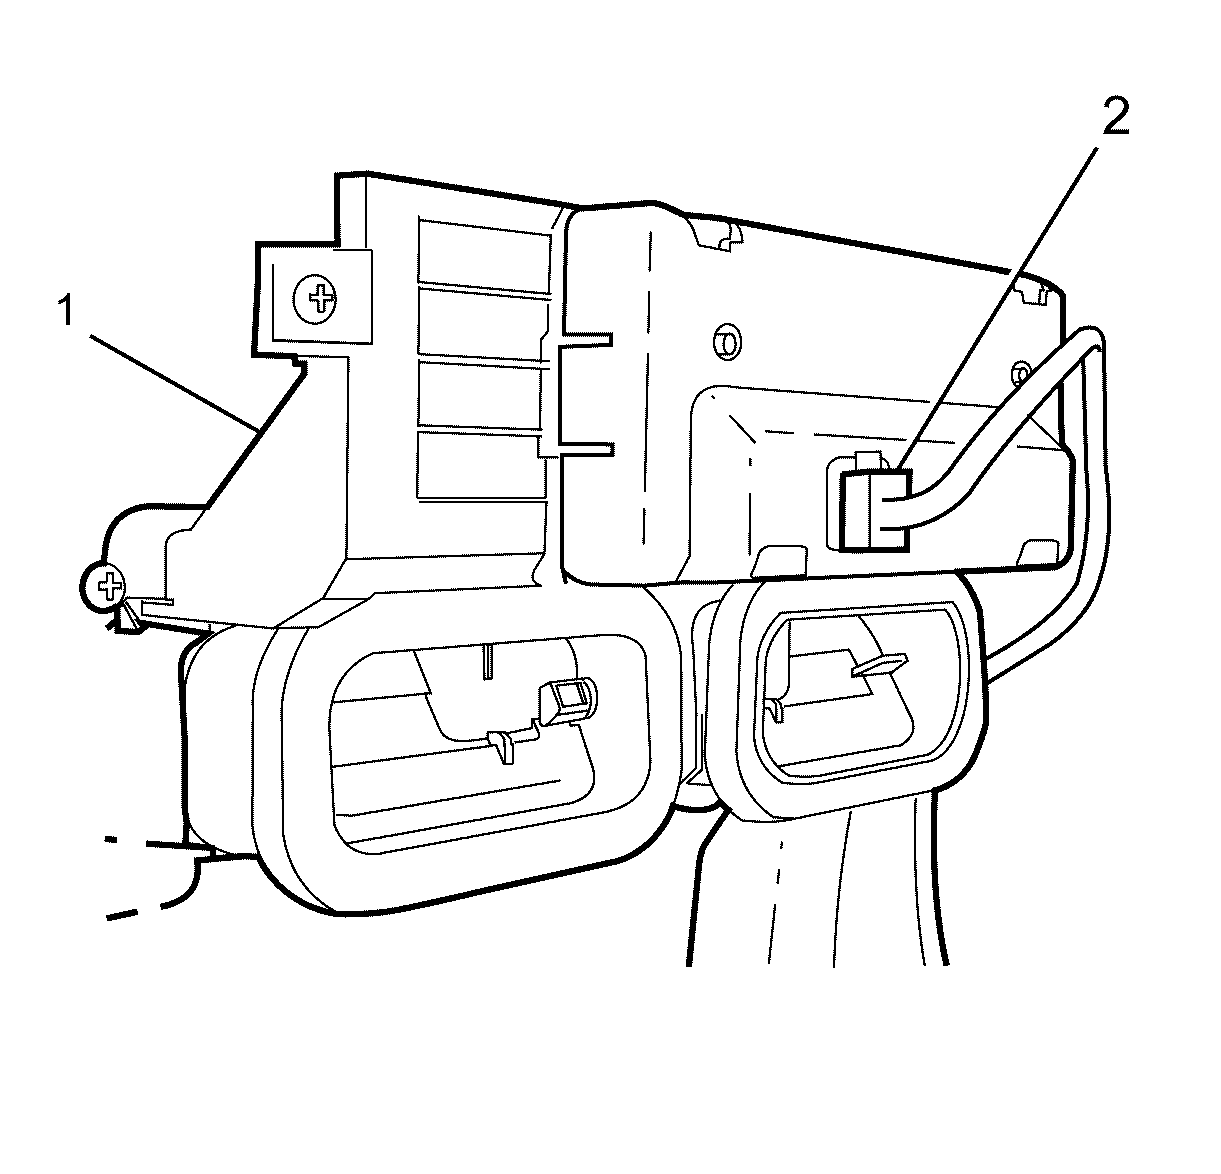
- Detach the I/P centre trim panel (1) from the I/P (3)
- Disconnect the multi function display unit electrical connector (2).
- Remove the I/P centre trim panel (1).
Important: Use care when detaching the I/P centre trim panel (2) from the I/P (3). Failure to do so may result in damage to the I/P centre trim panel to I/P locating pins (1).
Important: Lift the trim panel upward and rearward to detach the I/P centre trim panel (2) from the I/P (3).
Position the I/P centre trim panel (1) rearward of the I/P (3).
Installation Procedure - (SV6, SS and SS-V)
- Position the I/P centre trim panel (1) in the vehicle.
- Connect the multi function display unit electrical connector (2).
- Attach the I/P centre trim panel (2) to the I/P (3).
- Install the I/P centre trim panel to I/P retaining screws (1).
- Install the I/P centre trim panel to I/P retaining screws (2).
- Install the I/P centre trim panel to centre console retaining screws (3).
- Install the upper I/P centre trim panel to I/P pad retaining screws (1).
- Install the coinholder (1) to the centre console (3).
- Install the coinholder upper retaining screws (5).
- Install the park brake recess trim (4) to the centre console (3).
- Install the park brake recess trim upper retaining screw (2).
- Install the infotainment unit. Refer to Customer Concern Verification Sheets .
- Install the instrument panel compartment. Refer to Instrument Panel Compartment Replacement .
- Install the knee bolster. Refer to Knee Bolster Replacement .
- Install the centre console trim plate. Refer to Console Trim Plate Replacement .
Important: Make sure the I/P centre trim panel to I/P locating pins (1) are correctly aligned with the I/P (3) when attaching the I/P centre trim panel (2) to the I/P (3). Failure to do so may result in damage to the I/P centre trim panel to I/P locating pins (1).
Notice: Refer to Fastener Notice in the Preface section.
Tighten
Tighten the screws to 2 N·m (18 lb in).
Tighten
Tighten the screws to 2 N·m (18 lb in).
Tighten
Tighten the screws to 2 N·m (18 lb in).
Tighten
Tighten the screws (1) to 2 N·m (18 lb in).
Tighten
Tighten the screws to 2 N·m (18 lb in).
Tighten
Tighten the screw to 2 N·m (18 lb in).
