Service Engine Soon (SES) Light Illuminated, Multiple Powertrain Control Module (PCM) Diagnostic Trouble Code (DTC) P1404 and/or P0404 (Install EGR Valve Kit and Reprogram PCM)

| Subject: | Service Engine Soon (SES) Light Illuminated, Multiple Powertrain Control Module (PCM) Diagnostic Trouble Code (DTC) P1404 and/or P0404 (Install EGR Valve Kit and Reprogram PCM) |
| Models: | 2005-2006 Buick Rendezvous Built Prior to December 5, 2005 |
| 2005-2006 Buick Terraza Built Prior to January 11, 2006 |
| 2005-2006 Chevrolet Uplander Built Prior to January 11, 2006 |
| 2005-2006 Pontiac Montana SV6 Built Prior to January 11, 2006 |
| 2005-2006 Saturn Relay Built Prior to January 11, 2006 |
| with 3.5L V6 Engine (VIN L - RPO LX9) |
This bulletin is being revised to update the information. Please discard Corporate Bulletin Number 06-06-04-003C (Section 06 -- Engine/Propulsion System).
Condition
Some customers may comment on a Service Engine Soon (SES) light illuminated on the instrument cluster. Some vehicles may have previously been serviced for this same condition. Technicians may also find a DTC P1404 and/or DTC P0404, which may have led to previous exhaust gas recirculation (EGR) valve and PCM replacements.
Correction
Important: The EGR Valve Kit, P/N 89018174, has the following parts required to perform an EGR System changeover for the vehicles listed in this bulletin only. Please be advised that some early produced kits may contain an instruction sheet that has an error in the wiring portion of the procedure. Therefore, it is advised that the instructions included in the kit be discarded and that only the instructions contained in this bulletin be used .
| • | EGR Valve -- P/N 12581876 |
| • | EGR Gasket -- P/N 12593632 |
| • | Pipe Assembly, EGR Valve -- P/N 12602651 |
| • | Wiring Harness Connector, EGR Valve (includes terminals and wire leads) -- P/N 15306175 |
Important: This EGR valve kit is used to convert a Delphi EGR valve equipped LX9 engine used in the Chevrolet Uplander, Pontiac Montana SV6, Buick Rendezvous, Buick Terraza and Saturn Relay to a Siemens valve. This kit contains all the necessary parts for conversion. The Powertrain Control Module (PCM) calibration must be updated for a Siemens EGR valve to work correctly. Failure to install an updated calibration when using this conversion kit may cause PCM diagnostic codes to set, resulting in a Service Engine Soon indicator lamp to illuminate.
EGR Valve Identification
Siemens EGR Valve
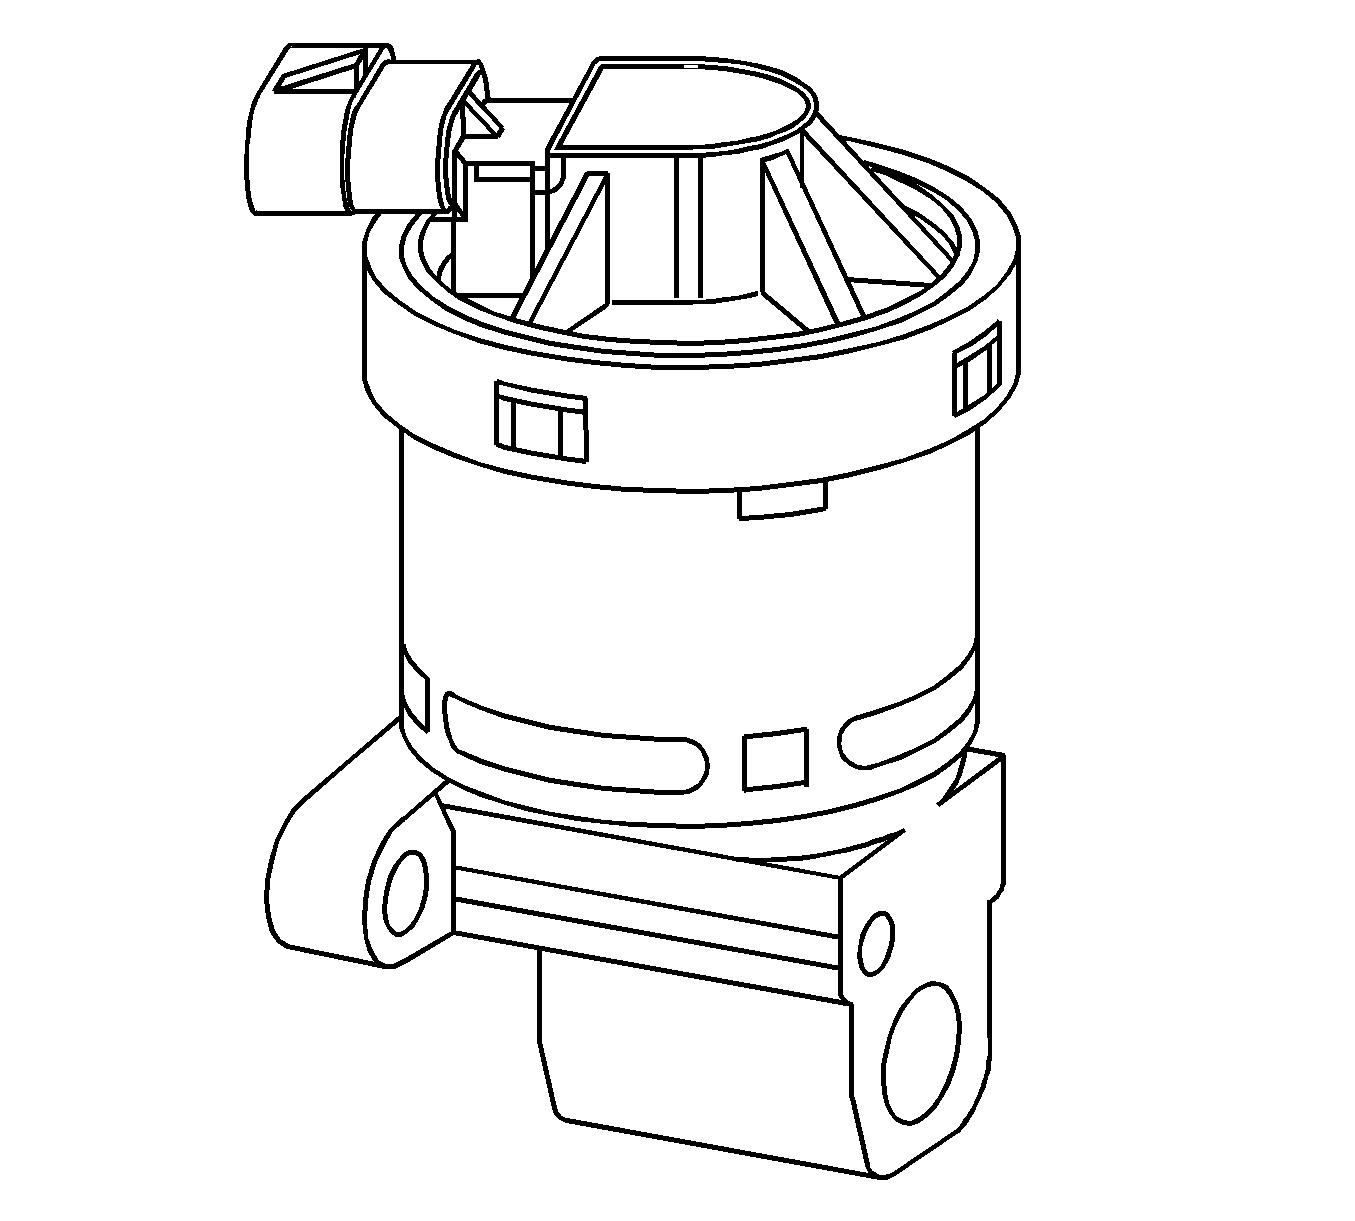
Delphi EGR Valve

Siemens EGR valves have a horizontal electrical connector. Delphi EGR valves have a vertical electrical connector. If a Siemens valve is already installed, it is not necessary to install this kit. Individual components are serviced.
Install the parts listed in this bulletin using the following procedure:
- Disconnect the negative battery cable at the battery.
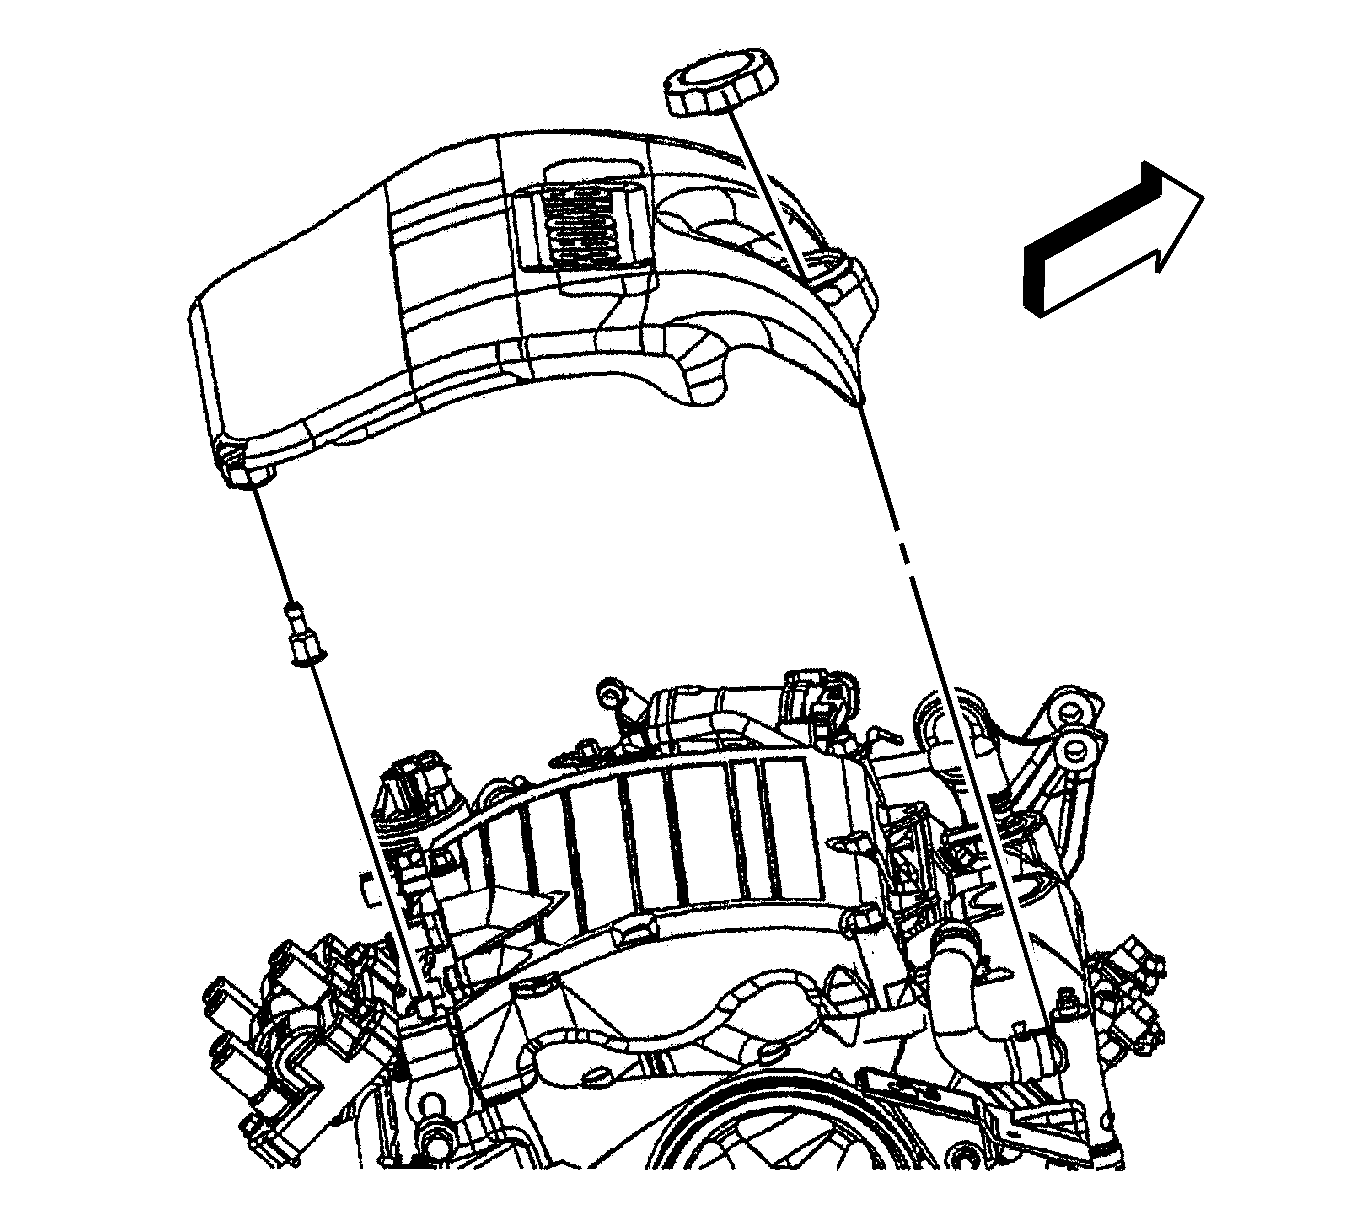
- Remove the intake manifold cover if equipped by removing the engine oil fill cap and pull up on the cover in order to disengage the cover from the stud. If the vehicle is not equipped with the intake manifold cover, then proceed to step number 3.
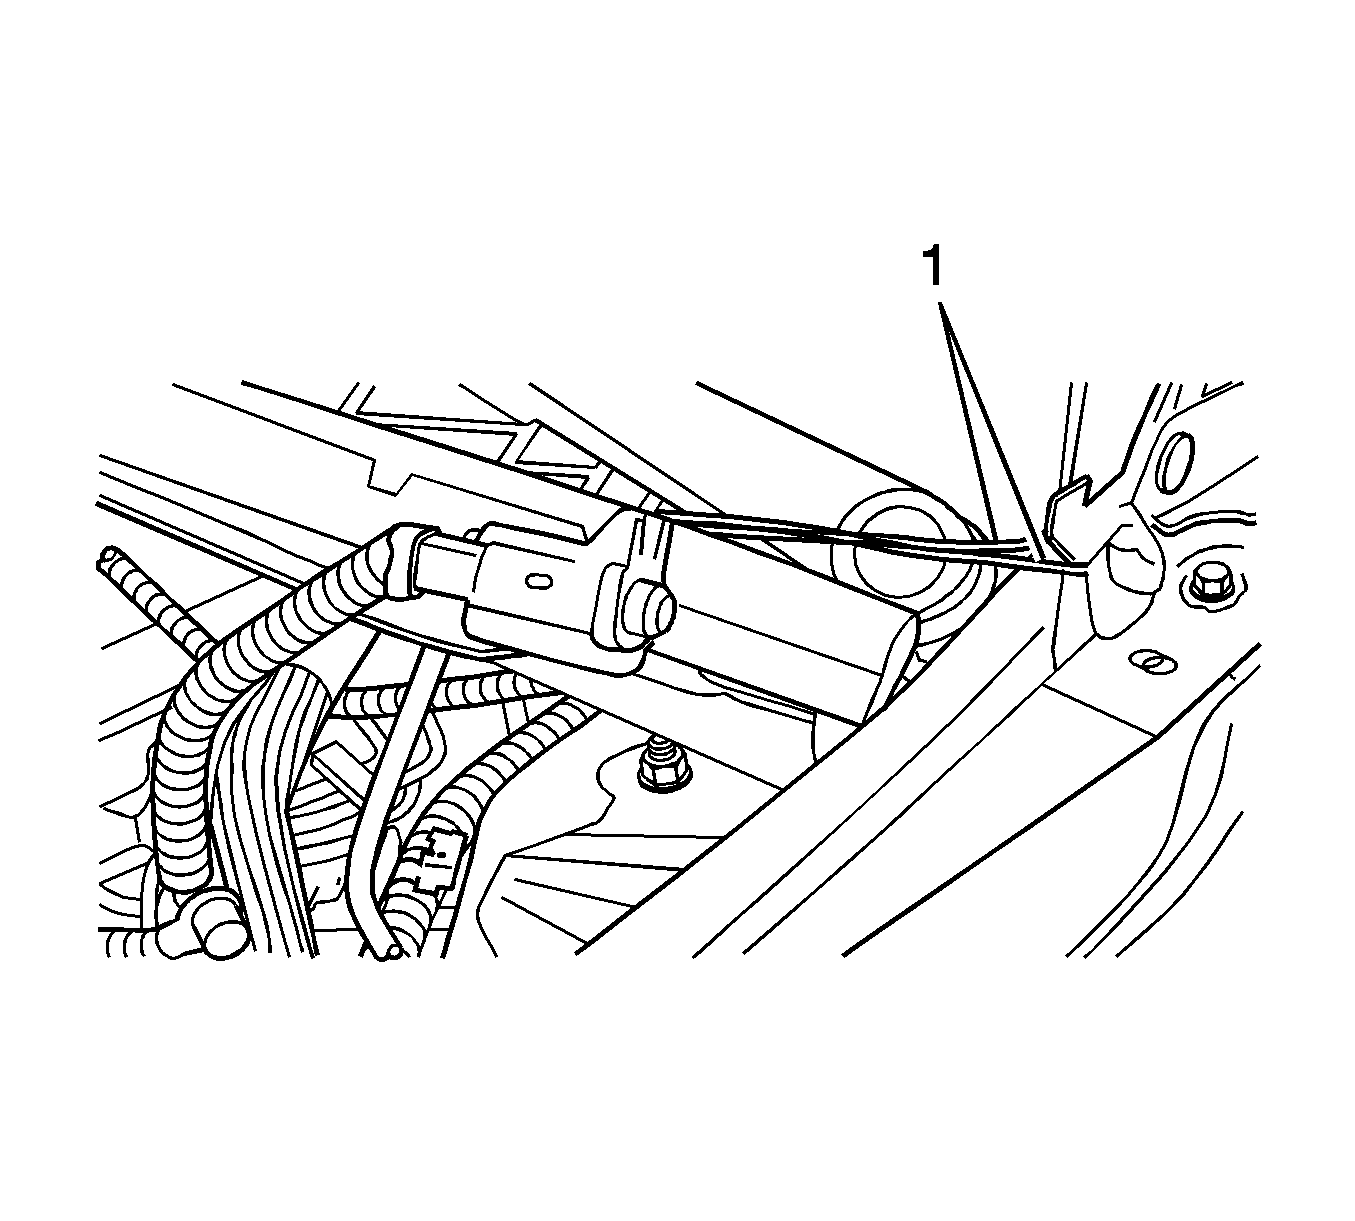
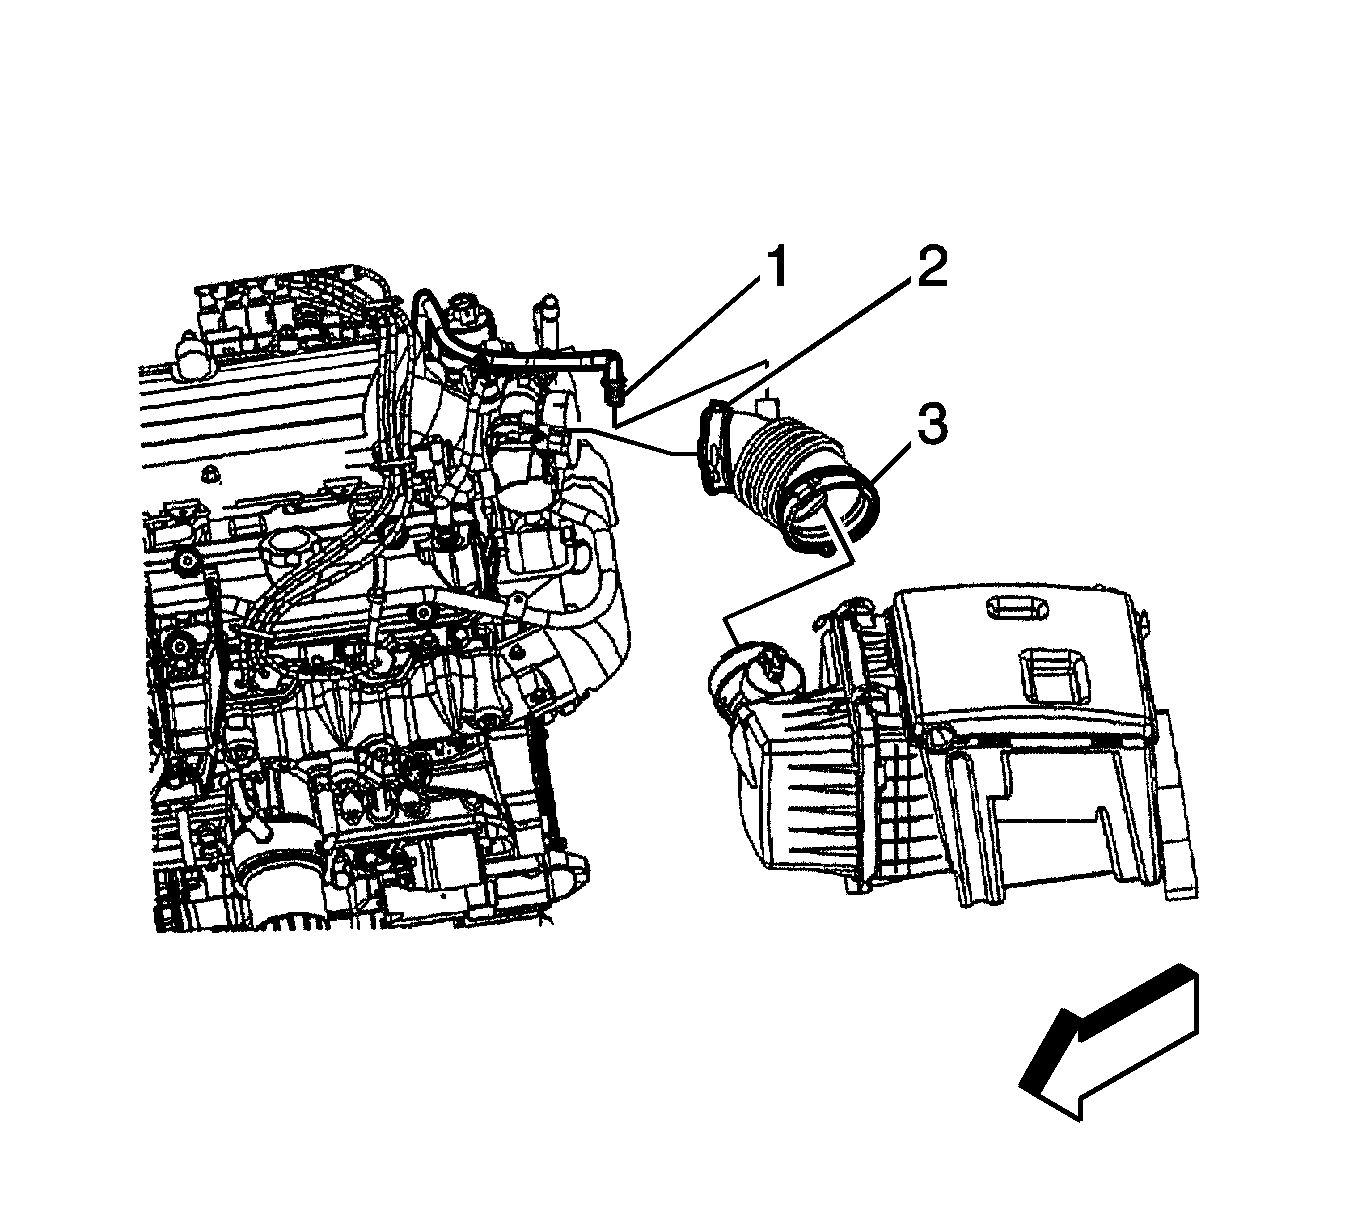
- Disconnect the EVAP purge solenoid electrical connector and remove the bolt. Remove the EVAP purge solenoid from the engine and reposition and secure the EVAP purge solenoid with mechanic wire (1).
- Remove the positive crankcase ventilation (PCV) fresh air tube (1) from the air cleaner outlet duct and the back of the engine, then remove PCV fresh air tube from the vehicle.
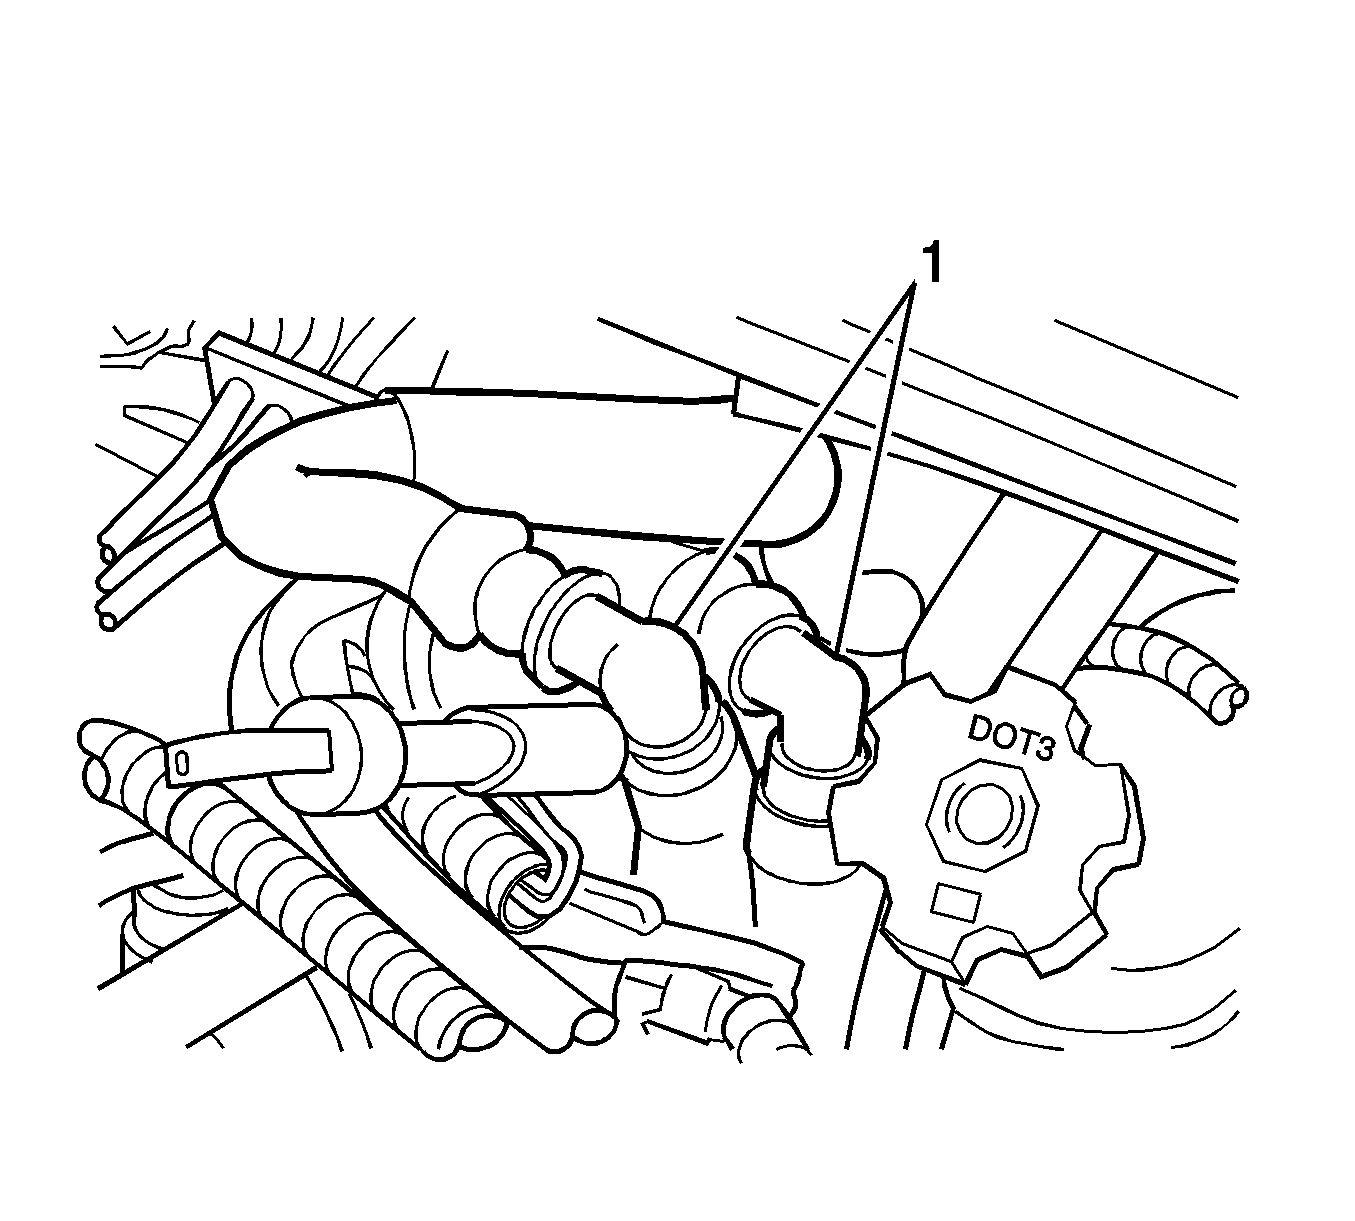
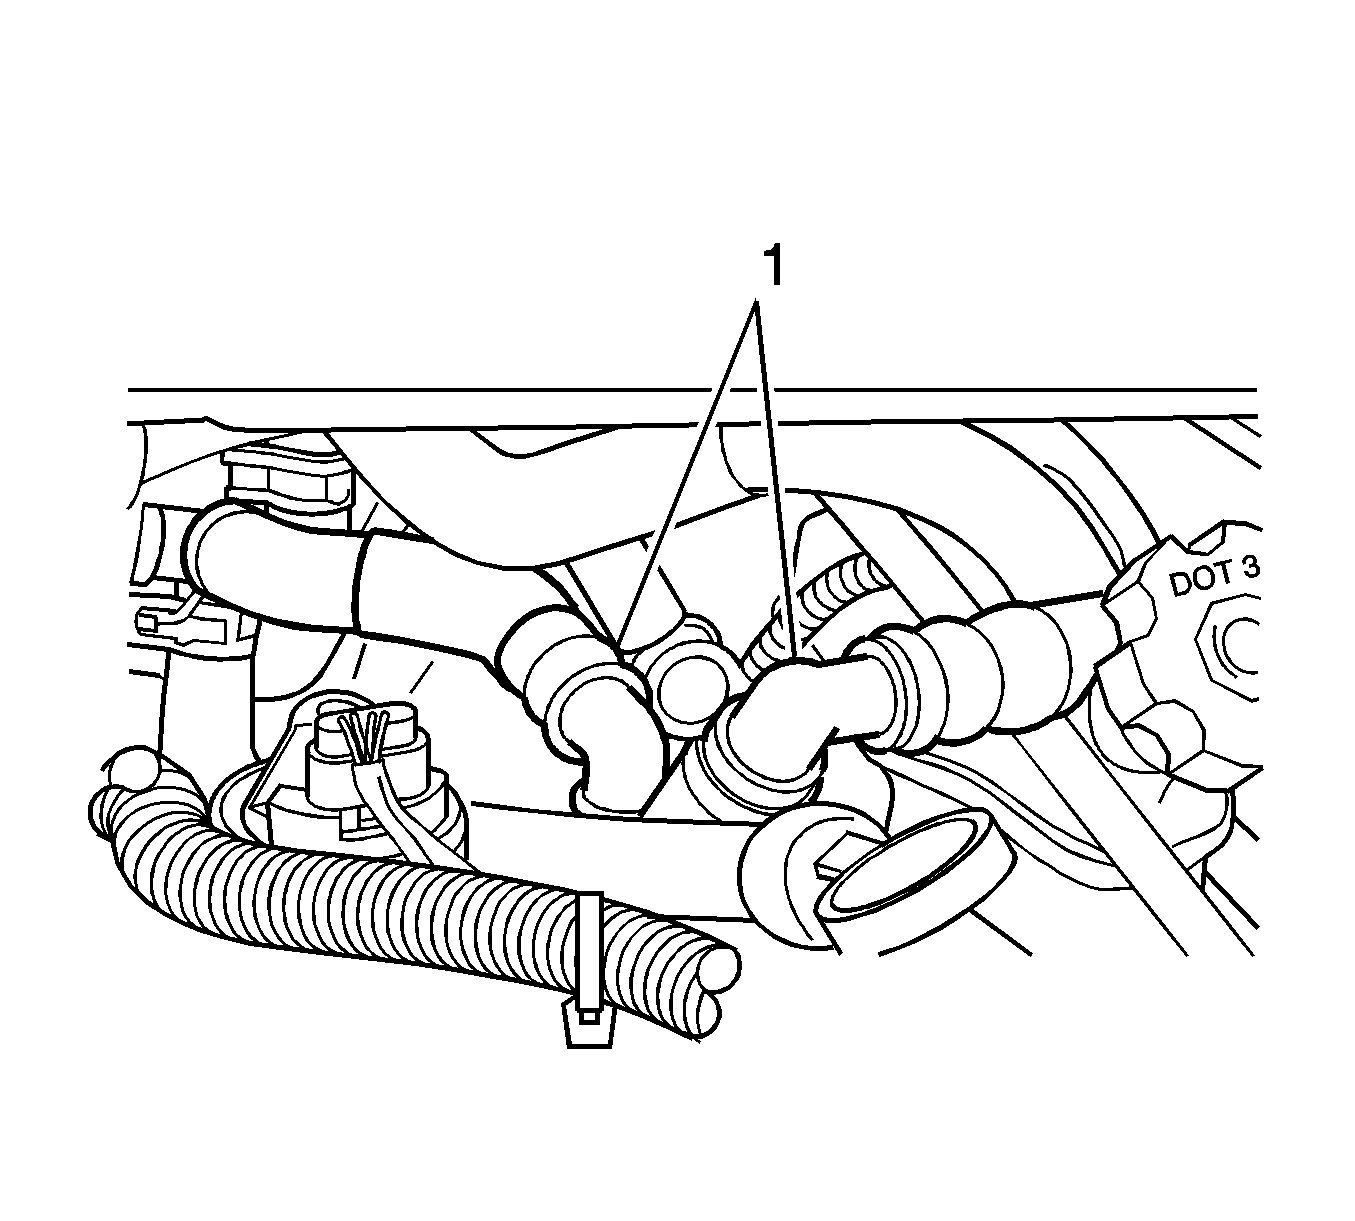
- Rotate the heater hoses (1) away from the EGR valve.
- With the heater hoses rotated (1) you now have access to the EGR valve.
- Remove the EGR valve pipe bolt (3) and carefully pull the pipe assembly back.
- Raise and support the vehicle. Refer to Lifting and Jacking the Vehicle in SI.
- Unscrew the EGR valve pipe assembly nut (5) from the exhaust manifold.
- Remove the EGR pipe (2).
- Remove the transaxle fill tube bolt to the transaxle case.
- Lower the vehicle.
- Remove the transaxle fill tube nut at the EGR valve and reposition the fill tube.
- Disconnect the engine harness electrical connector from the EGR valve.
- Remove the EGR valve studs (4,6).
- Remove the EGR valve.
- Remove the EGR valve gasket (1).
- Clean and inspect the EGR valve gasket mating surfaces.
- Install a new EGR valve gasket (1), P/N 12593632.
- Install the new EGR valve, P/N 12581876.
- Install the original EGR valve studs (4,6).
- Take the disconnected EGR valve harness electrical connector and cut the wires directly at the base of the connector. Open the EGR electrical conduit to expose the wire leads.
- Strip approximately 6 mm (1/4 in) of insulation from all five EGR circuit harness connector wires.
- Install the new EGR valve wiring harness connector, P/N 15306175 (includes splice connectors, terminals and wire leads), to the existing engine wiring harness.
- Use a heat gun to shrink the tubing and set the glue in the connectors.
- Wrap the new EGR valve wiring harness leads with electrical tape and secure them into the EGR valve electrical harness conduit.
- Connect the engine harness electrical connector to the EGR valve.
- Position the transaxle fill tube to the normal installed position.
- Raise the vehicle.
- Install the transaxle fill tube bolt to the transaxle case.
- Install the EGR valve pipe (2), P/N 12602651, to the exhaust manifold.
- Lower the vehicle.
- Install the EGR pipe and bolt (3) to the EGR valve.
- Install the transaxle fill tube nut to the stud.
- Reposition the heater hoses (1).
- Install PCV fresh air tube (1) to the air cleaner outlet duct and to the back of the engine.
- Remove the mechanic wire from the EVAP purge solenoid and install the EVAP purge solenoid and bolt.
- Install the EVAP purge solenoid electrical connector to the EVAP purge solenoid.
- Align the cover if equipped to the stud on the engine. Push down on the cover above the stud in order to engage the cover to the stud. Then install the engine oil fill cap. If the vehicle is not equipped with the intake manifold cover, then proceed to step number 40.
- Connect the negative battery cable at the battery.
- Reprogram the PCM with the latest calibrations for the EGR system changeover. An updated PCM calibration is now available to address this concern. This calibration, or any that follow, is designed to address this concern. Refer to Service Programming System (SPS) using the appropriate Service Information (SI) procedures. The new PCM calibrations will be available to dealerships as part of TIS2000 incremental satellite update version 1.0, which was broadcast to dealers on 01/08/2006. For the dealerships that use CDs, the CD version will be 1.0 for 2006, which will be mailed 01/12/2006. As always, make sure your Tech 2 is updated with the latest software version.
Notice: The removal of the EVAP purge solenoid is being done so that the EVAP purge solenoid will not be damaged in the EGR valve removal.

Important: Remove all old gasket material from intake manifold with a gasket scraper.
Notice: Refer to Fastener Notice in Caution and Notices in SI.
Tighten
Tighten the studs to 30 N·m (22 lb ft).
Important: In the following steps, care must be taken to prevent cross-wiring of the two gray colored EGR wire leads (located at pin A and pin D). Cross-wiring will result in an MIL to be set. Before cutting the wiring harness leads, mark the gray leads using tape so the location will be remembered on assembly.
Important:
• Refer to the correct EGR Valve Wiring Harness Connector End View Schematics in the bulletin for the installation of the new EGR valve wiring harness connector, P/N 15306175. • Use splice seal connectors supplied in the wiring harness kit, P/N 15306175, when replacing the EGR Valve Wiring Harness Connector.
Tighten
Tighten the bolt to 13 N·m (115 lb in).
Tighten
Tighten the nut to 25 N·m (18 lb ft).
Tighten
Tighten the bolt to 25 N·m (18 lb ft).
Tighten
Tighten the nut to 13 N·m (115 lb in).
Tighten
Tighten the bolt to 10 N·m (89 lb in).
EGR Valve Wiring Harness Connector End View Schematic (Buick Rendezvous Only)
Connector Part Information | 5-Way F Metri-Pack 150 (Black) | ||
|---|---|---|---|
Pin | Wire Color | Circuit Number | Function |
A | Gray | 435 | EGR Solenoid Low Control |
B | Black | 2753 | Low Reference |
C | Brown | 1456 | EGR Valve Position Signal |
D | Gray | 2702 | 5-Volt Reference |
E | Red | 1676 | EGR Solenoid High Control |
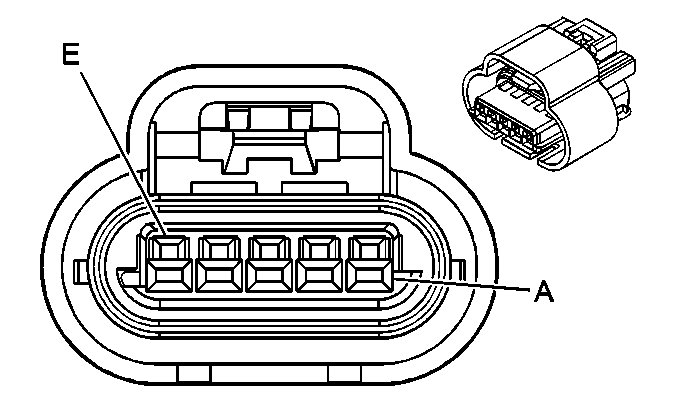
EGR Valve Wiring Harness Connector End View Schematic
Connector Part Information | 5-Way F Metri-Pack 150 (Black) | ||
|---|---|---|---|
Pin | Wire Color | Circuit Number | Function |
A | Gray | 435 | EGR Solenoid Low Control |
B | Tan | 2753 | Low Reference |
C | Brown | 1456 | EGR Valve Position Signal |
D | Gray | 2702 | 5-Volt Reference |
E | Orange | 1676 | EGR Solenoid High Control |
Parts Information
Part Number | Description | Qty |
|---|---|---|
89018174 | Valve Kit, EGR | 1 as required |
Warranty Information
For vehicles repaired under warranty, use:
Labor Operation | Description | Labor Time |
|---|---|---|
J7906* | Install EGR Valve Kit and Reprogram PCM | 1.2 hrs |
* This unique labor operation number is for bulletin use only. It will not be published in the Labor Time Guide. | ||
