SERVICE MANUAL UPDATE DRIVEABILITY & EMISSIONS CHART

VEHICLES AFFECTED: 1987-88 "N" 2.3L
This bulletin has been revised for Oldsmobile only to clarify Injector Driver Circuits and IDI Connector Pin labelling.
This bulletin serves to revise the facing page art for Chart C-4M, "Misfire Diagnosis" and Code 42, "Electronic Spark Timing" and the facing page art and charts for Chart A-3 "Engine Cranks But Won't Run" (Page 1 of 3), (Page 2 of 3) and (Page 3 of 3) in Section 6E3 "Driveability And Emissions" in the 1987 and 1988 Service Manuals for "N" Carline with (VIN D) 2.3L engines.
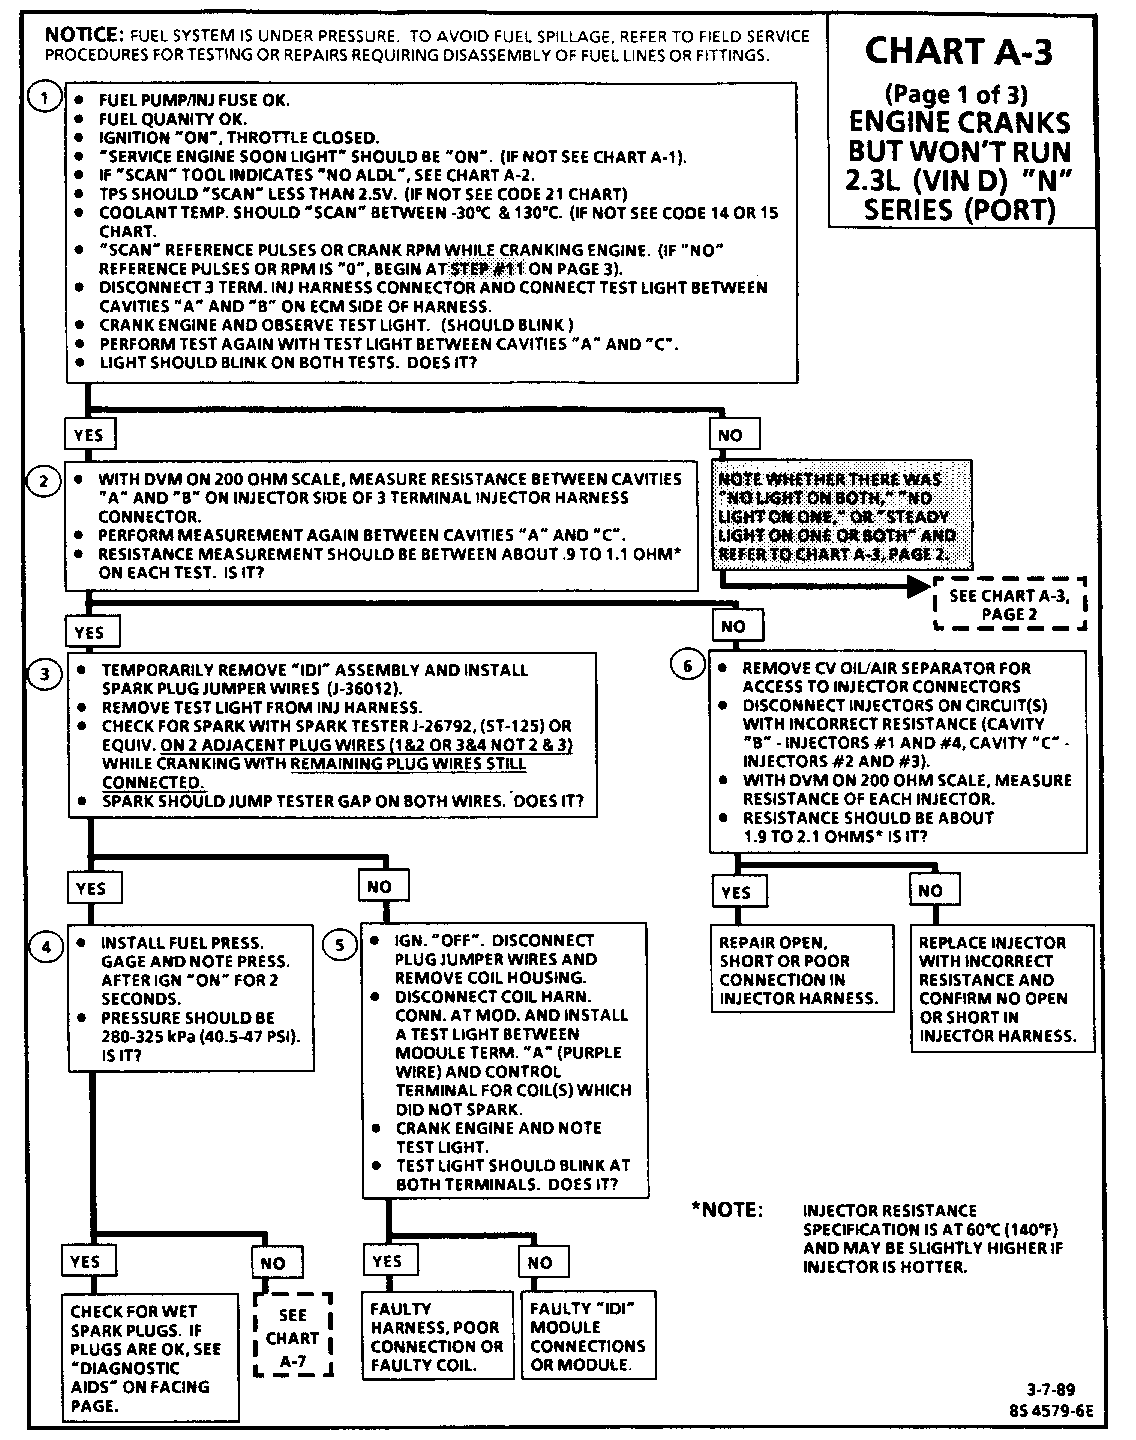
CHART A-3 (Page 1 of 3) ENGINE CRANKS BUT WON'T RUN 2.3L (VIN D) "N" SERIES (PORT)
Condition:
Engine cranks but won't run, or engine may start, but immediately stops running. Battery condition and engine cranking speed are OK and there is adequate fuel in the tank.
Circuit Description:
This engine is equipped with a distributorless ignition system called the "Integrated Direct Ignition" system (IDI). The primary circuit of the IDI consists of two separate ignition coils, an IDI (ignition) module and crankshaft sensor as well as the related connecting wires and the EST (electronic spark timing) portion of the ECM. The secondary circuit consists of the secondary winding of the coil, two connecting metal strips molded into the coil housing, the spark plug boot/connector assemblies and spark plugs.
Test Description: Numbers below refer to circled numbers on the diagnostic chart.
1. This step verifies that "SES" light operation, on-board diagnostics, cranking rpm, TPS and coolant sensor signals are normal. A blinking test light verifies that the ECM is receiving the IDI reference signal and attempting to activate the injectors.
2. This step checks injector harness and injectors for opens or shorts. Resistance should measure half that of one injector due to parallel circuit.
3. By installing spark plug jumper leads and testing for spark on two adiacent plug leads (do not use 2 & 3 as they are on same coil), each ignition coil's ability to produce at least 25,000 volts is verified.
4. Checks to see if fuel pump and relay are operating correctly (fuel pump only "ON" 2-3 seconds) and fuel pressure is within proper range.
5. If module can make the test light blink, the fault is coil harness or connections. If not, module or it's connections are faulty.
6. This step determines whether harness or injector is cause of incorrect resistance. Nominal injector resistance is 1.9 to 2.1 ohms at 60 DEG C (140 DEG F). Resistance will increase slightly at higher temperatures.
Diagnostic Aids:
Check For:
- TPS binding or sticking in wide open throttle position or intermittently shorted or open. - Water or foreign material in fuel. - Low Compression. (Timing chain failure) - Verifyy that only resistor spark plugs are used.
CHART A-3 (Page 2 of 3) ENGINE CRANKS BUT WON'T RUN 2.3L (VIN D) "N" SERIES (PORT)
Condition:
Engine cranks but won't run, or engine may start, but immediately stops running. Battery condition and engine cranking speed are OK and there is adequate fuel in the tank.
Circuit Description:
This engine is equipped with a distributorless ignition system called the "Integrated Direct Ignition" system (IDI). The primary circuit of the IDI consists of two separate ignition coils, an IDI ignition module and crankshaft sensor as well as the related connecting wires and the EST (electronic spark timing) portion of the ECM. Each secondary circuit consists of the secondary winding of the coil, two connecting metal strips molded into the coil housing, the spark plug boot/connector assemblies and spark plugs.
Test Description: Numbers below refer to circled numbers on the diagnostic chart.
7. Battery voltage should be available at cavity "A" whenever the fuel pump power feed circuit is switched "ON". The ECM should switch the fuel pump "ON" for 2-3 seconds after ignition is turned "ON" (and when ECM is receiving ignition reference pulses, as while cranking or running). The ignition must be turned "OFF" for at least 10 seconds to assure that the ECM powers down and will then switch the fuel pump back "ON" for 2-3 seconds when ignition is turned back "ON."
7A. 1988 models use the fuel pump power feed circuit to power the injectors, while 1987 models should have power whenever ignition is turned "ON.
8. Light "ON" one circuit only indicates power is available at cavity "A", but grounded circuit is not being completed on the other circuit. This could be due to open circuit or ECM not switching the injector driver circuit to ground.
9. Steady light indicates ground circuit is always completed and is not being switched. This could be due to short to ground in circuit, or faulty ECM injector driver.
10. The fuel pump should be switched "ON" by the ECM for 2-3 seconds after ignition is first turned "ON." It is necessary to turn the ignition "OFF" for at least 10 seconds to assure that the ECM powers down and will then switch the fuel pump back "ON." If the fuel pump operates, but power is not available at injector harness, circuit must be open. If the fuel pump does not operate, CHART A-5 should be used to diagnose the cause.
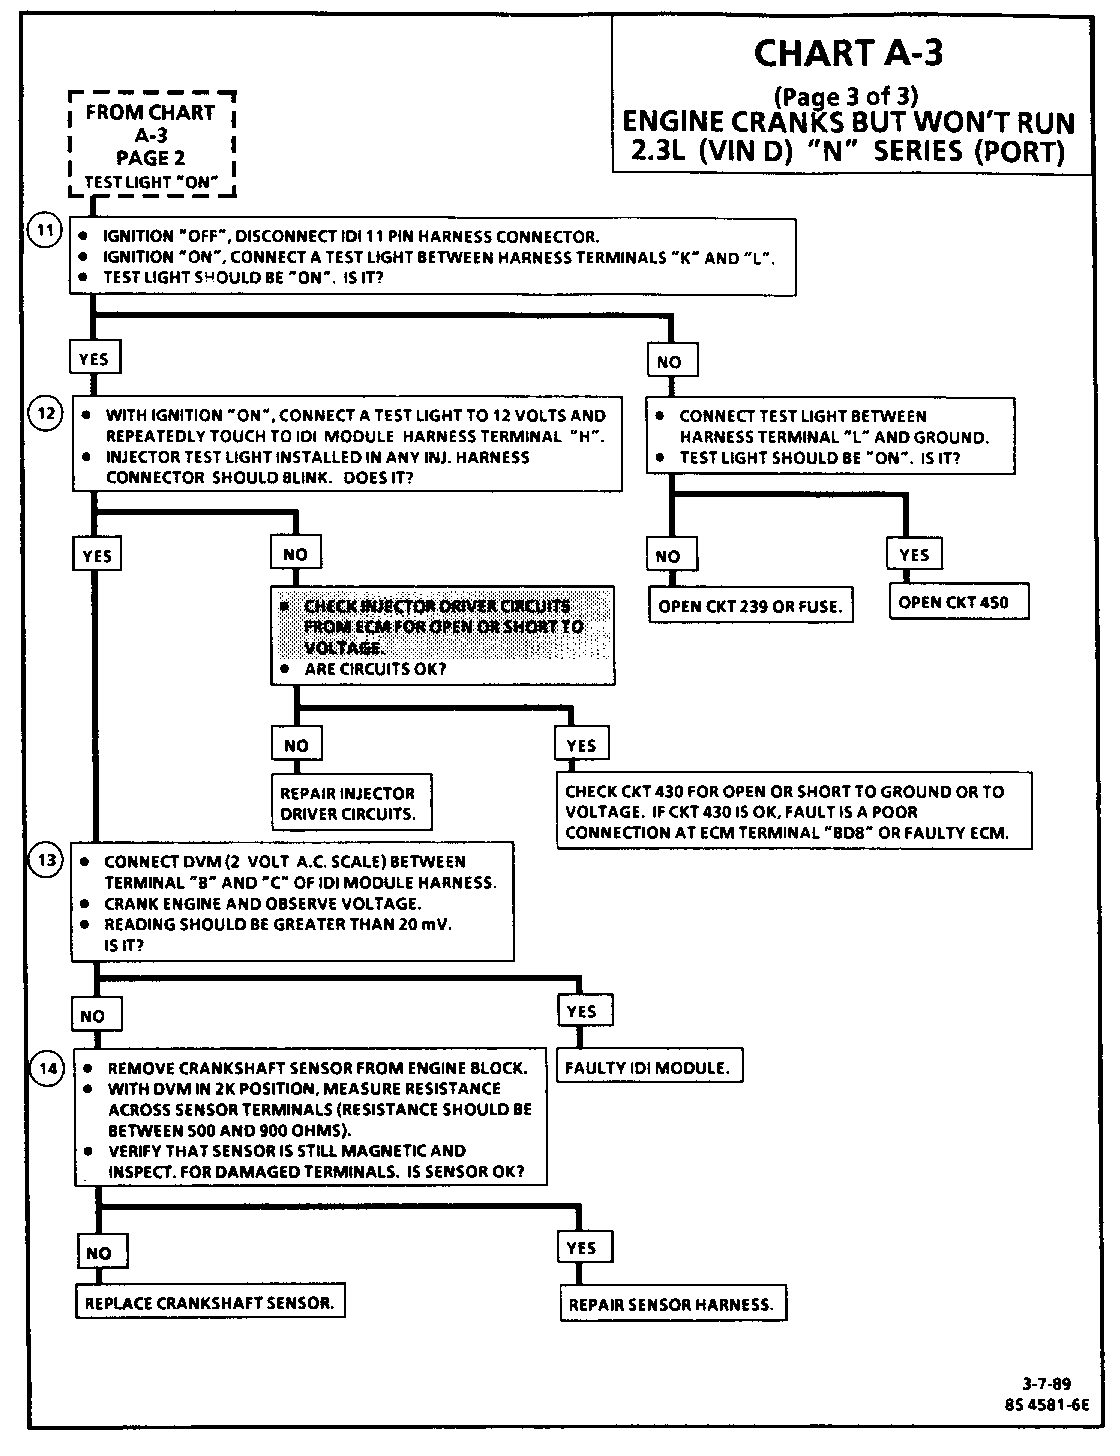
CHART A-3 (Page 3 of 3) ENGINE CRANKS BUT WON'T RUN 2.3L (VIN D) "N" SERIES (PORT)
Circuit Description:
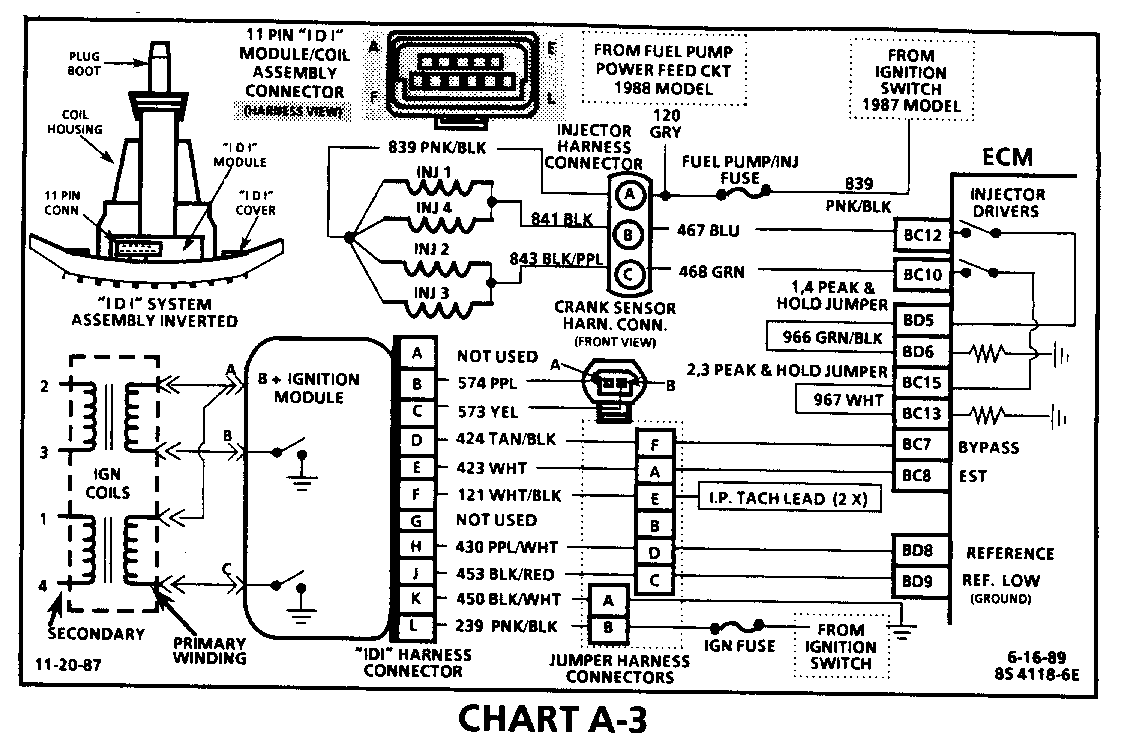
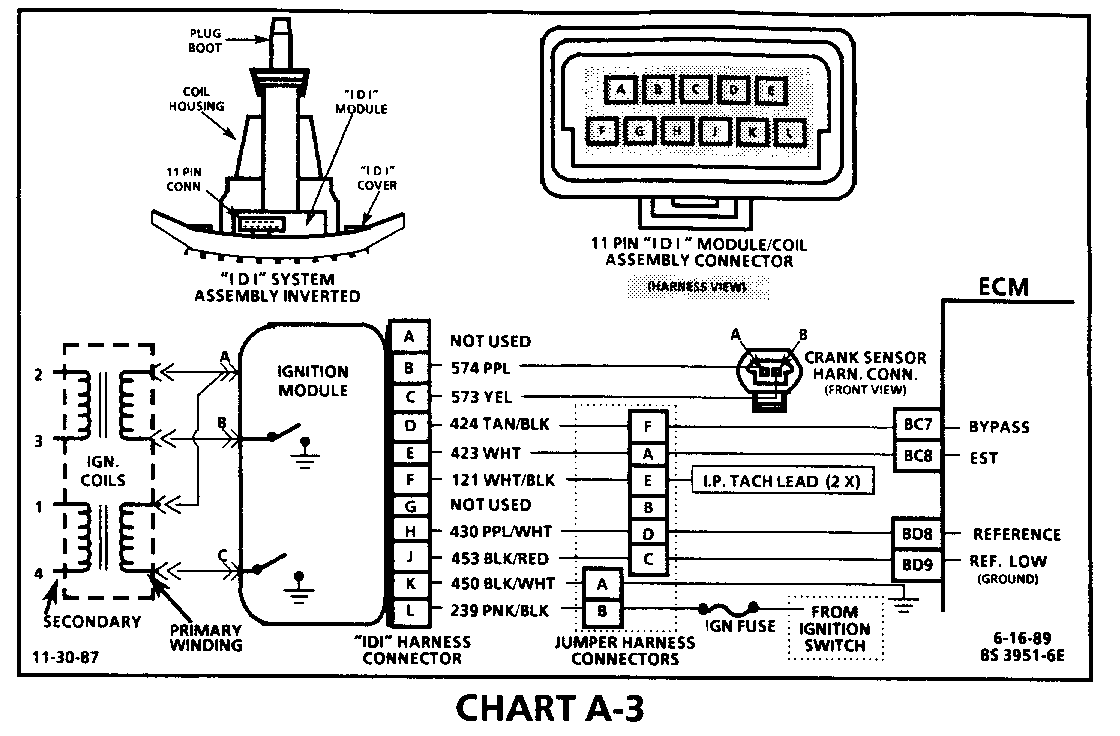
The "Integrated Direct Ignition" system (IDI) uses a waste spark method of distribution. In this type of system the ignition module triggers the #1-4 coil pair resulting in both #1 and #4 spark plugs firing at the same time. #1 cylinder is on the compression stroke at the same time #4 is on the exhaust stroke, resulting in a lower energy requirement to fire #4 spark plug. This leaves the remainder of the high voltage to be used to fire #1 spark plug. On this application, the crank sensor is mounted to, and protrudes through the block to within approximately 0.050" of the crankshaft reluctor. Since the reluctor is a machined portion of the crankshaft and the sensor is mounted in a fixed position on the block, timing adjustments are not possible or necessary.
Test Description: Numbers refer to circled numbers on the diagnostic chart.
11. Battery voltage should be available at terminal "L" of the IDI 11 pin connector, and terminal "K" should be a good ground.
12. The test light to 12V simulates a reference signal to the ECM which will result in an injector test light blink for every other touch of the test light, if CKT 430, the ECM and the injector driver circuit are all functioning properly.
13. The crankshaft sensor should output a voltage as the crankshaft turns. If no voltage is produced, the indication is a poor sensor connection or faulty sensor.
14. The crank sensors core is a magnet, therefore, it should be magnetized and the resistance should be within a range of 500 to 900 ohms.
CODE 42 ELECTRONIC SPARK TIMING (EST) CIRCUIT 2.3L (VIN D) "N" SERIES (PORT)
Circuit Description:
The ignition module sends a reference signal to the ECM when the engine is cranking or running. While the engine is under 700 rpm, the ignition module controls the ignition timing. When the engine speed exceeds 700 rpm, the ECM sends a 5 volts signal on the "bypass" CKT 424 to switch the timing to ECM control through the EST CKT 423.
An open or ground in the EST or "bypass" circuit will set a Code 42 and cause the engine to run on module or "bypass" timing. This will result in poor performance and poor fuel economy.
Test Description: Numbers refer to circled numbers on the diagnostic chart.
1. Checks to see if ECM recognizes a problem. If it doesn't set Code 42 at this point, it is an intermittent problem and could be due to a loose connection.
2. With the ECM disconnected, the ohm meter should be reading less than 500 ohms, which is the normal resistance of the ignition module. A higher resistance would indicate a fault in CKT 423, a poor ignition module connection or a faulty ignition module.
3. If the test light was "ON" when connected from 12 volts to ECM harness terminal "BC7", either CKT 423 is shorted to ground or the ignition module is faulty.
4. Checks to see if ignition module switches when the bypass circuit is energized by 12V through the test light.
If the ignition module actually switches, the ohmmeter reading should shift to over 8000 ohms.
5. Disconnecting the ignition module should make the ohm meter read as if it were monitoring an open circuit (infinite reading). If the ohmmeter has a reading other than infinite, CKT 423 is shorted to ground.
Diagnostic Aids:
An intermittent may be caused by a poor connection, rubbed through wire insulation, or a wire broken inside the insulation. Inspect ECM harness connectors for backed out terminals "BC7" or "BC8", improper mating, broken locks, improperly formed or damaged terminals, poor terminal to wire connection and damaged harness.
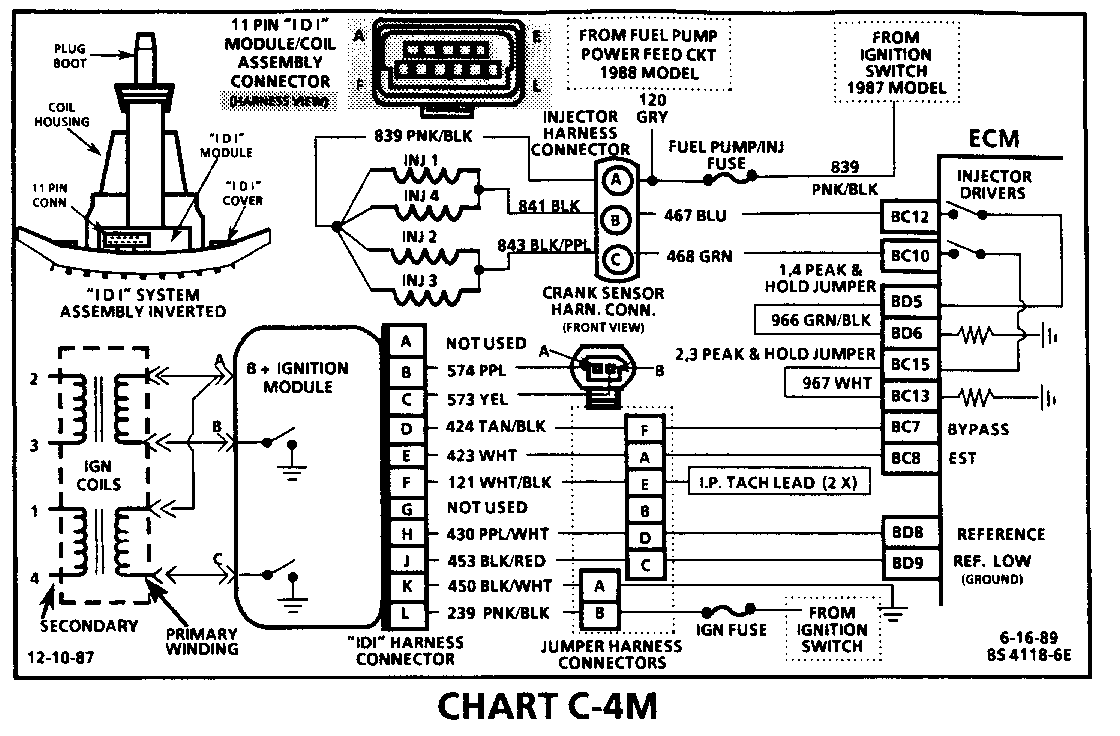
CHART C-4M INTEGRATED DIRECT IGNITION (IDI) MISFIRE DIAGNOSIS 2.3L (VIN D) "N" SERIES (PORT) Circuit Description:
The "Integrated Direct Ignition" system (IDI) uses a waste spark method of distribution. In this type of system the ignition module triggers the #1-4 coil pair resulting in both #1 and #4 spark plugs firing at the same time. #1 cylinder is on the compression stroke at the same time #4 is on the exhaust stroke, resulting in a lower energy requirement to fire #4 spark plug. This leaves the remainder of the high voltage to be used to fire # 1 spark plug. On this application, the crank sensor is mounted to and protrudes through the block to within approximately 0.050" of the crankshaft reluctor. Since the reluctor is a machined portion of the crankshaft and the sensor is mounted in a fixed position on the block, timing adjustments are not possible or necessary.
Test Description: Numbers below refer to circled numbers on the diagnostic chart.
1. This checks for equal relative power output between the cylinders. Any injector which when disconnected did not result in an rpm drop approximately equal to the others, is located on the misfiring cylinder.
2. If aplug boot is burned, the other plug on that coil may still fire at idle. This step tests the system's ability to produce at least 25,000 voits at each spark plug.
3. No spark, on one coil, may be caused by an open secondary circuit. Therefore, the coil's secondary resistance should be checked. Resistance readings above 20,000 ohms, but not infinite, will probably not cause a no start but may cause an engine miss under certain conditions.
4. If the no spark condition is caused by coil connections, a coil or a secondary boot assembly, the test light will blink. If the light does not blink, the fault is module connections or the module.
5. Checks for ignition voltage feed to injector and for an open injector driver circuit.
6. An injector driver circuit shorted to ground would result in the test light "ON" steady, and possibly a flooded condition which could damage engine. A shorted injector (less than 2 ohms) could cause incorrect ECM operation.
Diagnostic Aid:
Verify IDI connector terminal "J", CKT 450 resistance to ground is less than .5 ohm.


General Motors bulletins are intended for use by professional technicians, not a "do-it-yourselfer". They are written to inform those technicians of conditions that may occur on some vehicles, or to provide information that could assist in the proper service of a vehicle. Properly trained technicians have the equipment, tools, safety instructions and know-how to do a job properly and safely. If a condition is described, do not assume that the bulletin applies to your vehicle, or that your vehicle will have that condition. See a General Motors dealer servicing your brand of General Motors vehicle for information on whether your vehicle may benefit from the information.
