TEMPORARY REDUCTION OF POWER STEERING

MODELS AFFECTED: 1982-84 SKYHAWK, SKYLARK AND CENTURY WITH POWER STEERING 1985 ELECTRA PARK AVENUE
General Motors has determined that some 1982-1984 Buick Skyhawk, Skylark and Century models equipped with power steering and 1985 Electra/Park Avenue models may exhibit a temporary reduction of power steering assist when the vehicle is started cold. After a short period of engine operation, full assist is restored.
SPECIAL POLICY ADJUSTMENT
This special policy covers the condition described above for a period of five (5) years or 50,000 miles, whichever occurs first, from the date the vehicle was originally placed in service. Correction of this condition will consist of installation of a seal service kit.
This "Special Policy Adjustment Bulletin" should be filed in the three ring binder furnished to dealers by General Motors.
SPECIAL POLICY ADJUSTMENT ANNOUNCEMENT
This special policy will be announced to owners by a general press release (a representative copy of the press release is included with this bulletin).
VEHICLES INVOLVED
- All 1982, 1983, and 1984 model year Skyhawks, Skylarks, and Centurys with Power Steering.
- All 1985 model year Electra/Park Avenues.
REIMBURSEMENT
Customer claims for reimbursement on previously paid repairs to correct a temporary reduction of power steering assist when cold condition, are to be submitted according to the instructions included with this bulletin. Owners must submit original documentation that reasonably confirms the amount of unreimbursed repair expenses, a description of the repair, the date of the repair, and the person or entity performing the repair.
PARTS INFORMATION
Parts are to be obtained from General Motors Service Parts Operations (GMSPO). To ensure these parts will be obtained as soon as possible, they should be ordered from GMSPO on a "C.I.O." order with no special instruction code, but on an advise code (2).
Part Number Description Quantity/Vehicle ----------- ----------- ---------------- 26010340 Seal Service Kit 1
A quantity of seal service kits will be preshipped along with a service procedure training video tape and all necessary special tools, on a no charge basis. Additional seal service kits, as required, are to be ordered through GMSPO in the normal manner. Special tools to be shipped each dealer are as follows:
- J-37090 Pinion and Valve Ring Protector - J-29822 Pinion Seal Installer - J-29810 Stub Shaft Seal Protector
SERVICE PROCEDURE
See instruction sheet attached to this bulletin for installation of Seal Service Kit.
In the unlikely event the seal service kit does not correct the condition, installation of a replacement gear assembly may be necessary. PRIOR AUTHORIZATION FROM YOUR ZONE/BRANCH WILL BE REQUIRED FOR INSTALLATION OF A REPLACEMENT GEAR ASSEMBLY. Order parts from the appropriate service parts catalog and follow service procedure in applicable service manual.
RETURN OF STEERING GEAR ASSEMBLIES
To assure proper payment for work performed when steering gear assemblies are replaced under this special policy program, the following MUST be supplied with the returned assemblies:
- A copy of the repair order, including the VIN and the labor operation performed.
- The dealer code of the dealer performing the service.
Refer to General Motors Parts Information Bulletins Nos. IB No. 87-161 and IB No. 86-117 for further shipping instructions. Steering gear assemblies returned for reasons other than this special policy need not include the above information.
WARRANTY CLAIM INFORMATION
When performing the repairs outlined in the Service Procedure of this bulletin, submit a warranty claim for credit, as follows:
LABOR FAILED SUBLET OPERATION TROUBLE REPAIR PART PARTS LABOR DEALER**** NUMBER CODE MODEL PERFORMED NUMBER ALLOWANCE HOURS MTL TWG ----- ---- ----- --------- ------ --------- ------ ------- T1283 92 82 Century Install Seal 26010340 * 2.2 $5.15 Service Kit
T1284 92 82 Skyhawk " " * 3.1 " T1385 92 82 Skylark " " * 2.4 " T1286 92 83 Century " " * 2.6 " T1287 92 83 Skyhawk " " * 3.1 " T1288 92 83 Skylark " " * 2.6 " T1289 92 84 Century " " * 2.6 " T1290 92 84 Skyhawk " " * 3.1 " T1291 92 84 Skylark " " * 2.6 " T1292 92 85 Electra/ " " * 2.8 " Park Avenue
T1293**** 92 82 Century Install Replacement Partial Gear ** * 1.2 "
T1294**** 92 82 Skyhawk " ** * 2.1 " T1295**** 92 82 Skylark " ** * 1.4 " T1296**** 92 83 Century " ** * 1.6 " T1297**** 92 83 Skyhawk " ** * 2.1 " T1298**** 92 83 Skylark " ** * 1.6 " T1299**** 92 84 Century " ** * 1.6 " T1300**** 92 84 Skyhawk " ** * 2.1 " T1301**** 92 84 Skylark " ** * 1.6 " T1302**** 92 85 Electra/ Park Avenue " ** * 1.8 "
T1303 92 All 82-84 Century, Skyhawk, See Instructions & Skylark and 85 Electra/Park Avenue For Reimbursement
* List current dealer price of part, plus 30%. ** Use part number of appropriate Rack and Pinion (gear partial). *** Allowance for power steering fluid used in conjunction with these operations. **** These "T" Operations are only to be used in the unlikely event that the Seal Service Kit does not correct the condition. Prior Authorization From Your Zone/Branch Will Be Required.
Request For Reimbursement Instructions
1. Customer presents dealer with original paid receipt covering repairs to correct a temporary reduction of power steering assist when cold condition exists.
2. Dealer Completes a Repair Order (R.O.) showing:
- Repair order date. - Vehicle Identification Number. - Current mileage. - Owner's address. - Attaches original owner's or dealer's paid invoices/receipt covering repair within the Special Policy 5 year/50,000 mile guidelines. - Use Labor Operation Number T1303 and Failure Code 92. - Enters total amount of reimbursement based on 100% of owner's expense related to covered steering repair.
3. Owner signs the repair order as acknowledgement of request for reimbursement amount.
4. Owner is given a copy of repair order.
5. Dealer assigns a Warranty Management System (WMS) authorization code to the claim and enters it on the WMS Authorization Log.
6. The dealer submits a claim to Buick for processing.
7. Dealer issues the owner a check for reimbursement in the approved amount. The check number must be entered on the repair order and a copy of the check must be attached to original paid invoices/receipt.
8. All supporting documentation must be available for review by Buick personnel as needed.
NOTICE: Refer to Buick Service Policies and Procedures Manual, Section 1, for specific procedures for Custoiner Reimbursement verification.
In the event the Dealer Service Manager and the owner cannot reach agreement on amount eligible for reimbursement after review of invoices/receipt, the Zone/Branch should be contacted for determination of covered expenses. In such cases, an explanation should be included on the R.O.
PRESS RELEASE DRAFT IMMEDIATELY, JANUARY, 1988
DETROIT -- GENERAL MOTOR IS MAKING AVAILABLE A SPECIAL POLICY OF FIVE
YEARS OR 50,000 MILES TO COVER A TEMPORARY REDUCTION IN POWER STEERING
ASSIST ON SOME 4.6 MILLION GM FRONT WHEEL DRIVE CARS PRODUCED BETWEEN 1982
AND 1985.
SOME OF THE VEHICLES MAY EXPERIENCE REDUCED POWER STEERING ASSIST UPON
FIRST STARTING THE CAR, PRIMARILY IN COLD WEATHER. ONCE THE SYSTEM WARMS UP
-- USUALLY IN ONE OR TWO MINUTES -- NORMAL POWER STEERING ASSIST IS
RESTORED. THE PHENOMENON DOES NOT OCCUR WHILE THE VEHICLE IS BEING DRIVEN
AFTER WARMUP.
GM DEALERS WILL REPAIR, FREE OF CHARGE, POWER STEERING SYSTEMS THAT
EXHIBIT THE PROBLEM FOR FIVE YEARS OR 50,000 MILES, WHICHEVER COMES FIRST.
GM WILL REIMBURSE OWNERS WHO IN THE PAST PAID TO HAVE THE PROBLEM CORRECTED,
WITHIN THE TIME AND MILEAGE LIMITS OF THE SPECIAL POLICY, PROVIDED THEY
PRESENT PROPER RECEIPTS TO THEIR DEALER.
SPECIFIC MODELS INCLUDED ARE AS FOLLOWS:
- 1982-84 BLUICK SKYHAWK, SKYLARK AND CENTLURY; CADILLAC CIMARRON;
CHEVROLET CAVALTER, CITATION AND CELEBRITY; OLDSMOBILE FIRENZA,
OMEGA AND CUTLASS CIERA; AND PONTIAC SUNBIRD, PHOENIX AND 6000
MODELS.
- 1985 BUICK ELECTRA, CADILLAC DEVILLE AND OLDSMOBILE NINETY-EIGHT MODELS.
INSTRUCTION SHEET
FOR EFFECTIVE REPAIR, USE ALL PARTS IN KIT REGARDLESS OF ORIGINAL CONDITION.
SERVICE PROCEDURE FOR INSTALLING "SPECIAL" VALVE BODY RINGS ON RACK AND PINION ASSEMBLIES WITH HARD STEERING ON INITIAL START-UP
READ INSTRUCTIONS COMPLETELY AND CAREFULLY BEFORE PROCEEDING.
Some complaints about the power steering system on initial start up may be reported as:
- Reduced power steering assist when parking. - Increased steering effort.
For further information, refer to the "Steering Diagnosis" section in vehicle service manual.
Tools Required:
J 37090 Pinion and Valve Ring Protector J 29822 Pinion Seal Installer J 29810 Stub Shaft Seal Protector
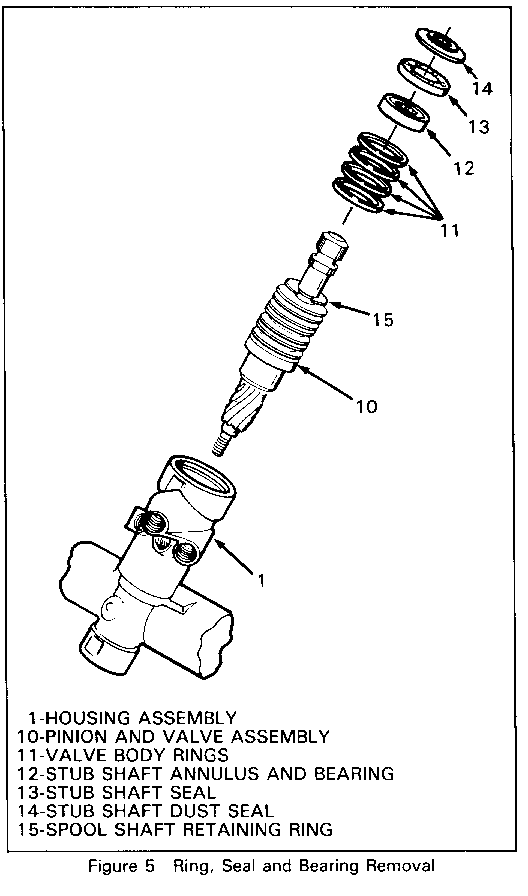
A. Remove rack and pinion assembly from car.
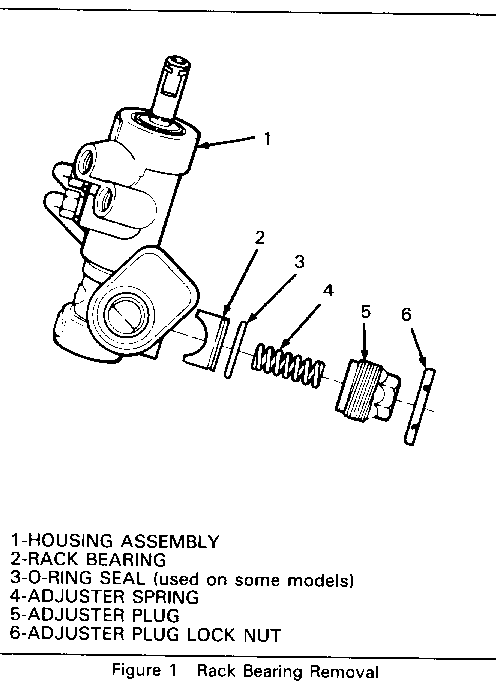
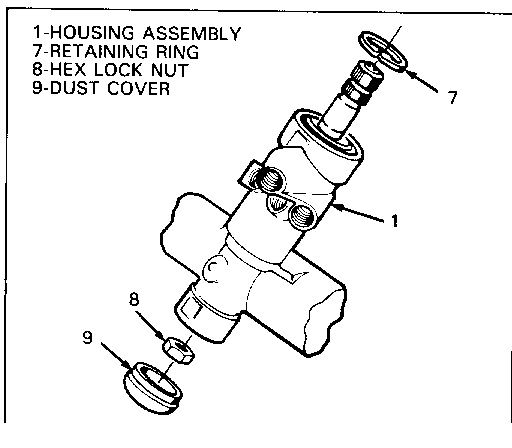
B. Valve removal: 1. Remove adjuster plug lock nut from adjuster plug. 2. Remove adjuster plug from housing. 3. Remove adjuster spring, rack bearing and 0-ring if required. 4. Drain power steering fluid from gear. (Rotate stub shaft allowing rack to travel corner to corner for removal.) 5. Remove retaining ring from housing. 6. Remove dust cover from housing. 7. While holding the stub shaft, remove lock nut from pinion.
Important
If stub shaft is not held, damage to the pinion teeth will occur.
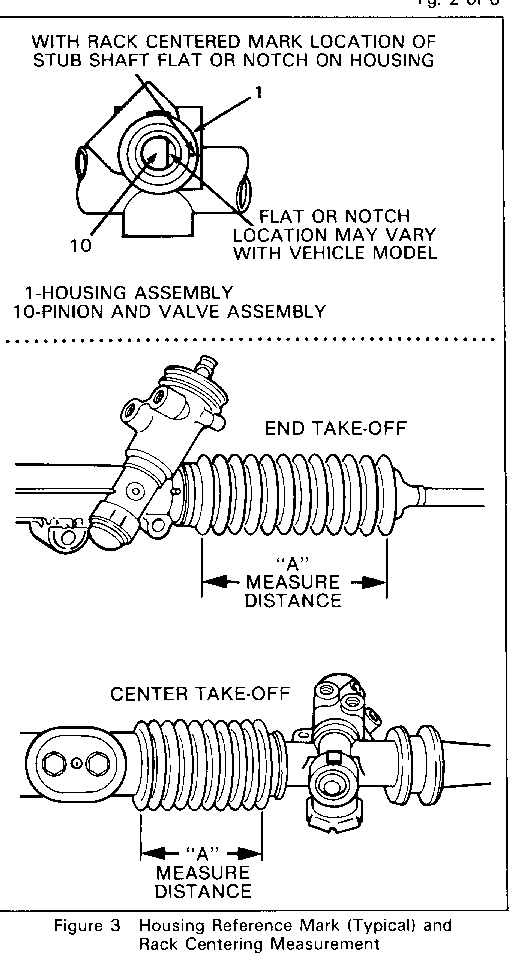
8. With gear centered, mark location of stub shaft flat or notch on housing and measure distance "A" indicated in Figure 3 for your specific vehicle; this will aid in proper reassembly.
Important
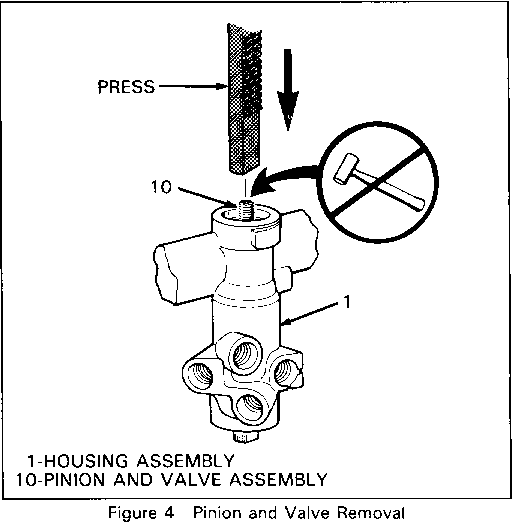
DO NOT hammer or pound on pinion and valve assembly, this could cause damage or loosen the drive pin.
9. Use an arbor press to press on threaded end of pinion until it is possible to remove the pinion and valve assembly from housing. Just before removal of pinion and valve assembly from housing, mark second location of stub shaft flat or notch on housing. The second mark is used to position flat or notch prior to reassembly.
10. Remove stub shaft dust seal, stub shaft seal, stub shaft bearing annulus assembly, pinion and valve assembly, with spool shaft retaining ring, and valve body rings attached.
11. Remove valve body rings from pinion and valve assembly.
Important
Use care when removing rings from valve assembly to prevent damage to valve assembly.
12. Thoroughly clean valve assembly ring grooves.
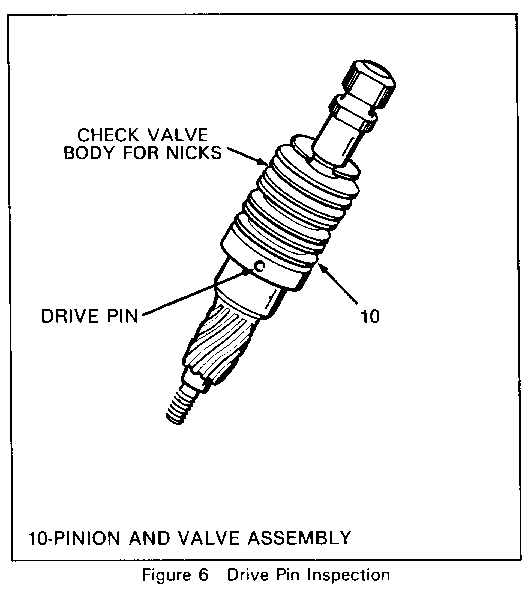
Inspect
Inspect pinion and valve assembly for nicks or loose drive pin. If a loose drive pin is found, replace the gear assembly.
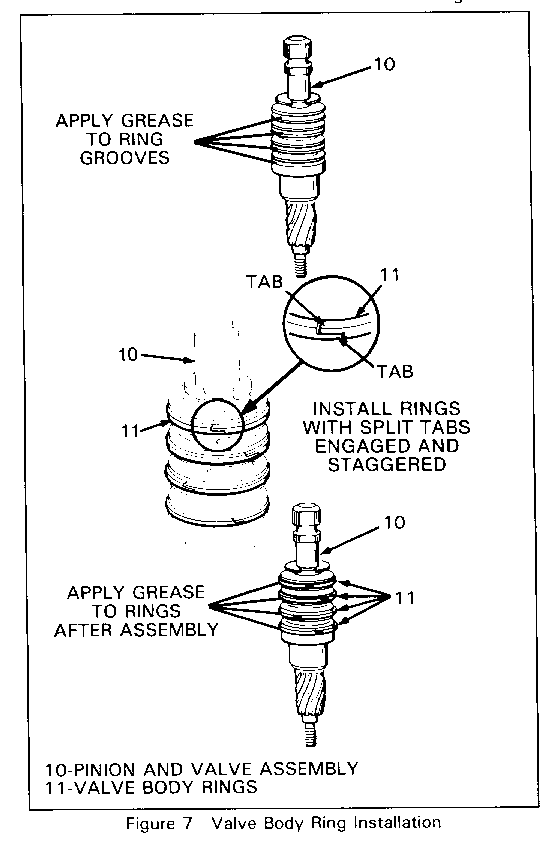
C. Install new split rings onto the valve assembly as follows:
Important
Valve assemblies and housings are NOT interchangeable. The same valve assembly MUST be reinstalled or rack and pinion assembly must be replaced.
Important
---------
Apply a liberal quantity of grease supplied in kit, in each ring groove and to new valve body rings when installed to hold rings in position. (See Figure 7.)
1. Install new valve body rings to pinion and valve assembly. (Care must be taken not to cut rings at installation.)
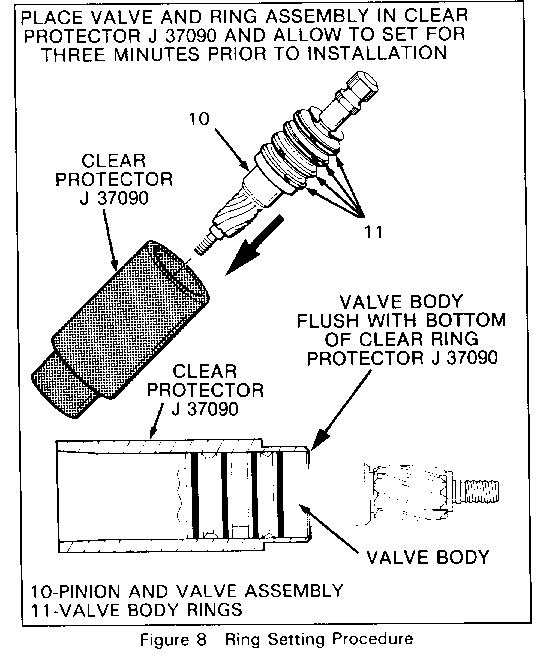
2. Place pinion and valve assembly into clear pinion and valve assembly ring protector J 37090. (Be sure to use only the clear protector.) Allow to set for approximately three minutes while continuing installation preparation. This allows the valve rings to be properly sized.
3. Position valve assembly in protector so that valve body is flush with bottom of clear protector. (See Figure 8.)
Inspect
Inspect valve body rings for cuts, nicks or other damage, proper seating of rings in grooves and engagement of split tabs.
4. Rack must be centered in housing. (See Figure 3 on page 2.)
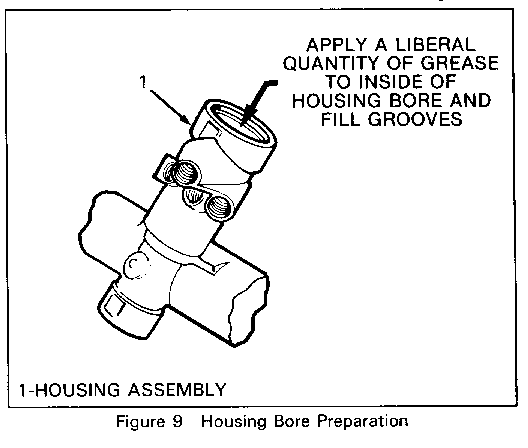
5. Wipe housing bore clean of any foreign material.
Important
Apply a liberal quantity of grease to the valve housing bore. Be sure to fill grooves with grease. This will ease reassembly of valve into housing.
Inspect
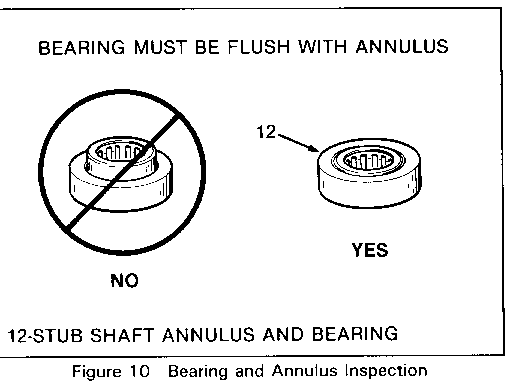
Inspect stub shaft bearing annulus for flatness and damage. Clean before reassembly.
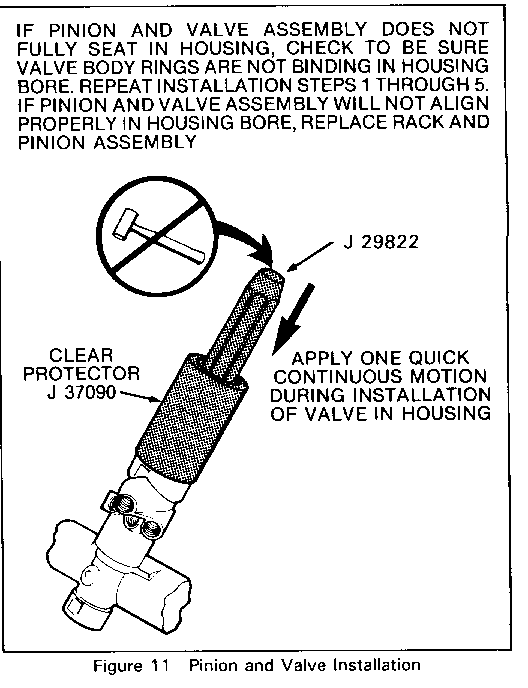
6. Align stub shaft nat or notch with second mark on housing made during disassembly. (See step 9 on page 2.) Install pinion and valve assembly with spool shaft retaining ring, and valve body rings included, into housing using J 37090 to prevent damage to valve rings during assembly.
Important
Set pinion and valve assembly onto housing using J 37090. Use J 29822 pinion seal installer to push assembly into housing bore. DO NOT hammer or use excessive force. If pinion and valve assembly does not fully seat in housing, check to be sure valve body rings are not binding in housing bore. Check rings for cuts or damage. Repeat installation steps I through 5. If pinion and valve assembly will not align properly in housing bore, replace rack and pinion assembly.
Inspect
When pinion and valve assembly is fully seated, flat or notch in stub shaft and first mark on housing must line up while the rack is centered in the housing. Refer to measurement "A" to verify proper rack position. (See Figure 3.)
7. While holding the stub shaft, thread lock nut onto pinion and torque to 35 N-m (26 Lbs. Ft.).
Important
If the stub is not held, damage to the pinion teeth will occur.
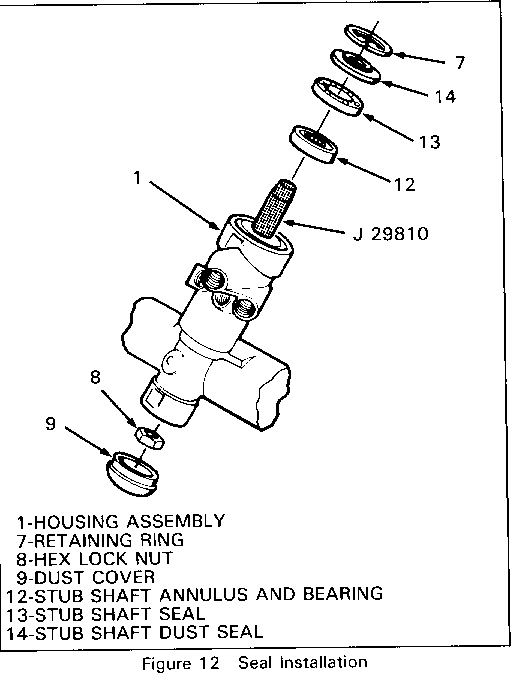
8. Install dust cover to housing.
9. Install stub shaft bearing annulus onto stub shaft.
10. Place seal protector J 29810 onto stub shaft.
11. Install stub shaft seal and stub shaft dust seal over protector and into housing. (Apply a small quantity of grease between seals and on top of dust seal.)
12. Install retaining ring into groove in housing.
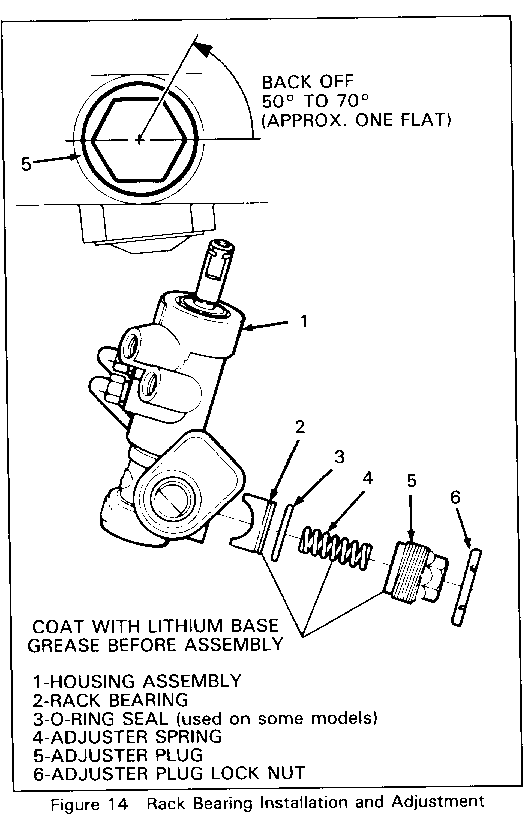
13. Coat rack bearing, adjuster spring and adjuster plug with lithium base grease and install in housing. (See Figure 14.)
Adjust
With rack centered in the housing, turn adjuster plug clockwise until it bottoms in the housing, then back off 50 DEG. to 70 DEG. (approx. one flat). Check torque on pinion. Maximum pinion preload torque is 1.8 N-m (16 Lbs. In.).
14. Install adjuster plug lock nut to adjuster plug. Tighten firmly against housing while holding adjuster plug stationary.
15. Install rack and pinion assembly into car. (Use appropriate service manual.)
Important
Flush power steering system (hoses, reservoir and cooler lines) with power steering fluid - GM Part #1050017 (or equivalent meeting GM Specification #9985010). Disconnect return line at pump reservoir. (Refer to bleeding procedure in vehicle service manual.) Be sure pump reservoir fluid level is maintained during the flush procedure.
16. Reconnect return line at pump reservoir.
17. Fill with power steering fluid.
18. Bleed air from system.
Inspect
Inspect for leaks.
19. Check toe angle and reset if necessary.
General Motors bulletins are intended for use by professional technicians, not a "do-it-yourselfer". They are written to inform those technicians of conditions that may occur on some vehicles, or to provide information that could assist in the proper service of a vehicle. Properly trained technicians have the equipment, tools, safety instructions and know-how to do a job properly and safely. If a condition is described, do not assume that the bulletin applies to your vehicle, or that your vehicle will have that condition. See a General Motors dealer servicing your brand of General Motors vehicle for information on whether your vehicle may benefit from the information.
