
| Subject: | HomeLink® Transceiver/Garage Door Opener Transmitter Test
Kit Available As Essential Tool |
| Models: | 2004 and Prior GM Passenger Cars and Trucks |
This bulletin is being revised to update the information. Please discard Corporate
Bulletin Number 01-08-97-001A (Section 08 - Body and Accessories).
Important: This bulletin is being reissued to emphasize
that proper diagnostics must be followed as outlined in the respective vehicle's Service
Manual including the utilization of essential tool J 41540-GM. Warranty part
return reviews have indicated significant misdiagnosis events have and continue to
occur where proper diagnostic steps and the utilization of this essential tool have
not been conducted. These reviews have also indicated that the majority of component
replacements were NOT necessary as they were operating as designed. By following the
diagnostic steps outlined in Service Information (SI), including the usage of essential
tool J 41540-GM, unnecessary part replacements and comeback repairs can be
eliminated.
The on-vehicle garage door opener transmitter/HomeLink® transceiver test
tool has been available from Kent-Moore as an Essential Tool since 2000. The Integrated
HomeLink® Tester, J 41540-GM, will aid in diagnosing garage door opener
transmitter/HomeLink® transceiver concerns.
The Integrated HomeLink® Tester performs three functions:
| • | Functionality test to determine all 3 channels of the HomeLink® system
are able to send an RF signal. Refer to the HomeLink® Functionality Test later
in this bulletin. |
| • | Trains any button on the HomeLink® Transceiver using the hand-held
transmitter supplied with the tester. This allows the Transceiver to be placed in
the "normal" mode so that the customer's transmitter code(s) can be programmed
into the Transceiver. |
| • | Range test to determine if the vehicle HomeLink® system is operating
in the 15-30 m (50-100 ft) range specified by HomeLink®. |
The test kit includes instructions that explain how to perform each test and
what to do in case of a failure.
Important: Before performing any tests, verify the customer's
transmitter was manufactured after 1982. Garage door openers/transmitters manufactured
prior to 1982 may not be compatible with the HomeLink® system.
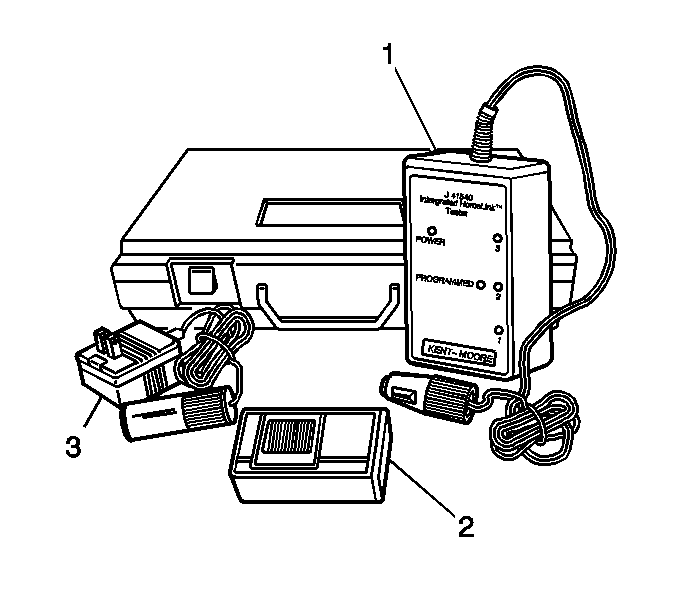
The kit includes:
| • | Hand Held Transmitter (2) |
| • | 120V-to-12V Power Supply (3) |
HomeLink® Functionality Test
- While in the driver seat, plug the HomeLink® Tester into the vehicle's
cigarette lighter using the cigarette lighter adapter supplied in the kit.
- Verify that when it is first plugged in, all of the lights on the HomeLink®
Tester illuminate for approximately 2 seconds. If the power light is on and
any of the other tester lights fail to illuminate, the tester is faulty.
- Push any button on the HomeLink® Transceiver to verify that it is
receiving power from the vehicle's battery. If the indicator on the Transceiver does
not activate, diagnose the cause of the power loss.
- Clear the transceiver and place it in the DEFAULT mode by using the following
procedure:
| • | Hold the two outer buttons on the HomeLink® Transceiver. The red light
on the Transceiver will be steady for about 20 seconds and then will flash
rapidly for about another 10 seconds. When the red light goes out, release
the outer buttons of the Transceiver. THE SYSTEM IS NOW PLACED IN THE DEFAULT MODE. |
| • | All customer transmitter codes have now been cleared from the system and
will have to be input at the end of the diagnostic procedure. |
- Check each signal of the Transceiver by pressing all three buttons, ONE
AT A TIME.
| • | When each button is pressed, an individual indicator light on the tester
will light. |
| • | Note that the Transceiver buttons may not be in the same sequence as the
indicator lights on the tester. Only one light should illuminate for each button. |
| • | If one of the indicator lights on the tester does not light when a HomeLink®
button is pressed, the Transceiver needs to be replaced. After replacement, repeat
the HomeLink® Functionality Test. |
- Verify that the hand-held transmitter operates correctly. This is performed
by pointing the hand-held transmitter supplied in the Test Kit at the Tester. As the
transmitter button is pushed, the green "Programmed" light on the tester
should illuminate. If the light does not illuminate, replace the batteries in the
hand-held transmitter with fresh, new batteries and re-test.
Important: All customer transmitter codes that have
been cleared from the system will have to be input. This is done during the HomeLink®
Training Test. Refer to the instructions that came with the Tester.
Important: If a customer has difficulty teaching the
HomeLink® their transmitter code, advise them to try again with fresh, new batteries
in their transmitter.
HomeLink® also provides customer assistance for owners having difficulties
programming their HomeLink® transmitters. You may wish to suggest the following
options:
| • | The customer may contact HomeLink® directly at 1-800-355-3515 for
assistance. Assistance is available in English, French and Spanish languages. |
| • | The customer may also be directed to the HomeLink® website at www.homelink.com. |
The website is user-friendly and actively demonstrates how to program the transmitter.
Many newer garage door openers have a "rolling code" feature and the website
does a great job of guiding the owner through the entire programming process. The
process is also explained below:
Rolling Code Programming
Rolling code garage door openers which are "code-protected" and
manufactured after 1996 may be determined by the following:
| • | Refer to the garage door opener owner's manual for verification. |
| • | The hand-held transmitter appears to program the HomeLink® Universal
Transceiver, but does not activate the garage door. |
| • | Press and hold the trained HomeLink® button. If the indicator light
flashes rapidly and then turns solid after 2 seconds, the garage door opener
has the rolling code feature. |
To program a garage door with the rolling code feature, follow these instructions.
Important: The assistance of a second person may make
the programming quicker and easier.
- Locate the learn (or smart) button on the garage door motor head unit.
The exact location and color of the button may vary by brand. (It is usually located
near the antenna wire on the motor head.) Refer to the garage door opener owner's
manual or www.homelink.com if you experience difficulty in locating this button.
- Press the learn button on the garage door opener motor head unit. This
activates the "training light." You now have 30 seconds in which
to initiate the next step.
- Firmly press and release the programmed HomeLink® button. Press and
release the HomeLink® button a second time to complete the programming process.
(Some garage door openers may require you to do this procedure a third time to complete
the programming.)
The garage door opener should now recognize the HomeLink® System.
The HomeLink® phone number, website address, and other useful information
can also be found in Section 2 of the Owner's Manual under HomeLink® Transmitter.
