Service of the PCM should normally consist of either replacement of the PCM or EEPROM programming. If the diagnostic procedures call for PCM replacement, inspect the PCM first to see if the PCM is the correct part. If the PCM is faulty, remove the PCM and install the new service PCM.
The new service PCM will not be programmed. You must program the new PCM. DTC P0602 indicates the EEPROM is not programmed or has malfunctioned.
There are no user serviceable parts in this PCM. The PCM should never be opened for any reason.
Important: When replacing the production PCM with a service PCM (controller), it is important to transfer the broadcast code and production PCM number to the service PCM label. Do not record this information on the PCM cover. Transfer allows positive identification of PCM parts throughout the service life of the vehicle.
Removal Procedure
- Using a scan tool, retrieve the percentage of remaining engine oil. Record the remaining engine oil life.
- Disconnect the negative battery cable. Refer to Battery Negative Cable Disconnection and Connection in Engine Electrical.
- Remove the left sheet metal diagonal brace. Refer to Front End Sheet Metal Diagonal Brace Replacement - Left Side or Front End Sheet Metal Diagonal Brace Replacement - Right Side in Body Front End.
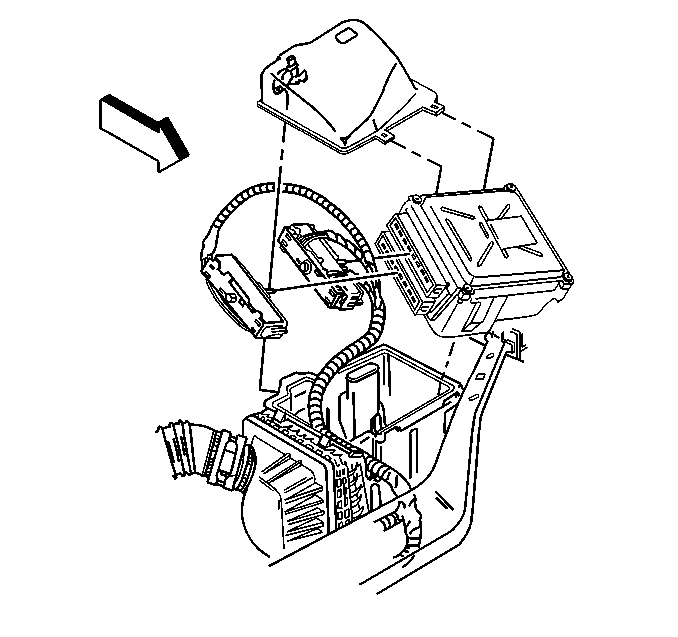
- Remove the air cleaner assembly cover and lift the PCM from the assembly.
- Disconnect the harness connectors from the PCM.
- Remove the PCM from the engine compartment.
Important: It is necessary to record the remaining engine oil life. If the replacement module is not programed with the remaining engine oil life, the engine oil life will default to 100%. If the replacement module is not programmed with the remaining engine oil life, the engine oil will need to be changed at 5000 km (3,000 mi) from the last engine oil change.
Installation Procedure
- Install the connectors to the PCM.
- Install the PCM into the air cleaner assembly.
- Install the air cleaner assembly cover.
- Tighten the air cleaner assembly cover retainers.
- Install the left sheet metal diagonal brace. Refer to Front End Sheet Metal Diagonal Brace Replacement - Left Side or Front End Sheet Metal Diagonal Brace Replacement - Right Side in Body Front End.
- Connect the negative battery cable. Refer to Battery Negative Cable Disconnection and Connection in Engine Electrical.
- If a new PCM is being installed, program the EEPROM. Refer to Powertrain Control Module Programming .
Notice: Refer to Fastener Notice in the Preface section.
Tighten
Tighten the PCM harness screws to 8 N·m (71 lb in).
