Tools Required
| • | J 29794 Axle
Shaft Remover Extension |
Removal Procedure
Important: Prevent the seals (boots) from contacting the other components in order
to prevent damage to the seals (boots).
- Raise and support the vehicle. Refer to
Lifting and Jacking the Vehicle
in General Information.
- Remove the tire and wheel assembly. Refer to
Tire and Wheel Removal and Installation
in Tires and Wheels.
- Remove the engine splash shield. Refer to
Engine Splash Shield Replacement
in Body Front End.
- Remove the stabilizer shaft link. Refer to
Stabilizer Shaft Link Replacement
in Front Suspension.
- Disconnect the electrical connector from the wheel speed sensor.
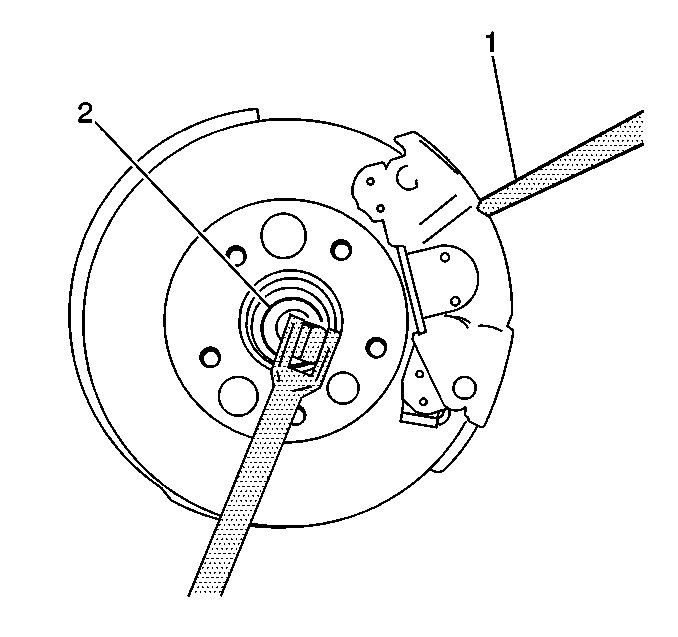
Important: Note the relationship between the halves of the 2-piece ramped washer.
The ramped sides must face each other when installing the washer.
- Remove the front wheel drive shaft nut (2) and the ramped, 2-piece
washer. Insert a drift or a flat-bladed tool (1) through the caliper
and into the brake rotor to prevent the rotor from turning.
Discard the wheel drive shaft nut.
- Disconnect the outer tie rod end from the steering knuckle; do
NOT loosen the tie rod end jam nut. Refer to
Rack and Pinion Outer Tie Rod End Replacement
in Power Steering System.
- Disconnect the lower ball joint from the steering knuckle. Refer
to
Lower Control Arm Replacement
in
Front Suspension.
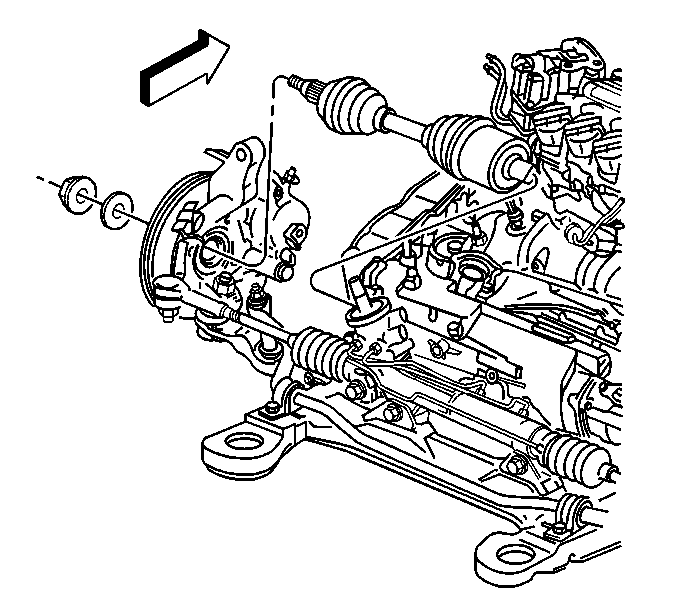
- Install the J 42129
onto the wheel hub and bearing and secure with wheel nuts.
Caution: Do not attempt to move vehicle with drive axle(s) removed from wheel
bearing. Wheel(s) could fall off, dropping vehicle to the ground and causing
personal injury or damage to the vehicle.
- Using the J 42129
, disengage the wheel drive shaft from the wheel hub and bearing
and support the wheel drive shaft.

- Assemble the J 2619-O1
, the J 29794
, and the J 33008-A
.
- Using the J 2619-O1
, the J 29794
, and
the J 33008-A
, disengage
the wheel drive shaft from the transaxle.
- Remove the wheel drive shaft from the vehicle.
- Remove and discard the wheel drive shaft retaining ring.
| • | On the right wheel drive shaft, the retaining ring is on the splined
shaft of the inner tripot housing. |
| • | On the left wheel drive shaft , the retaining ring is on the splined
transmission output shaft. |
Installation Procedure
Important: Prevent the boots (seals) from contacting the other components in order
to prevent damage to the boots (seals).
- Install a new wheel drive shaft retaining ring.
| • | On the right wheel drive shaft, the retaining ring is on the splined
shaft of the inner tripot housing. |
| • | On the left wheel drive shaft , the retaining ring is on the splined
transmission output shaft. |
- Install the wheel drive shaft to the transaxle.
- Push the wheel drive shaft into transaxle until the retaining
ring is fully seated.
- Verify that the wheel drive shaft retaining ring is properly seated.
| 4.1. | Grasp the inner (tripot) housing. |
| 4.2. | Pull the inner (tripot) housing outboard. Do not pull on the wheel
drive shaft bar. |
The wheel drive shaft will remain in place when
the retaining ring is properly seated.
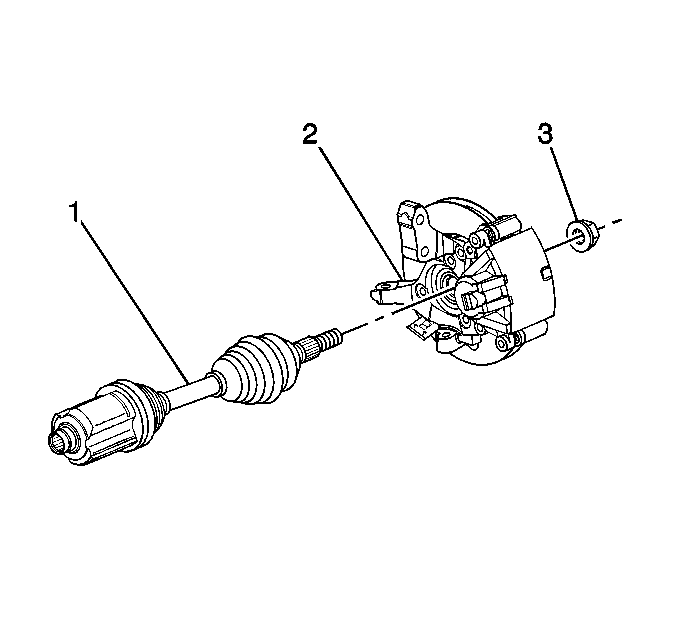
- Install the wheel drive
shaft (1) to the wheel hub and bearing.
- Connect the ball joint to the steering knuckle. Refer to
Lower Control Arm Replacement
in Front Suspension.
- Connect the outer tie rod end assembly to the steering knuckle.
Refer to
Rack and Pinion Outer Tie Rod End Replacement
in
Power Steering System.
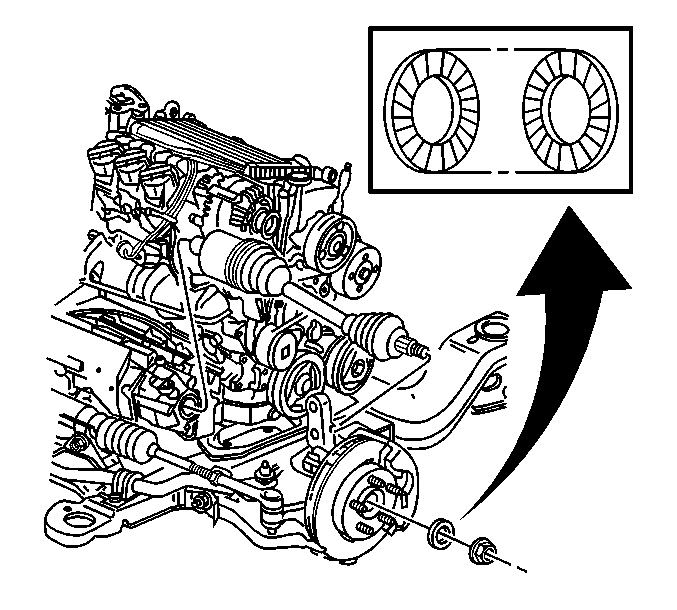
Important: Ensure that the 2-piece, ramped washer is installed prior to installing
the wheel drive shaft nut. The ramped sides of the washer must face each
other.
- Install the 2-piece, ramped washer to the wheel drive shaft spindle.
Notice: Use the correct fastener in the correct location. Replacement fasteners
must be the correct part number for that application. Fasteners requiring
replacement or fasteners requiring the use of thread locking compound or sealant
are identified in the service procedure. Do not use paints, lubricants, or
corrosion inhibitors on fasteners or fastener joint surfaces unless specified.
These coatings affect fastener torque and joint clamping force and may damage
the fastener. Use the correct tightening sequence and specifications when
installing fasteners in order to avoid damage to parts and systems.
- Install a NEW wheel drive shaft nut (2). Insert a drift or
a flat-bladed tool (1) through the caliper and into the brake
rotor to prevent the rotor from turning.
Tighten
Tighten the wheel drive shaft nut to 260 N·m (192 lb ft).
- Install the stabilizer shaft link. Refer to
Stabilizer Shaft Link Replacement
in Front Suspension.
- Connect the wheel speed sensor electrical connector.
- Install the engine splash shield. Refer to
Engine Splash Shield Replacement
in Body Front End.
- Install the tire and wheel assembly. Refer to
Tire and Wheel Removal and Installation
in Tires and Wheels.
- Lower the vehicle.
- Inspect the transaxle fluid level. Refer to
Transmission Fluid Check
in Automatic Transaxle -
4T65-E.
