Tools Required
J 42640 Steering Column Anti-Rotation Pin
Removal Procedure
- Disable the SIR system. Refer to SIR Disabling and Enabling in SIR.
- Install J 42640 to the steering column.
- Remove the steering wheel. Refer to Steering Wheel Replacement .
- Remove the knee bolster trim panel. Refer to Knee Bolster Replacement in Instrument Panel, Gages, and Console.
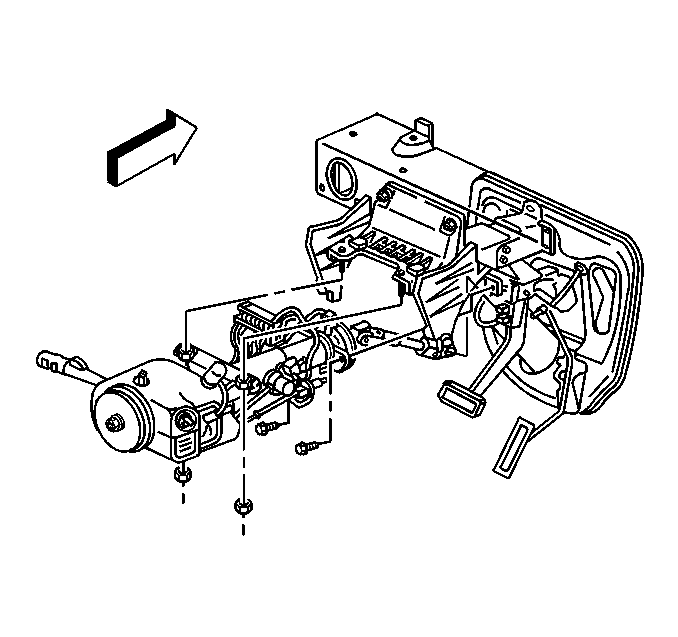
- Push the top of the intermediate shaft seal down in order to access to the upper retaining bolt.
- Remove the upper retaining bolt and nut.
- Disconnect the steering column electrical connectors.
- Column Shift Only. Disconnect the shift cable from the control assembly and the steering column.
- Remove the upper mounting nuts.
- Remove the lower mounting bolts.
- Remove the anchor cable from the bracket.
- Remove the steering column from the vehicle.
Notice: The wheels of the vehicle must be straight ahead and the steering column in the LOCK position before disconnecting the steering column or intermediate shaft from the steering gear. Failure to do so will cause the SIR coil assembly to become uncentered, which may cause damage to the coil assembly.
Important: If the inflatable restraint module is deployed, inspect the coil for signs of damage caused by excessive heat. Replace the coil if necessary.

Installation Procedure
- Install the steering column to the vehicle.
- Install the steering column to the intermediate shaft.
- Install the anchor cable to the bracket stud.
- Install the steering column nuts. Finger tighten the nuts.
- Install the steering column bolts.
- Tighten the fasteners in the following order:
- Tighten the bolts to 24 N·m (18 lb ft).
- Tighten the nuts to 24 N·m (18 lb ft).
- Install the upper intermediate shaft bolt.
- Install the intermediate shaft seal to the steering column.
- Column Shift Only. Install the shift cable to the control assembly and the steering column.
- Connect the steering column electrical connectors.
- Install the knee bolster trim panel. Refer to Knee Bolster Replacement in Instrument Panel, Gages, and Console.
- Install the steering wheel. Refer to Steering Wheel Replacement .
- Remove J 42640 from the steering column.
- Enable the SIR system. Refer to SIR Disabling and Enabling .
- Program the theft deterrent system. Refer to Programming Theft Deterrent System Components in Theft Deterrent.
Caution: In order to ensure the intended function of the steering
column in a vehicle during a crash and in order to avoid personal injury to
the driver, perform the following:
• Tighten the steering column lower fasteners before you tighten
the steering column upper fasteners. Failure to do this can damage the steering
column. • Tighten the steering column fasteners to the specified torque.
Overtightening the upper steering column fasteners could affect the steering
column collapse.
Notice: Refer to Fastener Notice in the Preface section.
Tighten
Tighten
Tighten the bolt to 48 N·m (35 lb ft).
Notice: If a service steering column has been installed, use care when installing the electrical connector into the SIR Coil. Use of excessive force will damage the SIR coil and cause the horn to sound when turning the steering wheel.
