For 1990-2009 cars only
Front Side Door Molding Replacement Rainier
Tools Required
J 25070 Heat Gun
Removal Procedure
- Remove the molding from the vehicle using the following procedure:
- Remove all adhesive from the body panel and the back of the door side molding using a 3M™ scotch brite molding adhesive remover disk 3M™ P/N 07501 or equivalent.
- Clean the body panel using Varnish Makers and Painters (VMP) naphtha.
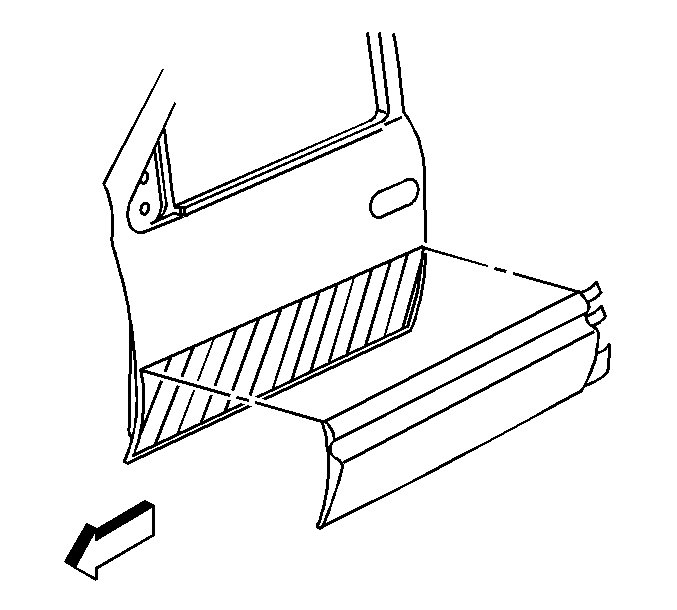
| 1.1. | Heat the door side molding using aJ 25070 . Hold the heat gun approximately 152 mm (6 in) from surface. |
Apply heat using a circular motion for about 30 seconds.
| Important: Be careful not to scratch or chip the paint. |
| 1.2. | Peel the door side molding from the panel surface using a flat-bladed tool. |
Installation Procedure
- Ensure the painted body surface in the tape contact area is clean and dry.
- Warm the body panel with a heat lamp or heat gun (if necessary) to a temperature between 18.8-41.1°C (66-100°F).
- Warm the molding with a heat lamp or heat gun to a minimum temperature of 35°C (95°F).
- Remove the tape liner from the adhesive tape.
- Ensure that the molding is aligned properly with the body panel. Press the door side molding to the body panel.
- Hand roll the door side molding to the body in order to ensure proper adhesion.
Important: Do not touch the adhesive surface.
Front Side Door Molding Replacement TrailBlazer, Envoy
Tools Required
J 25070 Heat Gun
Removal Procedure
- Remove the molding from the vehicle using the following procedure:
- Remove all adhesive from the body panel and the back of the door side molding using a 3M™ scotch brite molding adhesive remover disk 3M™ P/N 07501 or equivalent.
- Clean the body panel using Varnish Makers and Painters (VMP) naphtha.
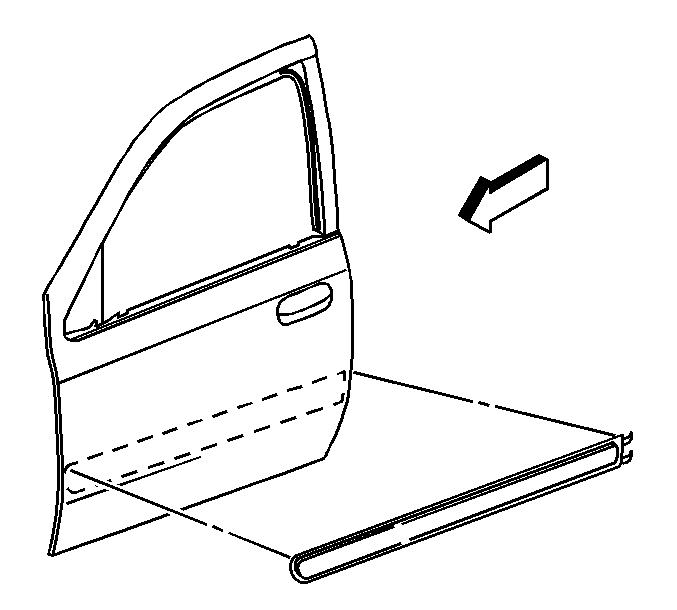
| 1.1. | Heat the door side molding using a J 25070 . Hold the heat gun approximately 152 mm (6 in) from surface. |
Apply heat using a circular motion for about 30 seconds.
| Important: Be careful not to scratch or chip the paint. |
| 1.2. | Peel the door side molding from the panel surface using a flat-bladed tool. |
Installation Procedure
- Ensure the painted body surface in the tape contact area is clean and dry.
- Warm body panel with a heat lamp or heat gun (if necessary) to a temperature between 18.8-41.1°C (66-100°F).
- Remove the tape liner from the adhesive tape.
- Ensure that the molding is aligned with the body panel. Press the door side molding to the body panel.
- Hand roll the door side molding to the body in order to ensure proper adhesion.
Important: Do not touch the adhesive surface.
