For 1990-2009 cars only
Front Bumper Fascia Replacement Rainier
Removal Procedure
- Remove the grille. Refer to Grille Replacement .
- Remove the 2 bolts that retain the top of the fascia to the headlamp housing panel.
- Raise and support the vehicle. Refer to Lifting and Jacking the Vehicle .
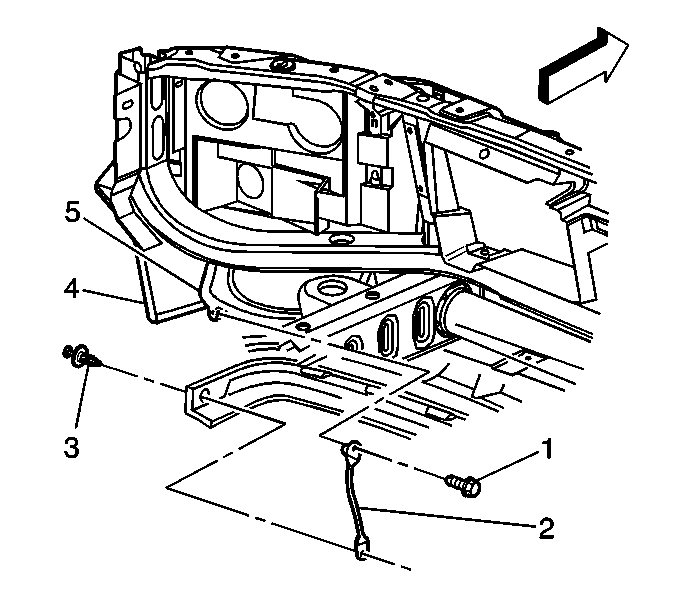
- Remove the push-pins (3) that retain the fascia to the fascia support rods (2).
- Remove the fog lamps from the fascia. Refer to Front Fog Lamp Replacement .
- Remove the cornering lamps from the fascia. Refer to Cornering Lamp Replacement .
- Remove the air deflector from the fascia. Refer to Front Bumper Fascia Air Deflector Replacement .
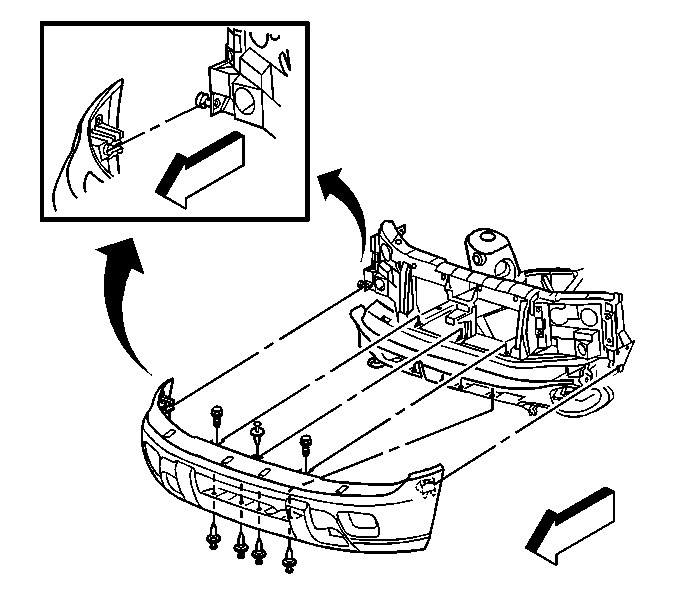
- Release the body side attachment tabs and pull the fascia straight forward in order to remove the fascia from the vehicle.
Installation Procedure
- Position the fascia to the vehicle, ensuring that the body side attachment tabs are fully seated.
- Install the push-pins (3) that retain the fascia to the fascia support rods (2).
- Install the air deflector to the fascia. Refer to Front Bumper Fascia Air Deflector Replacement .
- Install the cornering lamps. Refer to Cornering Lamp Replacement .
- Install the fog lamps. Refer to Front Fog Lamp Replacement .
- Lower the vehicle.
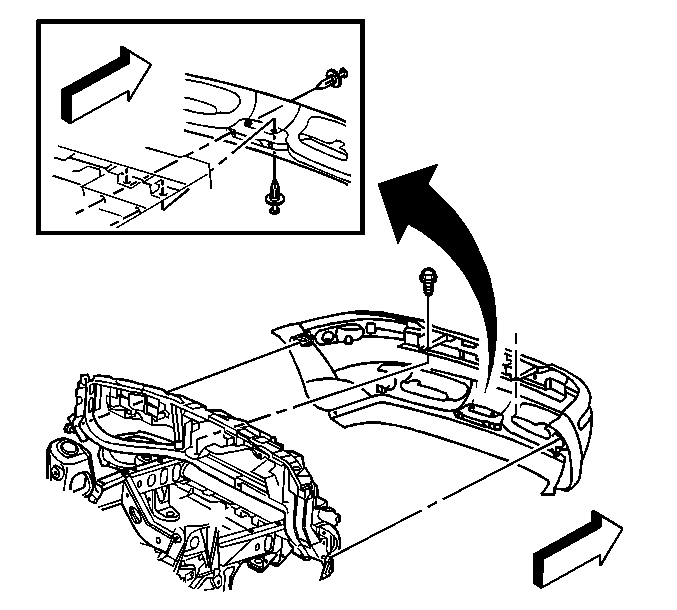
- Install the push-pin in the upper center of the fascia.
- Install the 2 bolts that retain the top of the fascia to the headlamp housing panel.
- Install the grille. Refer to Grille Replacement .
Notice: Refer to Fastener Notice in the Preface section.
Tighten
Tighten the bolts to 10 N·m (89 lb in).
Front Bumper Fascia Replacement Envoy, Envoy XUV
Removal Procedure
- Remove the grille. Refer to Grille Replacement in Exterior Trim.
- Remove the 2 bolts that retain the top of the fascia to the headlamp housing panel.
- Remove the push-pin that retains the top of the fascia to the headlamp housing panel.
- Raise and support the vehicle. Refer to Lifting and Jacking the Vehicle in General Information.
- Remove the push-pins (3) that retain the fascia to the fascia support rods (2).
- Remove the fog lamps from the fascia. Refer to Front Fog Lamp Replacement in Lighting Systems.
- Remove the cornering lamps from the fascia. Refer to Cornering Lamp Replacement in Lighting Systems.
- Remove the air deflector. Refer to Front Bumper Fascia Air Deflector Replacement .
- Remove the 4 push-pins that retain the bottom of the fascia to the headlamp housing panel.
- Release the body side attachment tabs and pull the fascia straight forward in order to remove the fascia from the vehicle.
Installation Procedure
- Position the fascia to the vehicle, ensuring that the body side attachment tabs are fully seated.
- Install the 4 push-pins that retain the bottom of the fascia to the headlamp housing panel.
- Install the push-pins (3) that retain the fascia to the fascia support rods (2).
- Install the air defector. Refer to Front Bumper Fascia Air Deflector Replacement .
- Install the cornering lamps. Refer to Cornering Lamp Replacement in Lighting Systems.
- Install the fog lamps. Refer to Front Fog Lamp Replacement in Lighting Systems.
- Lower the vehicle.
- Install the 2 bolts that retain the top of the fascia to the headlamp housing panel.
- Install the push-pin that retains the center of the top of the fascia to the headlamp housing panel.
- Install the grille. Refer to Grille Replacement in Exterior Trim.
Notice: Refer to Fastener Notice in the Preface section.
Tighten
Tighten the bolts to 10 N·m (89 lb in).
Front Bumper Fascia Replacement TrailBlazer
Removal Procedure
- Remove the grille. Refer to Grille Replacement .
- Remove the 2 bolts that retain the top of the fascia to the headlamp housing panel.
- Remove the push-pin that retains the top of the fascia to the headlamp housing panel.
- Raise and support the vehicle. Refer to Lifting and Jacking the Vehicle .
- Remove the push-pins (3) that retain the fascia to the fascia support rods (2).
- Remove the fog lamps from the fascia. Refer to Front Fog Lamp Replacement .
- Remove the air deflector. Refer to Front Bumper Fascia Air Deflector Replacement .
- Remove the 4 push-pins that retain the bottom of the fascia to the headlamp housing panel.
- Release the body side attachment tabs and pull the fascia straight forward from the wheelhouse opening in order to remove the fascia from the vehicle.
Installation Procedure
- Position the fascia to the vehicle, ensuring that the body side attachment tabs are fully seated.
- Install the 4 push-pins that retain the bottom of the fascia to the headlamp housing panel.
- Install the push-pins (3) that retain the fascia to the fascia support rods (2).
- Install the air defector. Refer to Front Bumper Fascia Air Deflector Replacement .
- Install the fog lamps. Refer to Front Fog Lamp Replacement .
- Lower the vehicle.
- Install the 2 bolts that retain the top of the fascia to the headlamp housing panel.
- Install the push-pin that retains the center of the top of the fascia to the headlamp housing panel.
- Install the grille. Refer to Grille Replacement .
Notice: Refer to Fastener Notice in the Preface section.
Tighten
Tighten the bolts to 10 N·m (89 lb in).
