WIND NOISE AT W/SHIELD COWL AREA (REPAIR PROCEDURE)

SUBJECT: WINDSHIELD COWL AREA WIND NOISE (INSERT STRIP OF 3/8 INCH CLOSED CELL FOAM)
VEHICLES AFFECTED: 1991-92 "C" MODELS
THIS BULLETIN IS BEING REVISED TO INCLUDE ART.
THIS BULLETIN SUPERSEDES AND REPLACES CORPORATE BULLETIN REFERENCE NUMBER 11151O." ORIGINAL BULLETIN WAS REVISED TO INCLUDE THE 1992 MODEL YEAR.
Some 1991-1992 Cadillac DeVilles and Fleetwoods may exhibit an objectionable level of wind noise in the windshield cowl area.
Previous Service bulletins Corporate reference number 801502R** and Corporate reference number 011515** include wind noise diagnostic testing information as well as repair procedures to eliminate wind noises from windshield urethane skips, door weatherstrip sealing, outside mirror sealing, and in the A-pillar cavity. The above bulletins are applicable to 1991-1992 vehicles and, performed as recommended, will eliminate most customer concerns.
If an objectionable wind noise level persists after performing the above bulletins, proceed to the following steps:
1.
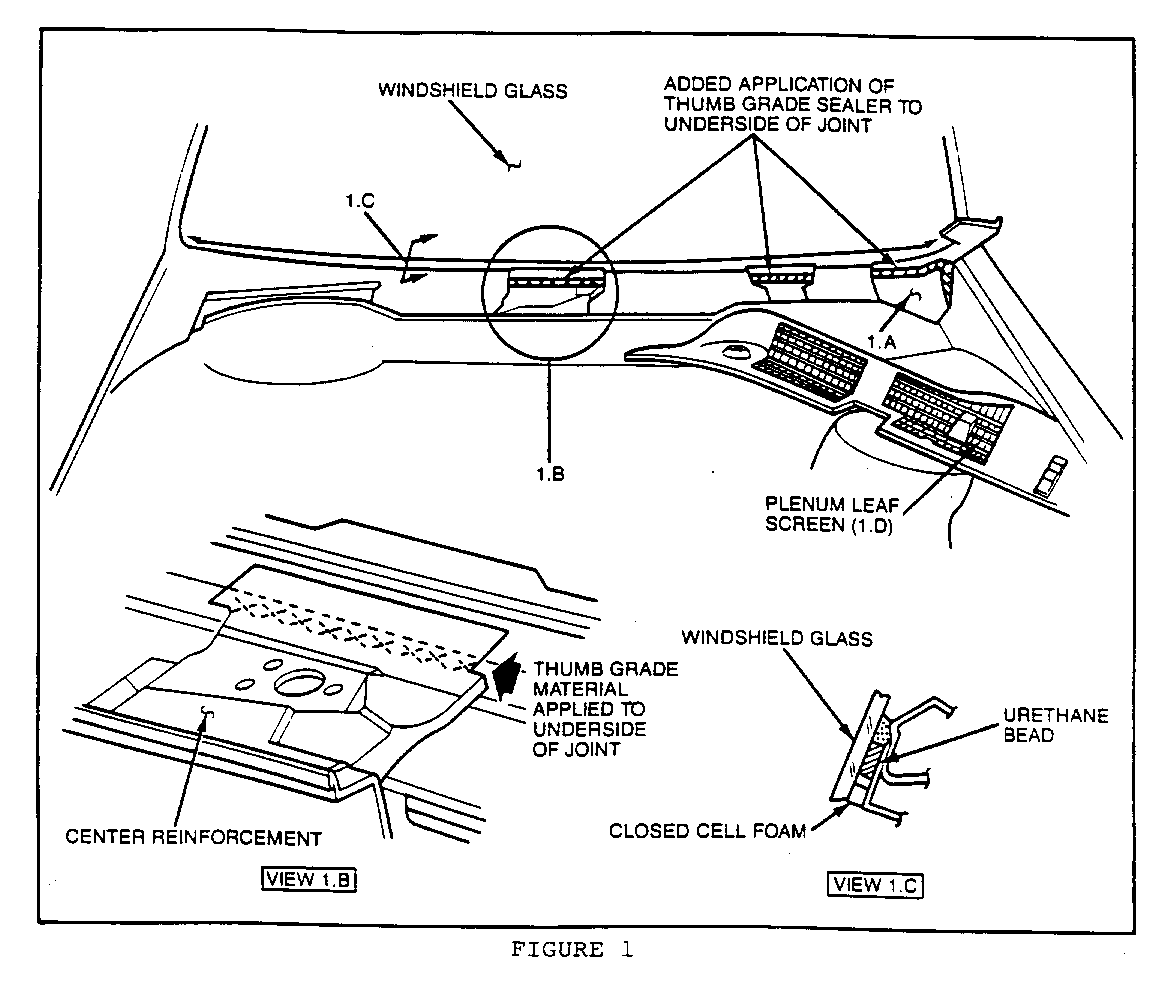
a. Remove the windshield wiper arms. Remove the plenum leaf screen. Remove the bolts securing the left and right windshield wiper transmission and allow it to rest in the bottom of the air plenum. Seal the underside of the left windshield transmission reinforcement to the air plenum with a thumb grade sealer (3M strip caulk, P/N 08578 or equivalent). Use a mirror to ensure the joint is totally sealed. Refer to Figure 1.
b. Repeat this sealing process under the centre reinforcement and under the fight windshield transmission reinforcement. Inspect for a gap at the top right corner of the plenum and seal with thumb grade. Refer to Figure 1.
c. Insert a strip of 3/8" closed cell foam (Kent product P/N 40320 or equivalent) under the entire length of the lower edge of the windshield glass to prevent air turbulence (below the urethane bead). If closed cell foam is not available, strip caulk sealer can be utilized.
d. Reinstall plenum leaf screen and windshield wiper components. Tighten wiper transmission retaining fasteners to 7.5 N.m and/or 5.5 lbs. ft.
2.
a. Remove the inner wheel well close out panels (splash shields) from both front fenders. Refer to Section 10-5-13 of the 1990 Service Information Manual for removal and installation.
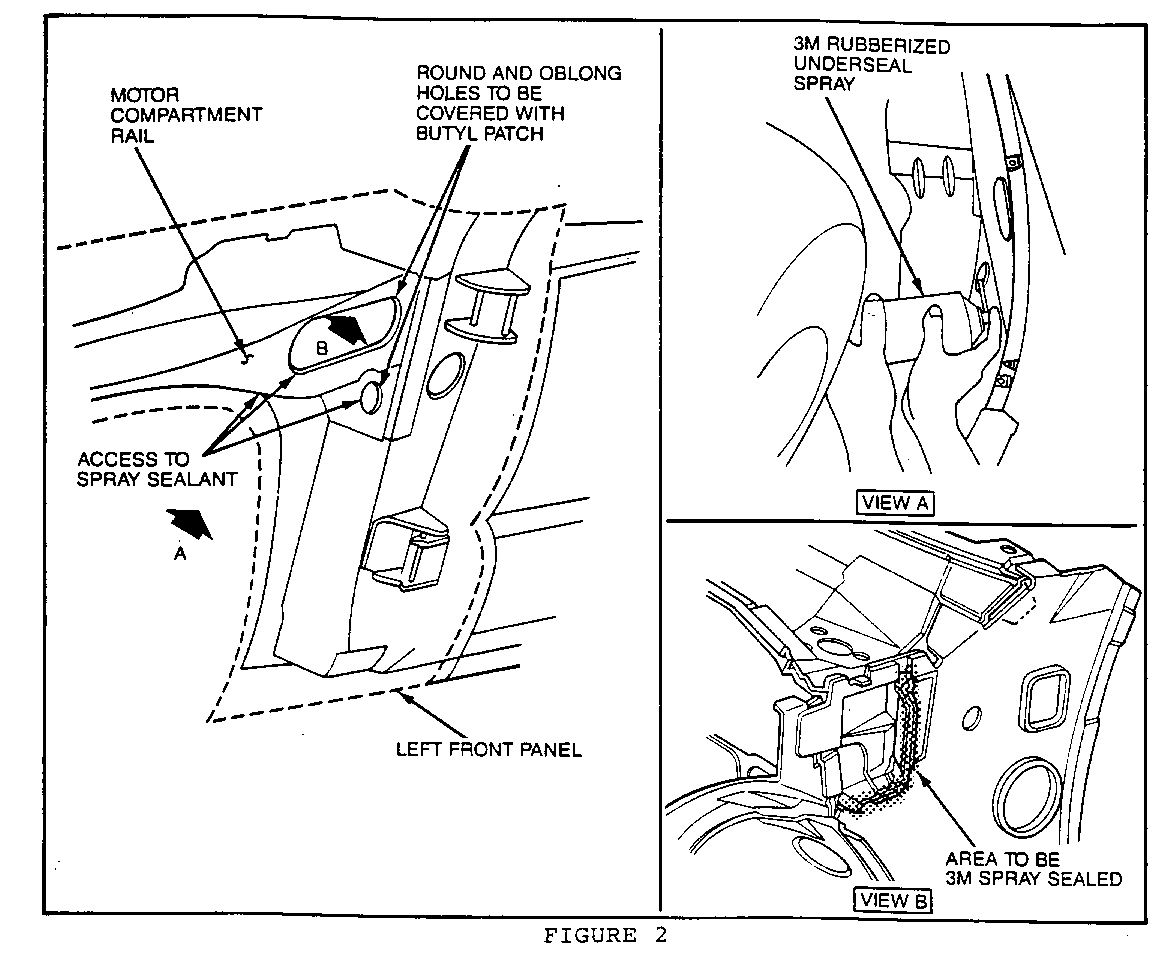
b. From inside the left fender opening, seal the weld joint in the cowl area located at the front body hinge pillar, upper motor compartment rail, and dash panel joint. The area to be sealed is accessible through the access holes in the upper motor compartment rail. Refer to Figure 2. Spray 3M rubberized underseal, P/N 08883 or equivalent, through the openings in the upper motor compartment rail. The 3M sealer should be directed upward at the weld joint making sure that the full length of the joint is sealed. Allow sufficient dry time between coats in order to prevent sagging. This step is required for the left side only, as the plenum does not extend to the right-hand cowl area.
c. Use butyl patches (3M silencer strip, P/N 08585 or equivalent) to cover the round and oblong access holes in the upper motor compartment rail. This step must be performed on both left and right sides.
d. Reinstall wheel well close out panels. Refer to the 1990 Service Information Manual, Section 10-5-13.
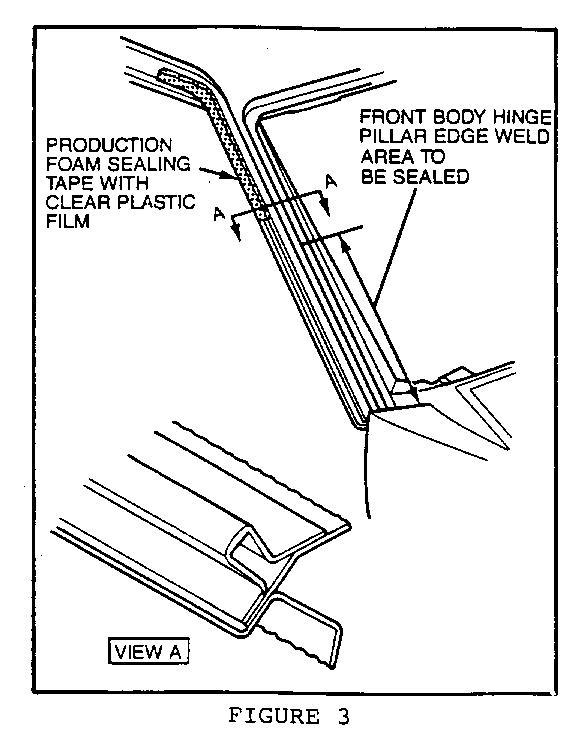
3. Pull back the weatherstrip from the weatherstrip retaining flange on the windshield posts. (The windshield posts should already have been filled with foam per Corporate Bulletin 01 1515**.) If there are any gaps at the weatherstrip retaining flange, apply 3M clear auto sealer, P/N 08551 or equivalent. Refer to Figure 3. Reinstall the weatherstrips.
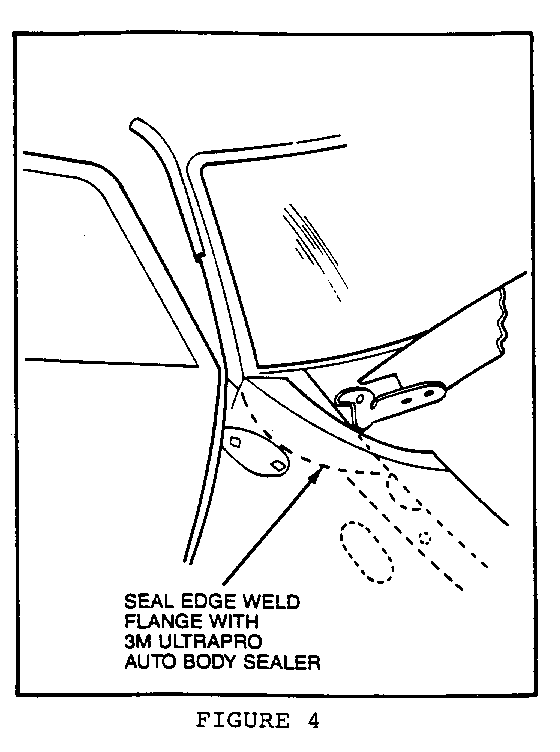
THE FOLLOWING STEP IS TO BE GIVEN SPECIAL SEALING ATTENTION!: ------------------------------------------------------------ 4. The windshield post seam extends beyond the weatherstrip and wraps around the front body hinge pillar up under the GTX plastic fender. Refer to Figure 4. Visually inspect the seam in this area for gaps and seal as required with 3M Ultrapro Auto Body Sealant, P/N 08302 or equivalent. By using a tool, such as a tongue depressor, to access this seam through the gap between the fender and hood and from the door opening, this operation can be performed without removing the front fenders.
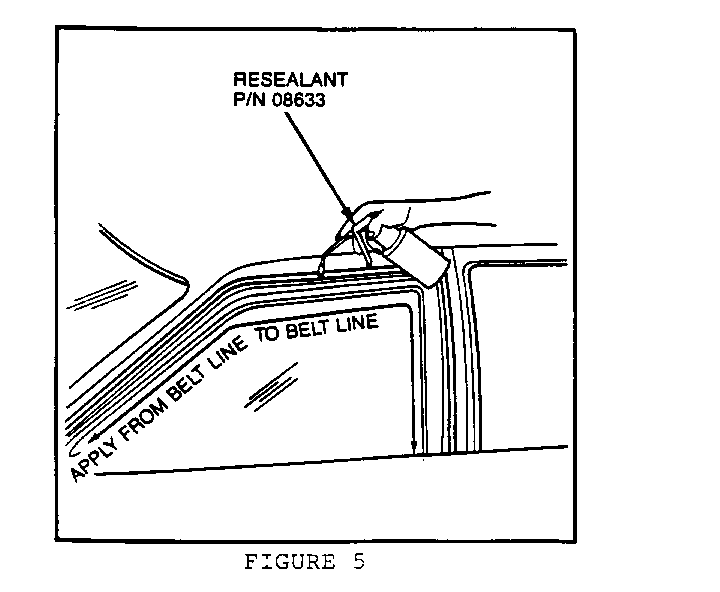
5. Fill the cavity behind all door window laces. Refer to Figure 5. This can be performed using window weld resealant, P/N 08633 or equivalent, following the same method as described in Corporate bulletin reference number 801502R** to seal the windshield lace. Do not pull the lace loose from the bottom of the moulding as the seal to the chrome is strongly bonded in that area.
For vehicles repaired under warranty use:
Labour Time: 2.0 hours for completing these operations
At this point, the vehicle should be reevaluated for wind noise level. Vinyl tops and sunroofs can be expected to create some wind rush noise. Vehicles which are not equipped with these options are less prone to a wind rush condition.
Additionally, vehicles with steel wheels can be expected to produce a "road noise" that will increase interior noise levels. On vehicles with steel wheels, installation of road noise dampener weights (refer to Corporate Bulletins 912001** and 011612**) should be performed prior to reevaluating wind noise levels so that road noise will not adversely affect the evaluation.
BULLETIN REFERENCES:
Corporate Ref. 111510 --------------------- General Motors of Canada 91-2-191
Cadillac Division T-91 -76
Corporate Ref. 801502R ---------------------- General Motors of Canada 91-2-193
Cadillac Division T-89-46
Corporate Ref. 011515 --------------------- General Motors of Canada 91-2-189
Cadillac Division T-90-78
Corporate Ref. 912001 --------------------- General Motors of Canada 90-2-102
Cadillac Division T-90-1
Corporate Ref. 011612 --------------------- General Motors of Canada 91-2-240
Cadillac Division T-91-9
General Motors bulletins are intended for use by professional technicians, not a "do-it-yourselfer". They are written to inform those technicians of conditions that may occur on some vehicles, or to provide information that could assist in the proper service of a vehicle. Properly trained technicians have the equipment, tools, safety instructions and know-how to do a job properly and safely. If a condition is described, do not assume that the bulletin applies to your vehicle, or that your vehicle will have that condition. See a General Motors dealer servicing your brand of General Motors vehicle for information on whether your vehicle may benefit from the information.
