Cooling System Draining and Filling L26 Static Fill
Draining Procedure
Tools Required
J 26568 Coolant and Battery Fluid Tester
Caution: To avoid being burned, do not remove the radiator cap or surge tank cap while the engine is hot. The cooling system will release scalding fluid and steam under pressure if radiator cap or surge tank cap is removed while the engine and radiator are still hot.
- Remove the coolant pressure cap.
- Place a drain pan under the drain cock.
- Open the radiator drain cock.
- Drain the cooling system.
- If a complete engine block drain is required, remove the knock sensors. Refer to Knock Sensor 1 Replacement and Knock Sensor 2 Replacement .
- Inspect the coolant.
- Follow the appropriate procedure based on the condition of the coolant.
Important: Draining the cooling system with the pressure cap installed will syphon the coolant from the overflow tank.
| • | Normal in appearance--Follow the filling procedure. |
| • | Discolored--Follow the flush procedure. Refer to Flushing . |
Filling Procedure
- Close the radiator drain cock.
- If the engine block was drained, install the knock sensors. Refer to Knock Sensor 1 Replacement and Knock Sensor 2 Replacement .
- Open the cooling system bleeder screw.
- Slowly fill the cooling system with a 50/50 coolant mixture. Refer to Approximate Fluid Capacities .
- After the coolant is visible and stable at the filler neck, push down on the upper radiator hose to remove air. While pushing down on the radiator hose ensure that the filler neck is full of coolant.
- Close the cooling system bleeder screw.
- Release the upper radiator hose and add coolant to the filler neck.
- Push down on the upper radiator hose and try to move any air in the upper hose back to the radiator. Repeat this step three times and add coolant to the filler neck each time.
- Install the coolant pressure cap.
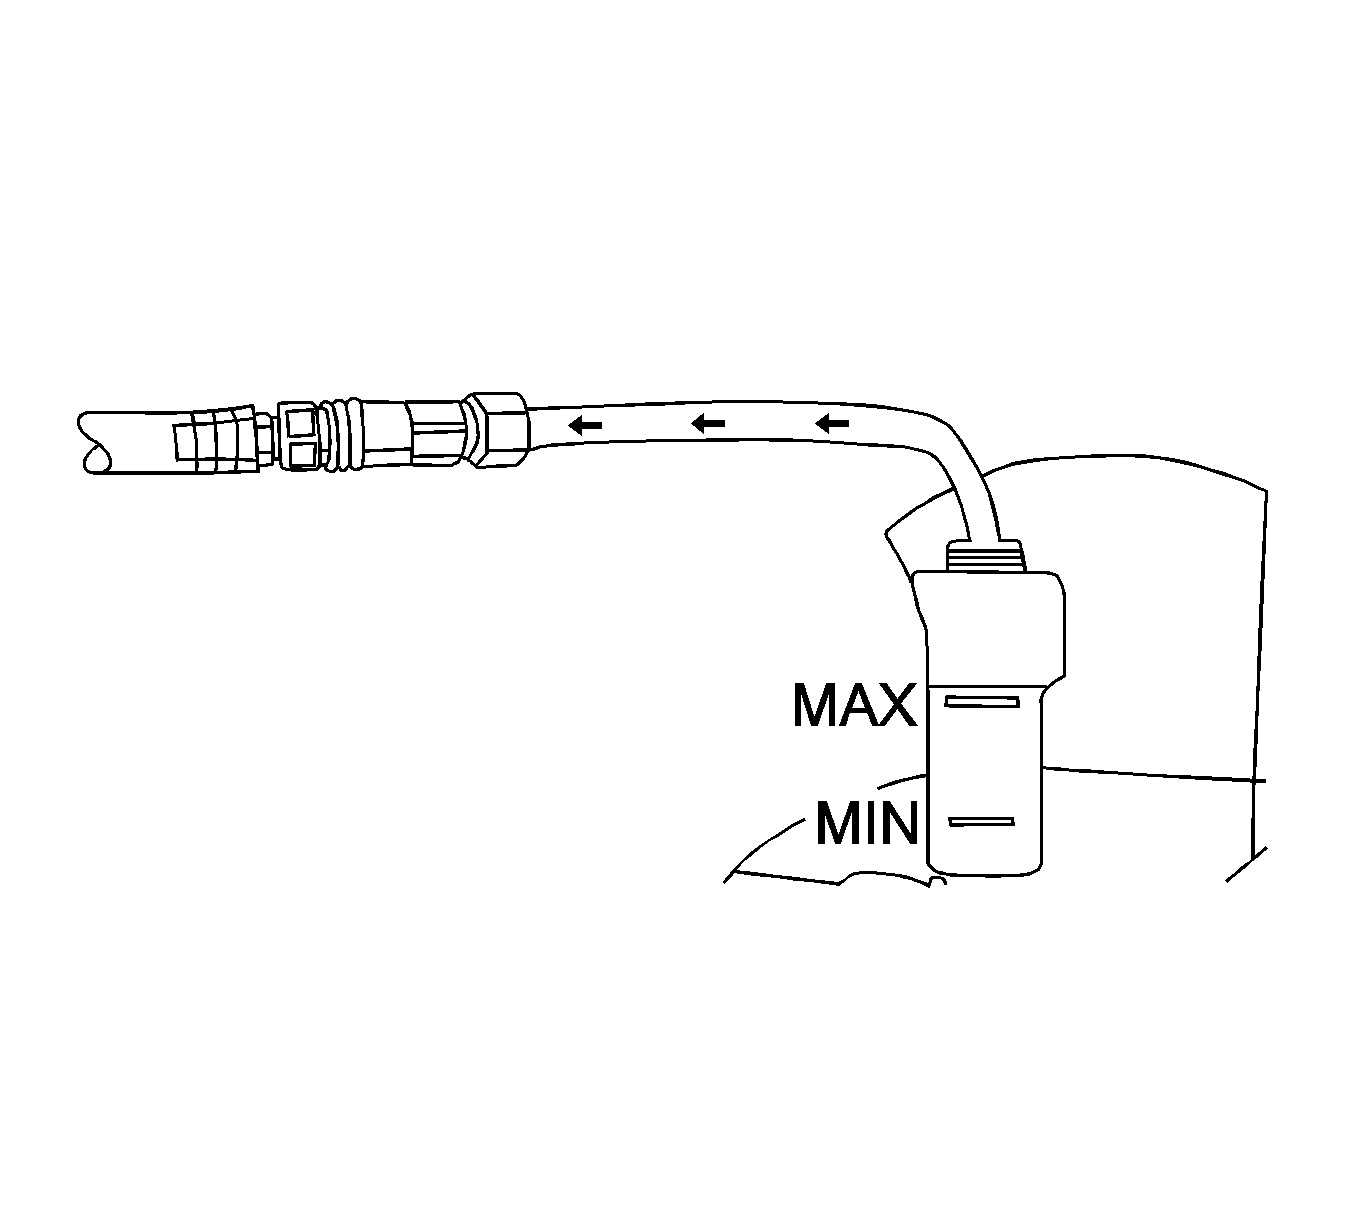
- Fill the coolant recovery bottle to the indicator line, then add 400 milliliters (13.5 ounces) more.
- Start the engine.
- Run the engine at 2,500 RPM until the engine is hot enough to open the thermostat.
- Allow the engine to idle for 3 minutes.
- Shut the engine OFF.
- Allow the engine to cool.
- Top off the coolant as necessary.
- Inspect the concentration of the engine coolant using the J 26568 .
- Rinse away any excess coolant from the engine and the engine compartment.
Notice: The procedure below must be followed. Improper coolant level could result in a low or high coolant level condition, causing engine damage.
Notice: Use the correct fastener in the correct location. Replacement fasteners must be the correct part number for that application. Fasteners requiring replacement or fasteners requiring the use of thread locking compound or sealant are identified in the service procedure. Do not use paints, lubricants, or corrosion inhibitors on fasteners or fastener joint surfaces unless specified. These coatings affect fastener torque and joint clamping force and may damage the fastener. Use the correct tightening sequence and specifications when installing fasteners in order to avoid damage to parts and systems.
Important: Use a 50/50 mixture of DEX-COOL antifreeze and clean, drinkable water.
Cooling System Draining and Filling LY7 Static Fill
Draining Procedure
Tools Required
J 26568 Coolant and Battery Fluid Tester
Caution: To avoid being burned, do not remove the radiator cap or surge tank cap while the engine is hot. The cooling system will release scalding fluid and steam under pressure if radiator cap or surge tank cap is removed while the engine and radiator are still hot.
- Remove the coolant pressure cap.
- Place a drain pan under the drain cock.
- Open the radiator drain cock.
- Drain the cooling system.
- If a complete engine block drain is required, remove the coolant drain plugs from the engine block. Refer to Engine Block Disassemble .
- Inspect the coolant.
- Follow the appropriate procedure based on the condition of the coolant.
Important: Draining the cooling system with the pressure cap installed will syphon the coolant from the overflow tank.
| • | Normal in appearance--Follow the filling procedure. |
| • | Discolored--Follow the flush procedure. Refer to Flushing . |
Filling Procedure
- Close the radiator drain cock.
- If a complete engine block drain was required, install the coolant drain plugs to the engine block. Refer to Engine Block Disassemble .
- Slowly fill the cooling system with a 50/50 coolant mixture until the coolant level is visible and stable. Refer to Approximate Fluid Capacities
- Install the pressure cap loosely (threaded on about one turn).
- Start the engine and raise the engine speed to 2,500 RPM and hold it there for 40 seconds, then shut engine off.
- Remove the pressure cap and fill the coolant system until the level is visible and stable.
- Install the pressure cap loosely (threaded on about one turn).
- Start the engine and raise the engine speed to 2,500 RPM and hold it there for 30 seconds, then shut engine off.
- Remove the pressure cap and fill the coolant system until the level is visible and stable.
- Install the pressure cap loosely (threaded on about one turn).
- Start the engine and raise the engine speed to 2,500 RPM and hold it there for 20 seconds, then shut engine off.
- Remove the pressure cap and fill the coolant system until the level is visible and stable.
- Install the pressure cap, fully threaded on.
- Fill the coolant recovery bottle to the indicator line, then add 400 milliliters (13.5 ounces) more.
- Start the engine and run it above 2500 RPM until it is hot enough to open the thermostat, this will allow the trapped air to be purged from the engine.
- Complete a series of three, four-second-duration idles with four-second-duration 3000 RPM cycles.
- Turn the engine off and allow it to cool down.
- Fill the coolant recovery bottle to the indicator line.
- Inspect the concentration of the engine coolant using the J 26568 .
- Rinse away any excess coolant from the engine and the engine compartment.
Notice: The procedure below must be followed. Improper coolant level could result in a low or high coolant level condition, causing engine damage.
Notice: Use the correct fastener in the correct location. Replacement fasteners must be the correct part number for that application. Fasteners requiring replacement or fasteners requiring the use of thread locking compound or sealant are identified in the service procedure. Do not use paints, lubricants, or corrosion inhibitors on fasteners or fastener joint surfaces unless specified. These coatings affect fastener torque and joint clamping force and may damage the fastener. Use the correct tightening sequence and specifications when installing fasteners in order to avoid damage to parts and systems.
Important: Use a 50/50 mixture of DEX-COOL antifreeze and clean, drinkable water.
Cooling System Draining and Filling L26, LY7 GE 47716 Fill
Tools Required
| • | J 26568 Coolant and Battery Fluid Tester |
| • | J 42401 Radiator Cap and Surge Tank Test Adapter |
| • | GE-47716 Vac N Fill Coolant Refill Tool |
Draining Procedure
Caution: To avoid being burned, do not remove the radiator cap or surge tank cap while the engine is hot. The cooling system will release scalding fluid and steam under pressure if radiator cap or surge tank cap is removed while the engine and radiator are still hot.
- Remove the coolant pressure cap.
- Place a drain pan under the drain cock.
- Open the radiator drain cock.
- Drain the cooling system.
- If a complete engine block drain is required, remove the knock sensors for the 3.8L engine or the engine block drain plugs for the 3.6L engine. Refer to Knock Sensor 1 Replacement and Knock Sensor 2 Replacement for the 3.8L engine or to Engine Block Disassemble for the 3.6L (LY7) engine.
- Inspect the coolant.
- Follow the appropriate procedure based on the condition of the coolant.
Important: Draining the cooling system with the pressure cap installed will syphon the coolant from the overflow tank.
| • | Normal in appearance--Follow the filling procedure. |
| • | Discolored--Follow the flush procedure. Refer to Flushing . |
Vac-N-Fill Procedure
- If a complete engine block drain was required, install the knock sensors for the 3.8L engine or the engine block drain plugs for the 3.6L engine. Refer to Knock Sensor 1 Replacement and Knock Sensor 2 Replacement for the 3.8L engine or to Engine Block Disassemble for the 3.6L (LY7) engine.
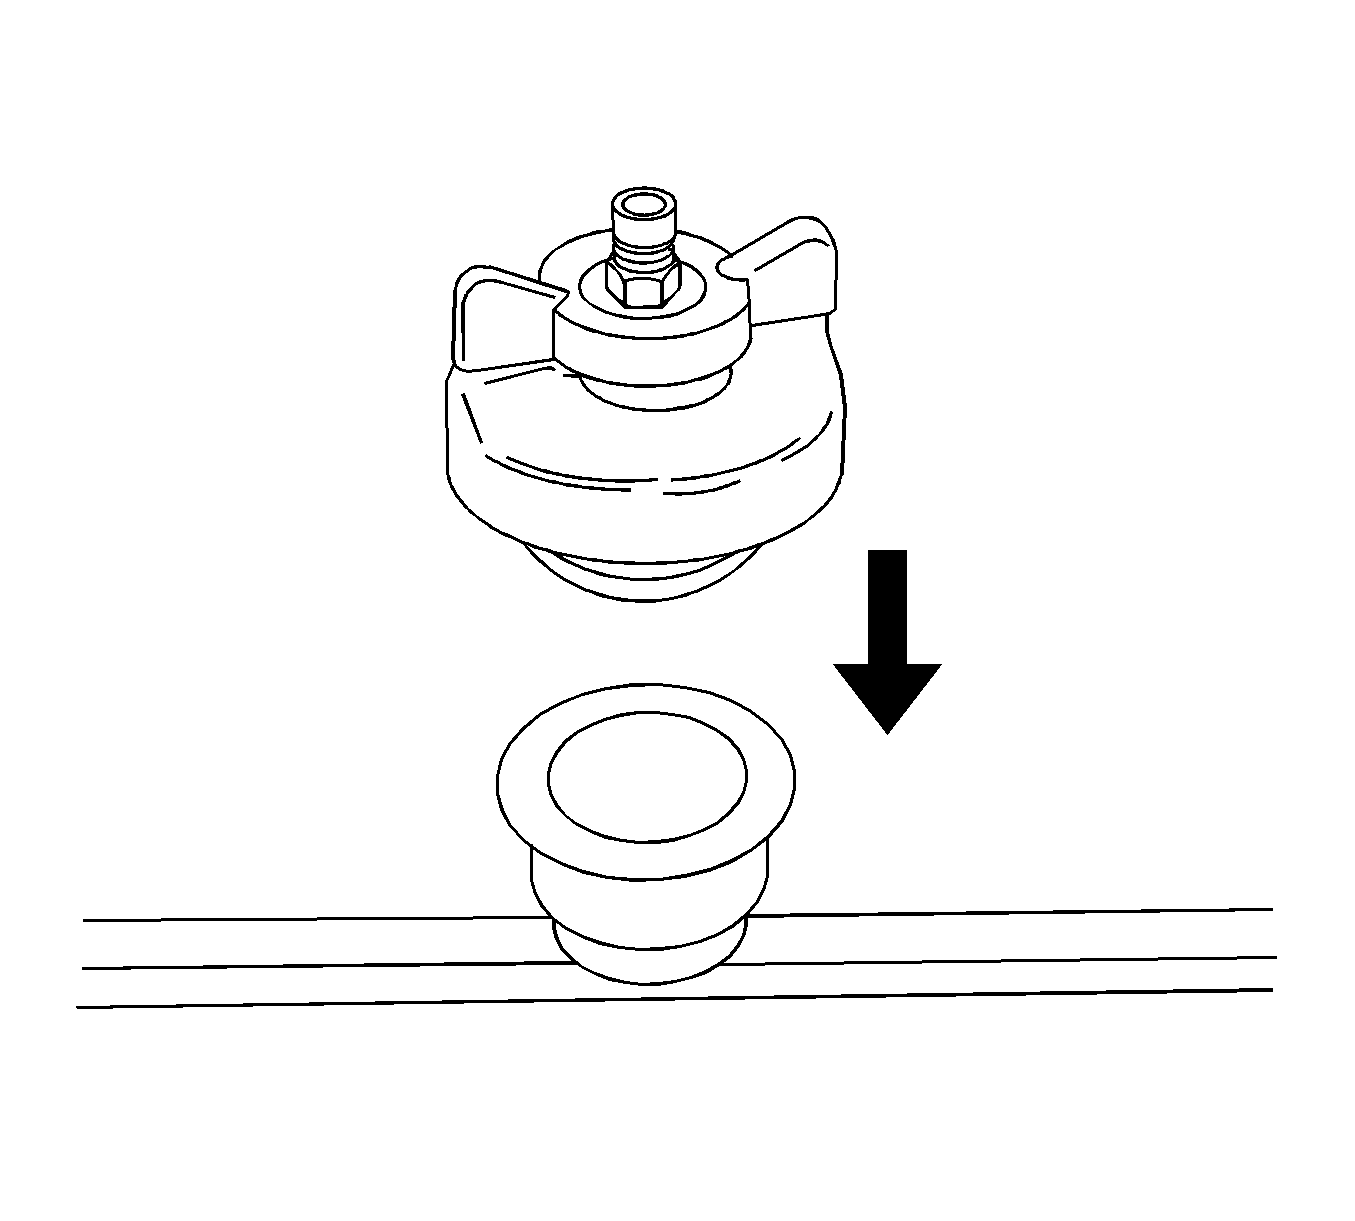
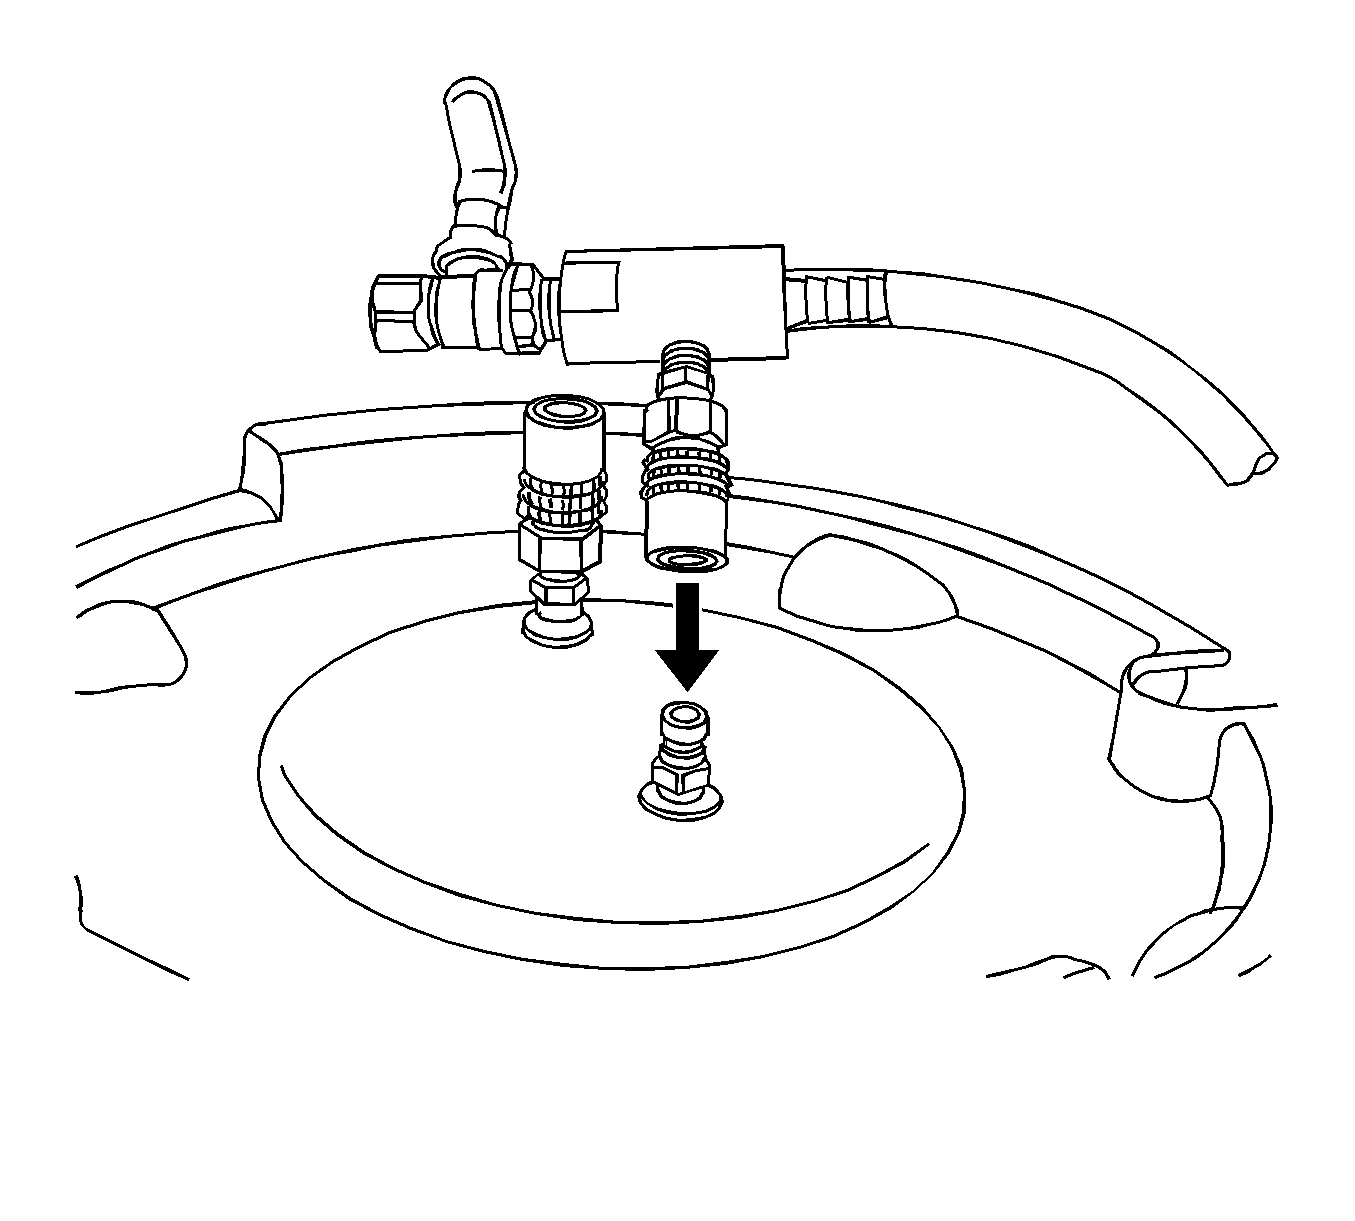
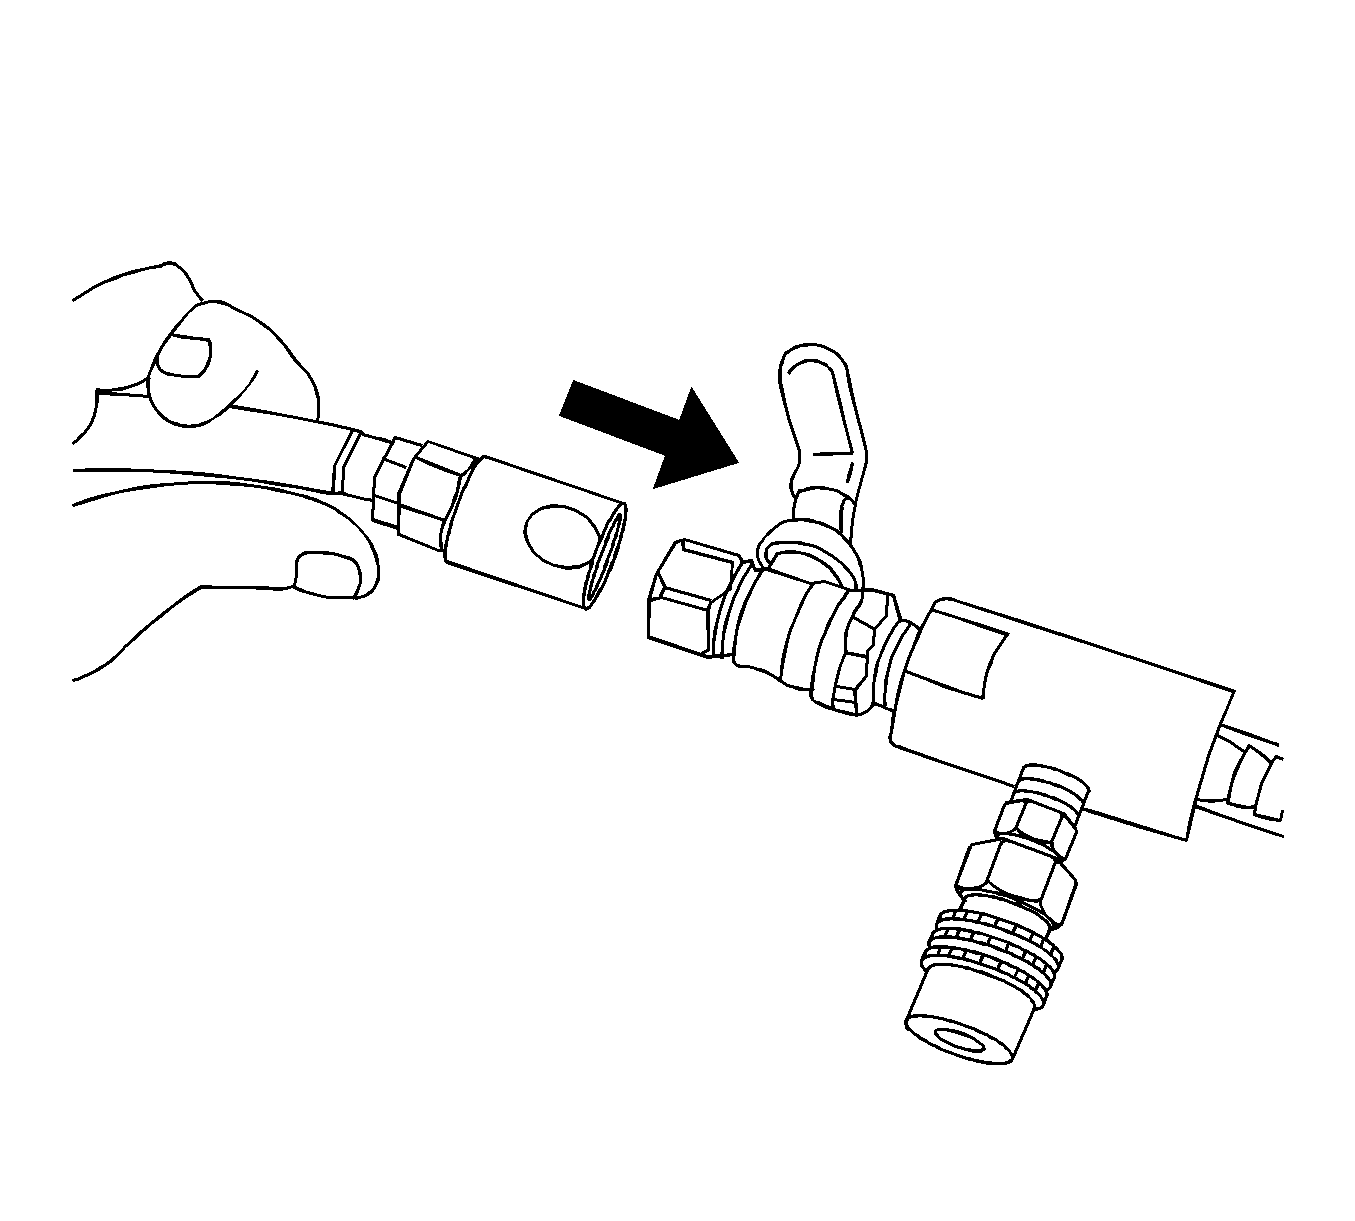
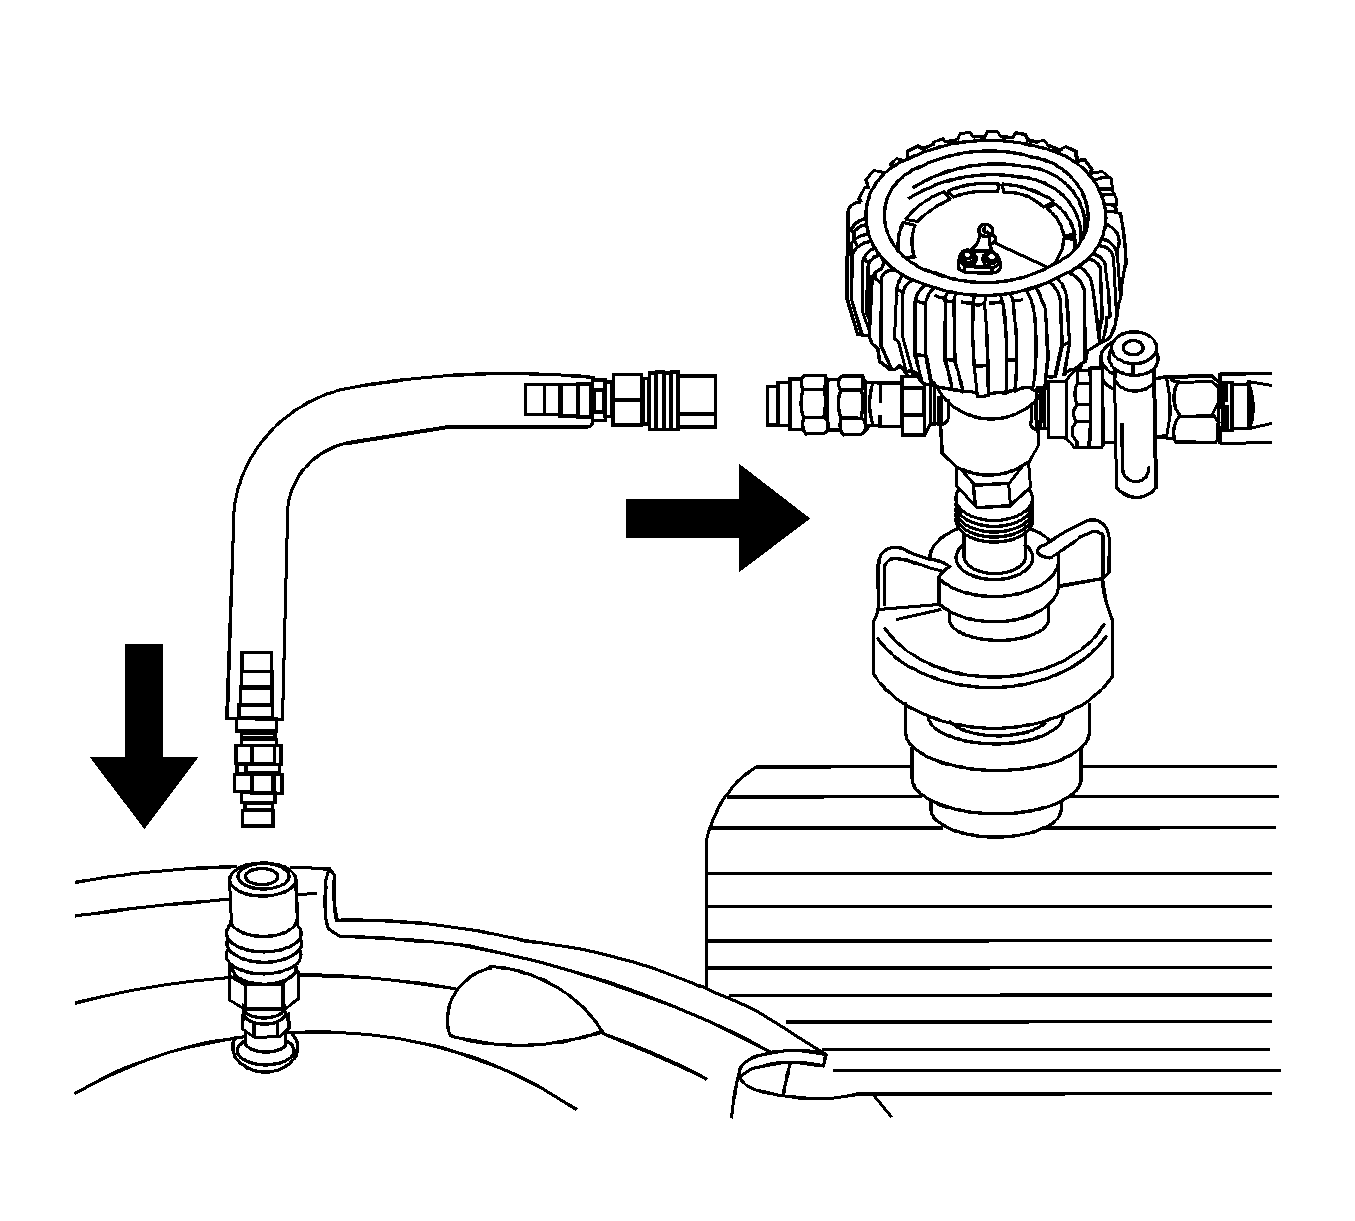
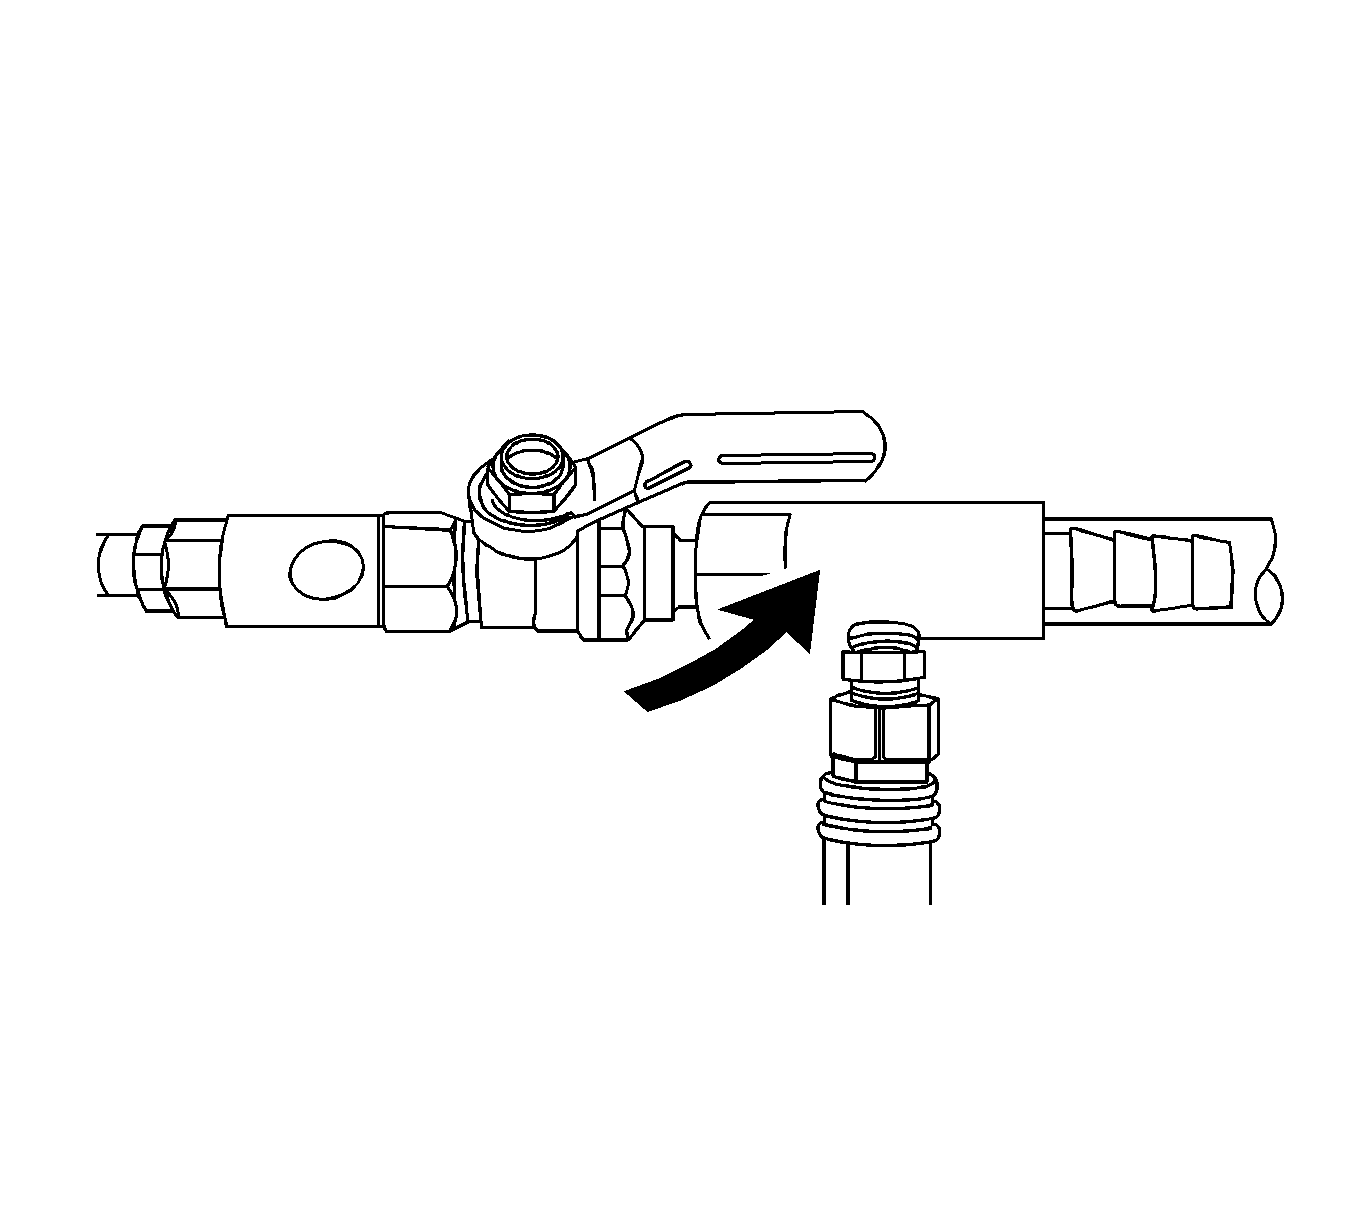
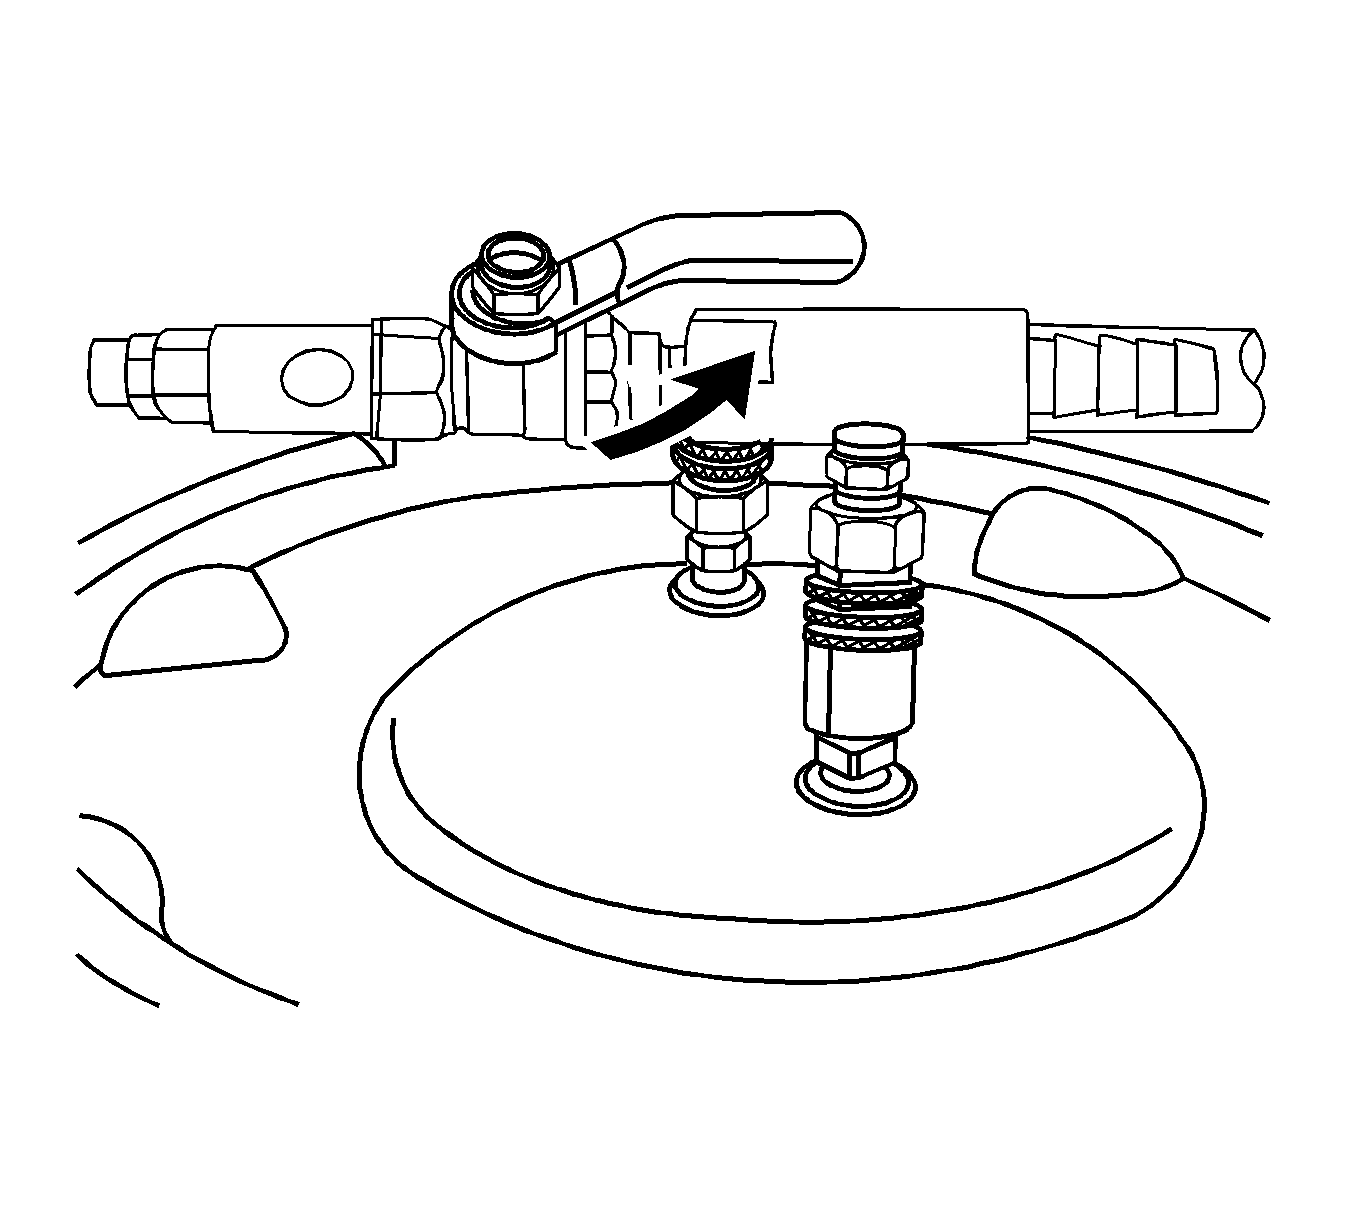
- Install the J 42401 to the coolant fill port.
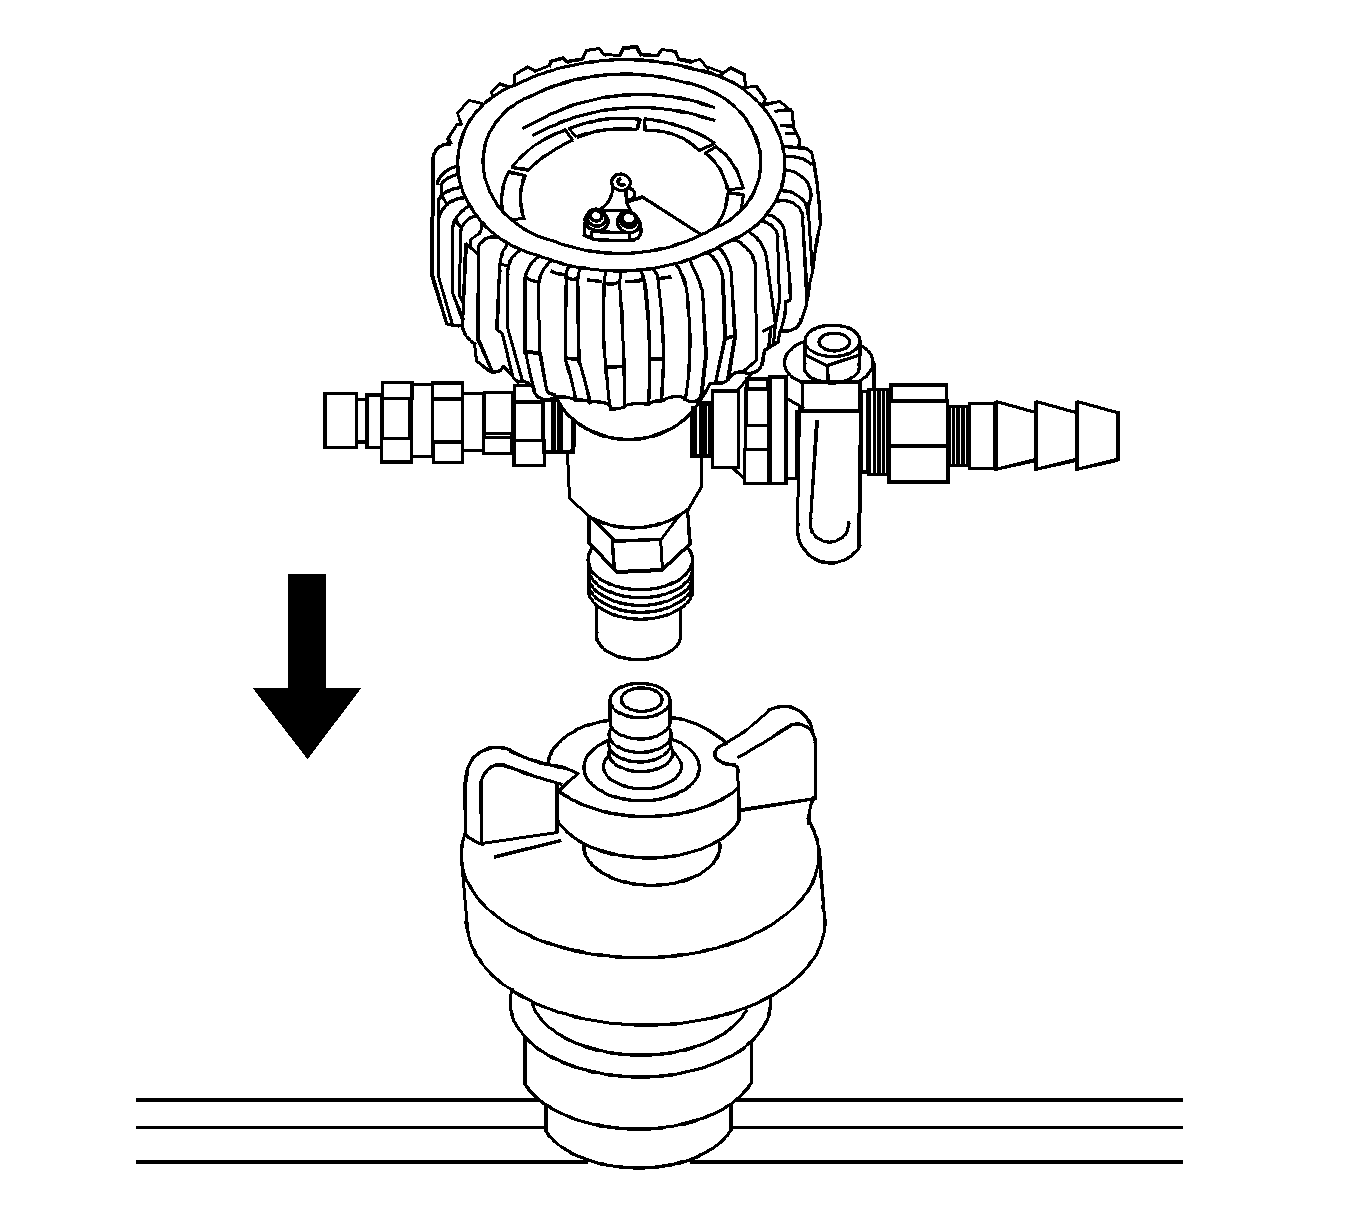
- Attach the Vac N Fill cap to J 42401 .
- Attach the vacuum gage assembly to the Vac N Fill cap.
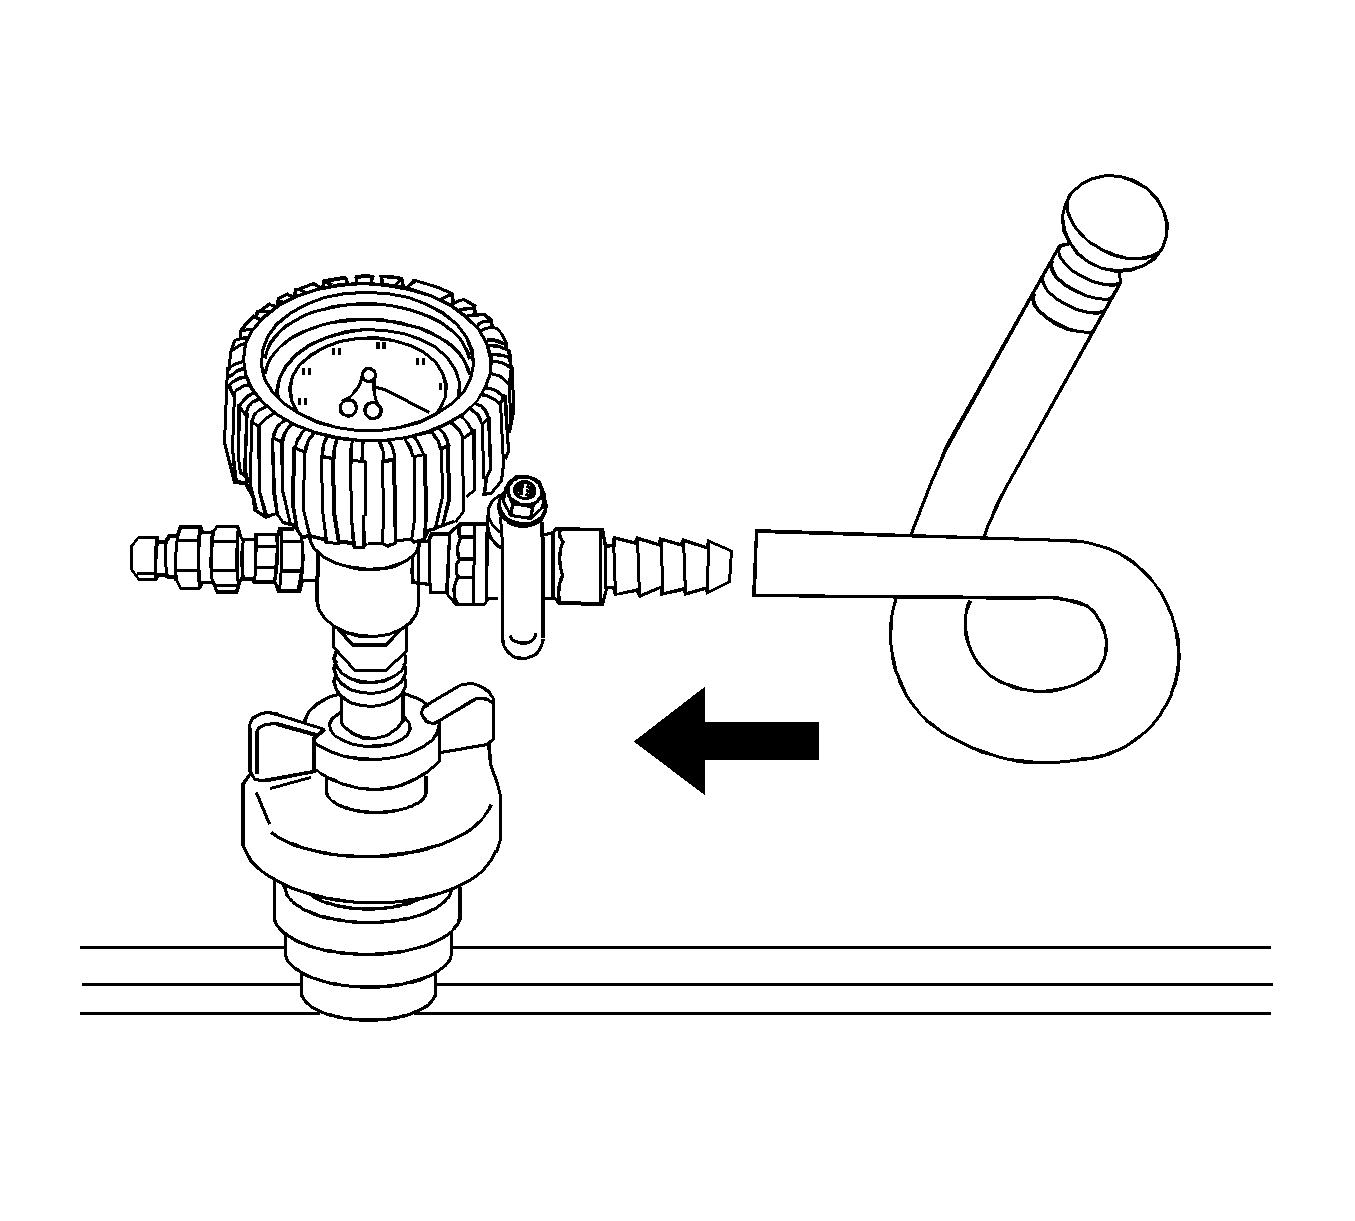
- Attach the fill hose to the barb fitting on the vacuum gage assembly.
- Pour the coolant mixture into the graduated reservoir.
- Place the fill hose in the graduated reservoir.
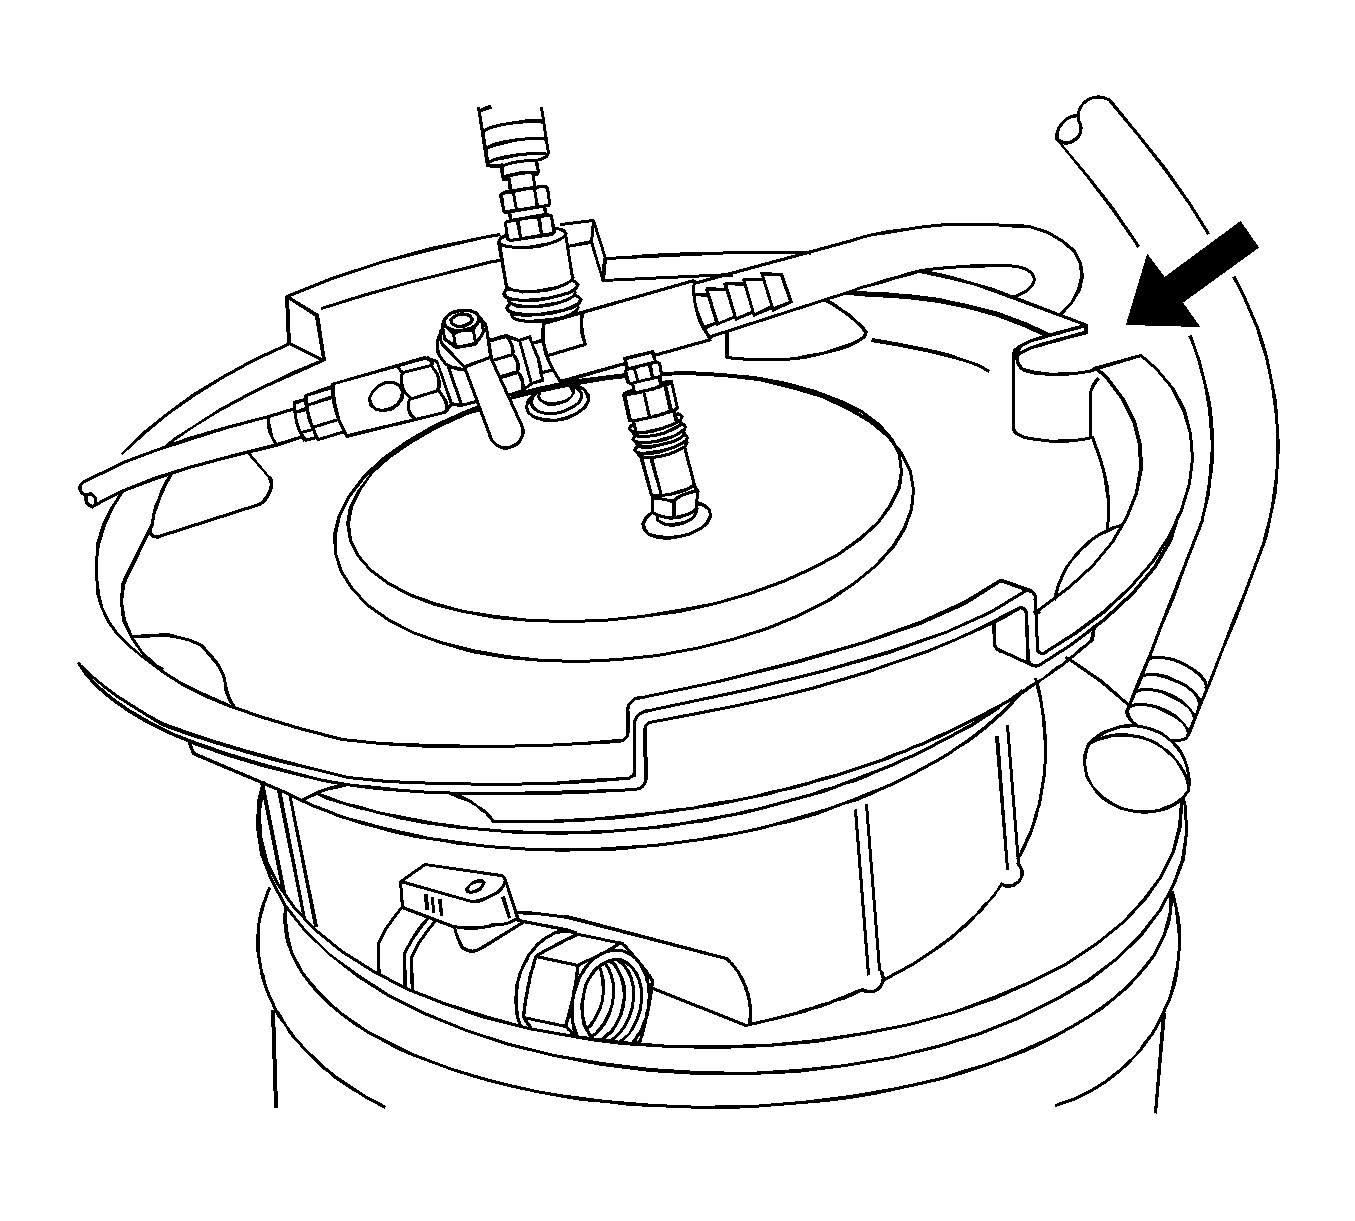
- Install the vacuum tank on the graduated reservoir with the fill hose routed through the cut-out area in the vacuum tank.
- Attach the venturi assembly to the vacuum tank.
- Attach a shop air hose to the venturi assembly.
- Attach the vacuum hose to the vacuum gage assembly and the vacuum tank.
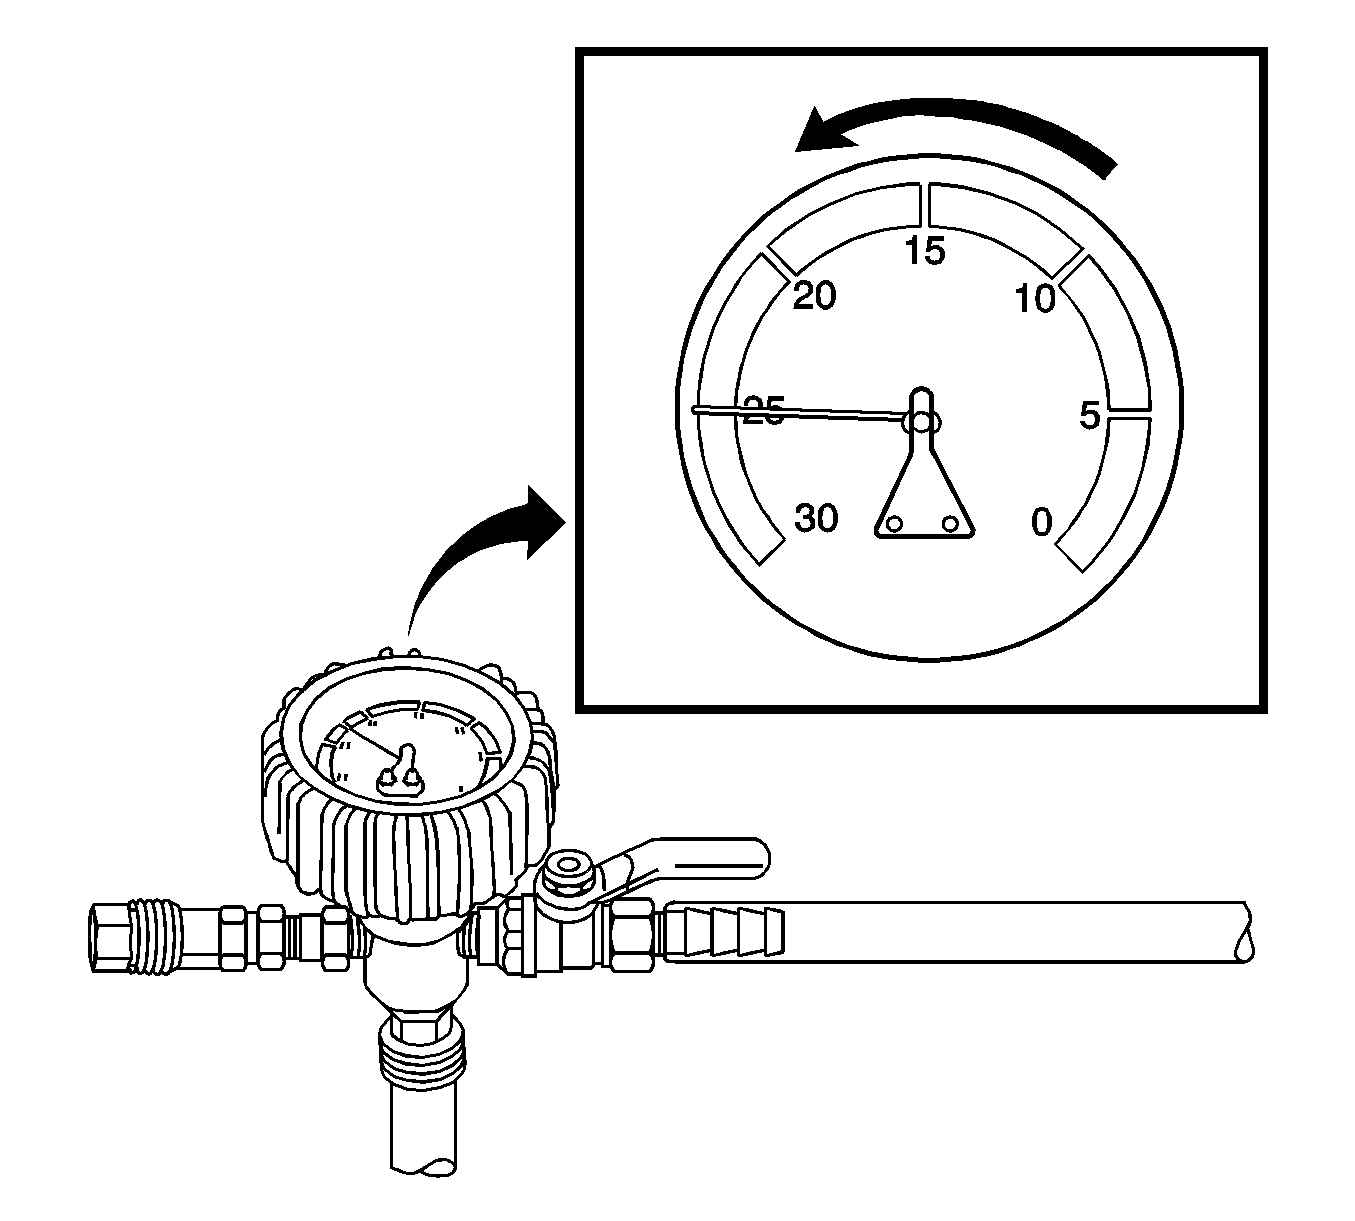
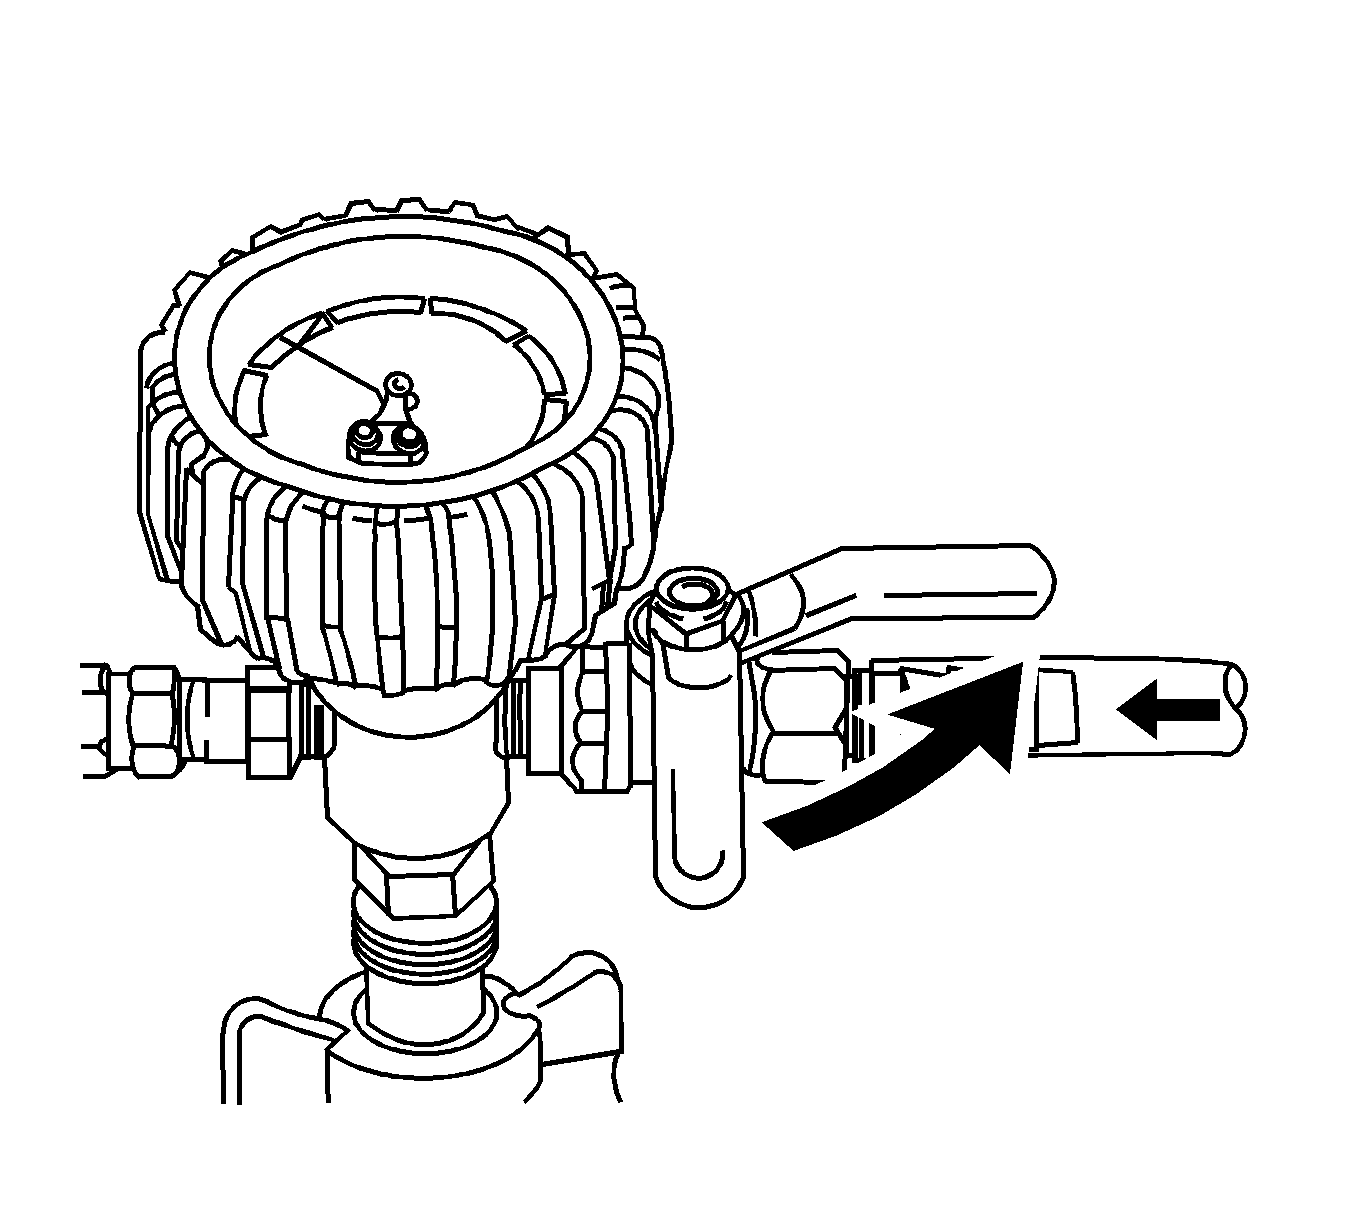
- Open the valve on the venturi assembly. The vacuum gage will begin to rise and a hissing noise will be present.
- Continue to draw vacuum until the needle stops rising. This should be 610-660 mm Hg (24-26 in Hg).
- To aid in the fill process, position the graduated reservoir above the coolant fill port.
- Slowly open the valve on the vacuum gage assembly. When the coolant reaches the top of the fill hose, close the valve. This will eliminate air from the fill hose.
- Close the valve on the venturi assembly.
- If there is a suspected leak in the cooling system, allow the system to stabilize under vacuum and monitor for vacuum loss.
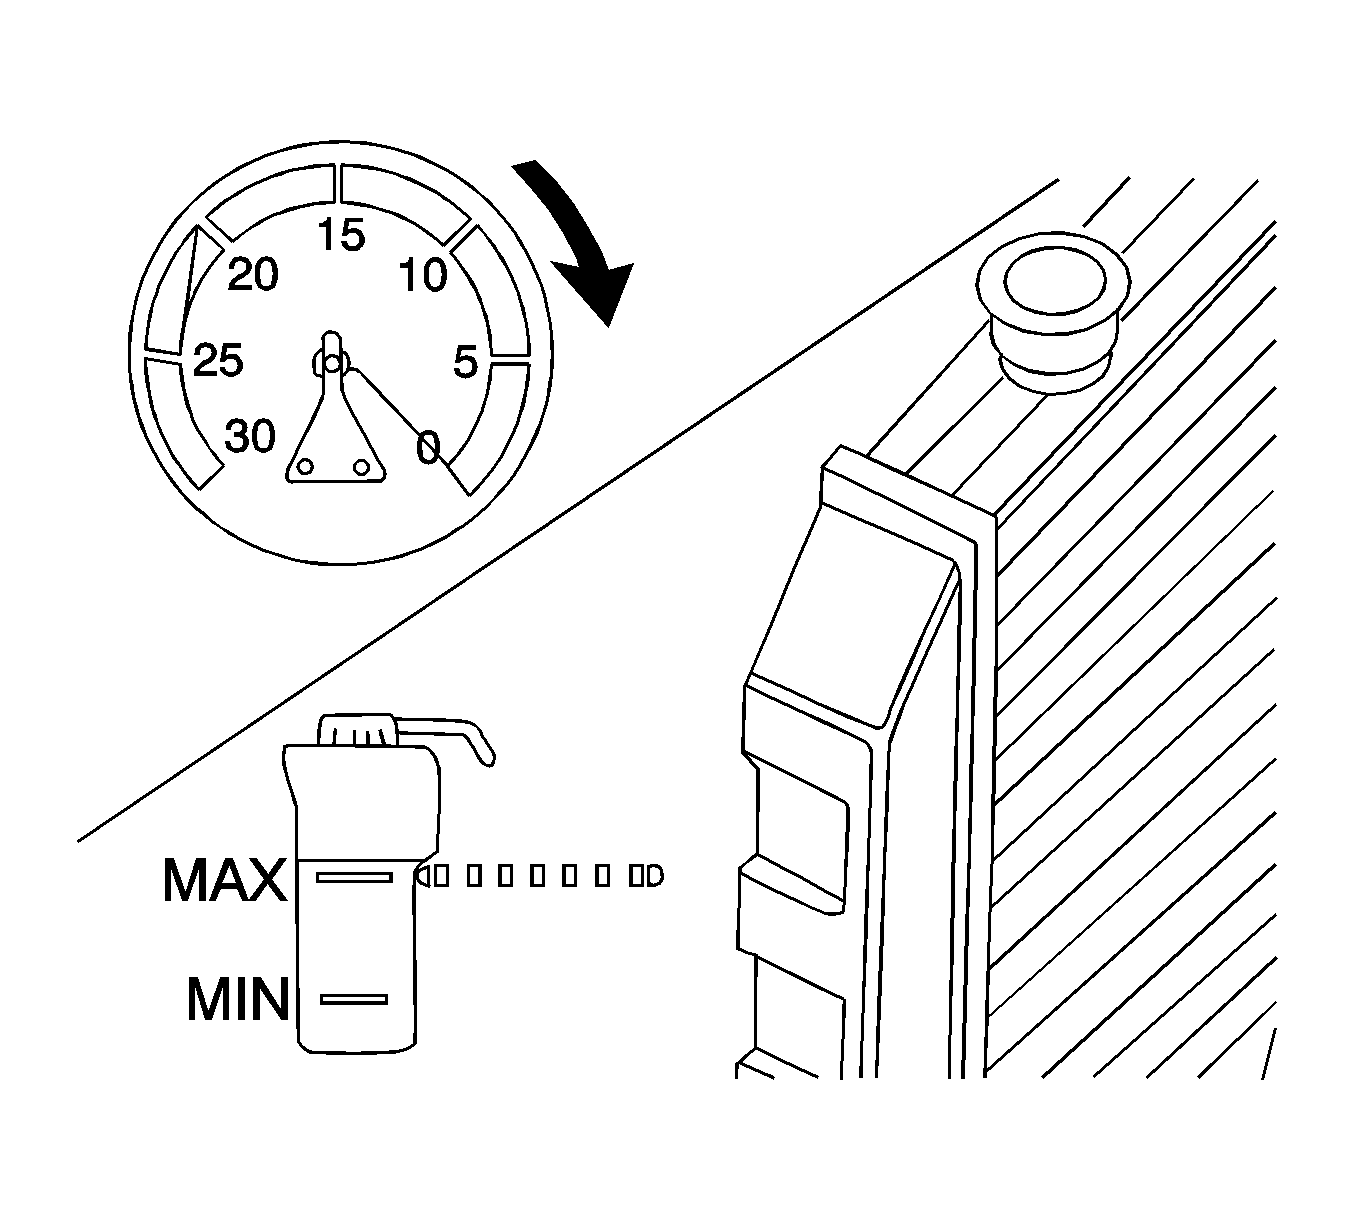
- Open the valve on the vacuum gage assembly. The vacuum gage will drop as coolant is drawn into the system.
- Once the vacuum gage reaches zero, close the valve on the vacuum gage assembly and repeat steps 11-17.
- Detach the Vac N Fill cap from the J 42401 .
- Remove the J 42401 from the coolant fill port.
- Add coolant to the system as necessary.
- Inspect the concentration of the coolant mixture using the J 26568 .
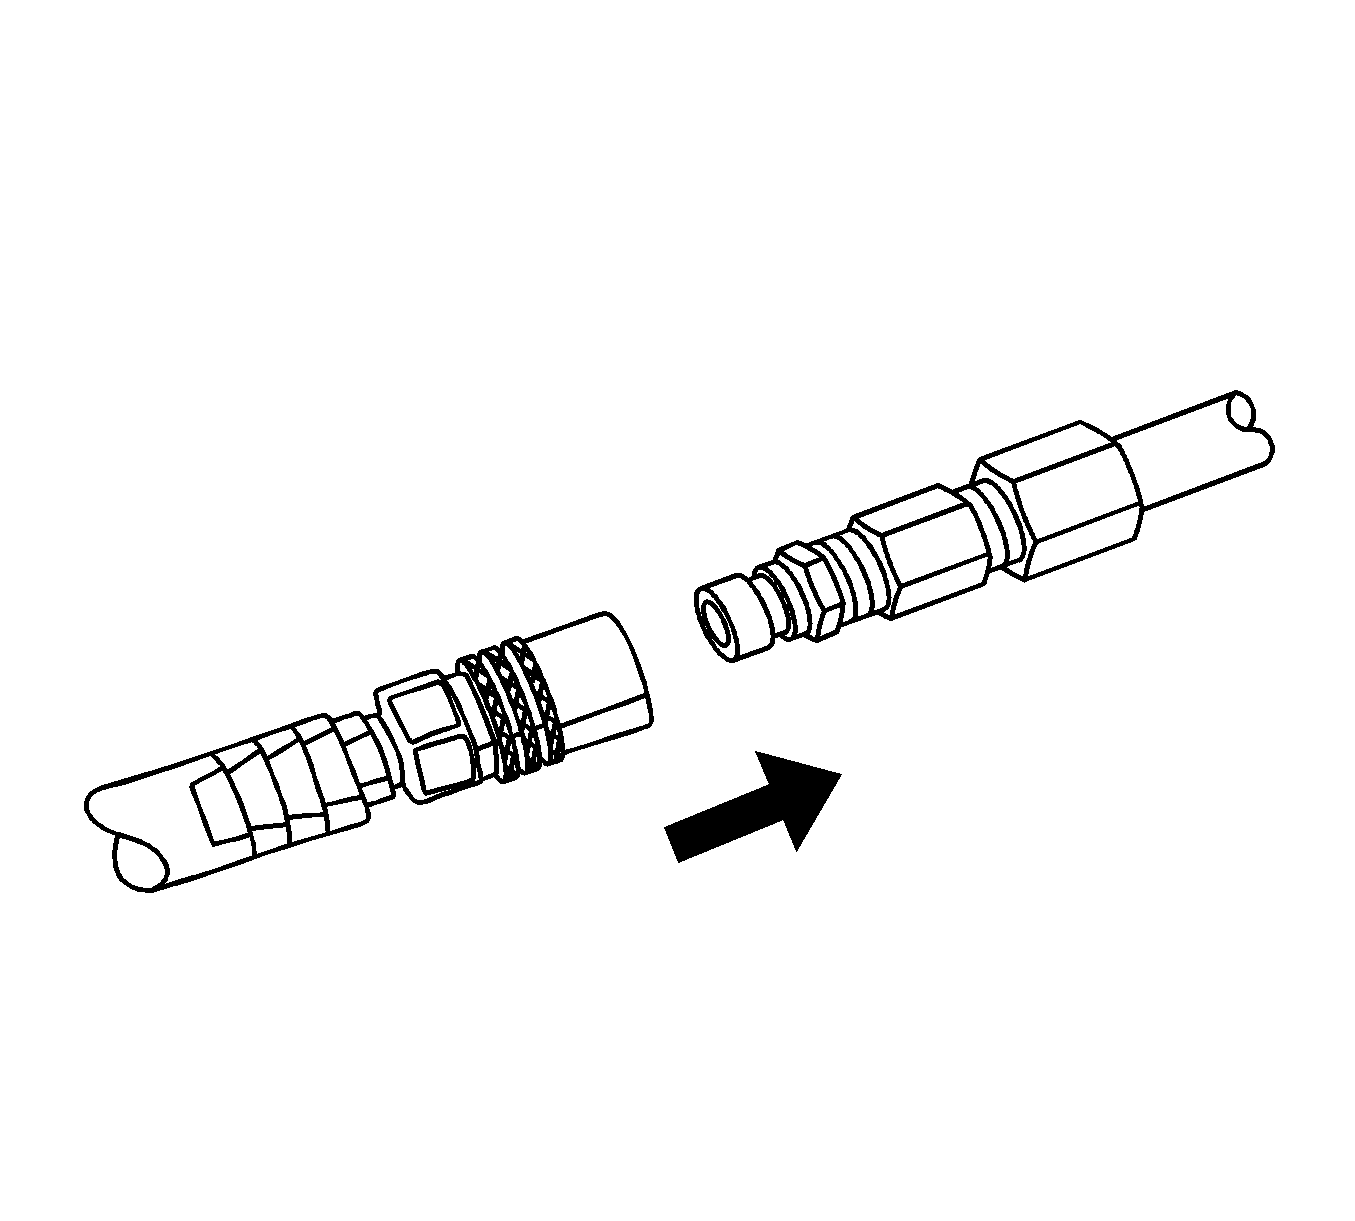
- Detach the vacuum hose from the vacuum gage assembly.
- Attach the extraction hose to the vacuum hose.
- Open the valve on the venturi assembly to start a vacuum draw.
- Use the extraction hose to draw out coolant to the proper level.
- The vacuum tank has a drain valve on the bottom of the tank. Open the valve to drain coolant from the vacuum tank into a suitable container for disposal.
- Fill the coolant recovery bottle to the indicator line, then add 400 milliliters (13.5 ounces) more.
- Install the coolant pressure cap.
- Start the engine and run it above 2500 RPM until it is hot enough to open the thermostat.
- Complete a series of three, four-second-duration idles with four-second-duration 3000 RPM cycles.
- Turn the engine off and allow it to cool down to room temperature.
- Ensure the coolant recovery bottle is filled to the indicator line or above.
Important: To prevent boiling of the coolant/water mixture in the vehicle’s cooling system, do not apply vacuum to a cooling system above 49° C (120° F). The tool will not operate properly when the coolant is boiling.
Ensure that the valve is closed.
Important: Use a 50/50 mixture of DEX-COOL® antifreeze and clean, drinkable water.
Always use more coolant than necessary. This will eliminate air from being drawn into the cooling system.Important: Prior to installing the vacuum tank onto the graduated reservoir, ensure that the drain valve located on the bottom of the tank is closed.
Ensure the valve on the venturi assembly is closed.
Cooling hoses may start to collapse. This is normal due to vacuum draw.
If vacuum loss is observed. Refer to Loss of Coolant .
Important: Complete 2 vacuum pulls to sufficiently fill the cooling system.
Important: After filling the cooling system, the extraction hose can be used to remove excess coolant to achieve the proper coolant level.
Cooling System Draining and Filling LS4 GE47716 Fill
Special Tools
| • | J 26568 Coolant and Battery Tester |
| • | J 42401 Radiator Cap/Surge Tank Test Adapter |
| • | GE-47716 Vac N Fill Coolant Refill Tool |
Draining Procedure
Caution: To avoid being burned, do not remove the radiator cap or surge tank cap while the engine is hot. The cooling system will release scalding fluid and steam under pressure if radiator cap or surge tank cap is removed while the engine and radiator are still hot.
- Remove the coolant pressure cap.
- Place a drain pan under the drain cock.
- Open the radiator drain cock.
- Drain the cooling system.
- If a complete engine block drain is required, remove the engine block drain plugs. Refer to Draining Fluids and Oil Filter Removal .
- Inspect the coolant.
- Follow the appropriate procedure based on the condition of the coolant.
Important: Draining the cooling system with the pressure cap installed will syphon the coolant from the overflow tank.
| • | Normal in appearance--Follow the filling procedure. |
| • | Discolored--Follow the flush procedure. Refer to Flushing . |
Vac-N-Fill Procedure
- If a complete engine block drain was required, install the engine block drain plugs. Refer to Draining Fluids and Oil Filter Removal .
- Install the J 42401 to the coolant fill port.
- Attach the Vac N Fill cap to the J 42401 .
- Attach the vacuum gage assembly to the Vac N Fill cap.
- Attach the fill hose to the barb fitting on the vacuum gage assembly.
- Pour the coolant mixture into the graduated reservoir.
- Place the fill hose in the graduated reservoir.
- Install the vacuum tank on the graduated reservoir with the fill hose routed through the cut-out area in the vacuum tank.
- Attach the venturi assembly to the vacuum tank.
- Attach a shop air hose to the venturi assembly.
- Attach the vacuum hose to the vacuum gage assembly and the vacuum tank.
- Open the valve on the venturi assembly. The vacuum gage will begin to rise and a hissing noise will be present.
- Continue to draw vacuum until the needle stops rising. This should be 610-660 mm Hg (24-26 in Hg).
- To aid in the fill process, position the graduated reservoir above the coolant fill port.
- Slowly open the valve on the vacuum gage assembly. When the coolant reaches the top of the fill hose, close the valve. This will eliminate air from the fill hose.
- Close the valve on the venturi assembly.
- If there is a suspected leak in the cooling system, allow the system to stabilize under vacuum and monitor for vacuum loss.
- Open the valve on the vacuum gage assembly. The vacuum gage will drop as coolant is drawn into the system.
- Once the vacuum gage reaches zero, close the valve on the vacuum gage assembly and repeat steps 11-17.
- Detach the Vac N Fill cap from the J 42401 .
- Remove the J 42401 from the coolant fill port.
- Add coolant to the system as necessary.
- Inspect the concentration of the coolant mixture using the J 26568 .
- Detach the vacuum hose from the vacuum gage assembly.
- Attach the extraction hose to the vacuum hose.
- Open the valve on the venturi assembly to start a vacuum draw.
- Use the extraction hose to draw out coolant to the proper level.
- The vacuum tank has a drain valve on the bottom of the tank. Open the valve to drain coolant from the vacuum tank into a suitable container for disposal.
- Fill the coolant recovery bottle to the indicator line, then add 400 milliliters (13.5 ounces) more.
- Install the coolant pressure cap.
- Start the engine and run it above 2500 RPM until it is hot enough to open the thermostat.
- Complete a series of 3, 4-second-duration idles with 4-second-duration 3,000 RPM cycles.
- Turn the engine OFF and allow it to cool down to room temperature.
- Ensure the coolant recovery bottle is filled to the indicator line or above.
Important: To prevent boiling of the coolant/water mixture in the vehicle’s cooling system, do not apply vacuum to a cooling system above 49°C (120°F). The tool will not operate properly when the coolant is boiling.
Ensure that the valve is closed.
Important: Use a 50/50 mixture of DEX-COOL antifreeze and clean, drinkable water.
Always use more coolant than necessary. This will eliminate air from being drawn into the cooling system.Important: Prior to installing the vacuum tank onto the graduated reservoir, ensure that the drain valve located on the bottom of the tank is closed.
Ensure the valve on the venturi assembly is closed.
Cooling hoses may start to collapse. This is normal due to vacuum draw.
If vacuum loss is observed. Refer to Loss of Coolant .
Important: Complete 2 vacuum pulls to sufficiently fill the cooling system.
Important: After filling the cooling system, the extraction hose can be used to remove excess coolant to achieve the proper coolant level.
Cooling System Draining and Filling LS4 Static Fill
Special Tools
J 26568 Coolant and Battery Tester
Draining Procedure
Caution: To avoid being burned, do not remove the radiator cap or surge tank cap while the engine is hot. The cooling system will release scalding fluid and steam under pressure if radiator cap or surge tank cap is removed while the engine and radiator are still hot.
- Remove the coolant pressure cap.
- Place a drain pan under the drain cock.
- Open the radiator drain cock.
- Drain the cooling system.
- If a complete engine block drain is required, remove the coolant drain plugs from the engine block. Refer to Draining Fluids and Oil Filter Removal .
- Inspect the coolant.
- Follow the appropriate procedure based on the condition of the coolant.
Important: Draining the cooling system with the pressure cap installed will syphon the coolant from the overflow tank.
| • | Normal in appearance--Follow the filling procedure. |
| • | Discolored--Follow the flush procedure. Refer to Flushing . |
Filling Procedure
- Close the radiator drain cock.
- If a complete engine block drain was required, install the coolant drain plugs to the engine block. Refer to Draining Fluids and Oil Filter Removal .
- Slowly fill the cooling system with a 50/50 coolant mixture until the coolant level is visible and stable. Refer to Approximate Fluid Capacities .
- Install the pressure cap loosely (threaded on about one turn).
- Start the engine and raise the engine speed to 2,500 RPM and hold it there for 40 seconds, then shut engine off.
- Remove the pressure cap and fill the coolant system until the level is visible and stable.
- Install the pressure cap loosely (threaded on about one turn).
- Start the engine and raise the engine speed to 2,500 RPM and hold it there for 30 seconds, then shut engine off.
- Remove the pressure cap and fill the coolant system until the level is visible and stable.
- Install the pressure cap loosely (threaded on about one turn).
- Start the engine and raise the engine speed to 2,500 RPM and hold it there for 20 seconds, then shut engine off.
- Remove the pressure cap and fill the coolant system until the level is visible and stable.
- Install the pressure cap, fully threaded on.
- Fill the coolant recovery bottle to the indicator line, then add 400 milliliters (13.5 ounces) more.
- Start the engine and run it above 2500 RPM until it is hot enough to open the thermostat, this will allow the trapped air to be purged from the engine.
- Complete a series of three, four-second-duration idles with four-second-duration 3000 RPM cycles.
- Turn the engine off and allow it to cool down.
- Fill the coolant recovery bottle to the indicator line.
- Inspect the concentration of the engine coolant using the J 26568 .
- Rinse away any excess coolant from the engine and the engine compartment.
Notice: The procedure below must be followed. Improper coolant level could result in a low or high coolant level condition, causing engine damage.
Notice: Use the correct fastener in the correct location. Replacement fasteners must be the correct part number for that application. Fasteners requiring replacement or fasteners requiring the use of thread locking compound or sealant are identified in the service procedure. Do not use paints, lubricants, or corrosion inhibitors on fasteners or fastener joint surfaces unless specified. These coatings affect fastener torque and joint clamping force and may damage the fastener. Use the correct tightening sequence and specifications when installing fasteners in order to avoid damage to parts and systems.
Important: Use a 50/50 mixture of DEX-COOL antifreeze and clean, drinkable water.
