Front Seat Adjuster Replacement Six-Way Power
Removal Procedure

- If one side of the seat adjuster is not working, perform the following procedure:
| 1.1. | The horizontal drive motor (1) and drive cables (4) are
located at the front of the seat. Verify that both cables are straight. If a cable
is bent an end will be pulled out of the drive motor or drive screw. Straighten the
cable. You may have to toggle the seat switch to get the cable ends to properly seat. |
| 1.2. | Run the seat forward until the seat removal bolts are accessible. |
| 1.3. | Once the seat is removed examine the cables to assure that no damage has
occurred. |
| 1.4. | The two sides of the seat adjuster will now be out of sync. Align these
sides or the adjuster may be noisy and the motor may overheat and fail. |
Use the following steps to align the adjuster:
| 1.4.1. | Tip the seat rearward. |
| 1.4.2. | Reconnect the adjuster to the power switch. |
| 1.4.3. | Run the seat adjuster rearward until the drive bracket (3) and the anchor
bracket (2) are together on one side of the adjuster. |
| 1.4.4. | Disconnect the drive cable on that side and run the opposite side rearward
until its brackets touch. |
| 1.4.5. | Re-attach the cables (4) to the motor and verify that the cables are
straight between the motor (1) and the drive brackets (3). |

- If the power seat motor is not operable,
and the bolts that secure the adjuster to the floor pan are not accessible, perform
the following procedure:
| 2.1. | From the front of the seat, disconnect both drive cables at the horizontal
drive motor (2), which is located at the front of the seat adjuster. |
| 2.2. | Attach a drill motor to a drive cable (1). |
| 2.3. | Alternately run both sides of the adjuster forward until the seat removal
bolts are accessible. |
- Remove the front seat. Refer to
Front Seat Replacement - Bucket
.
- Remove the seat trim panel. Refer to
Front Seat Adjuster Track Finish Cover Replacement
.
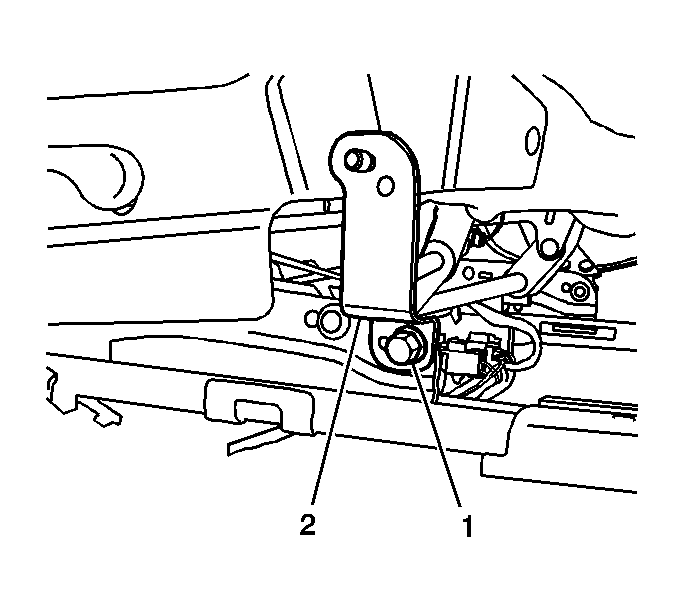
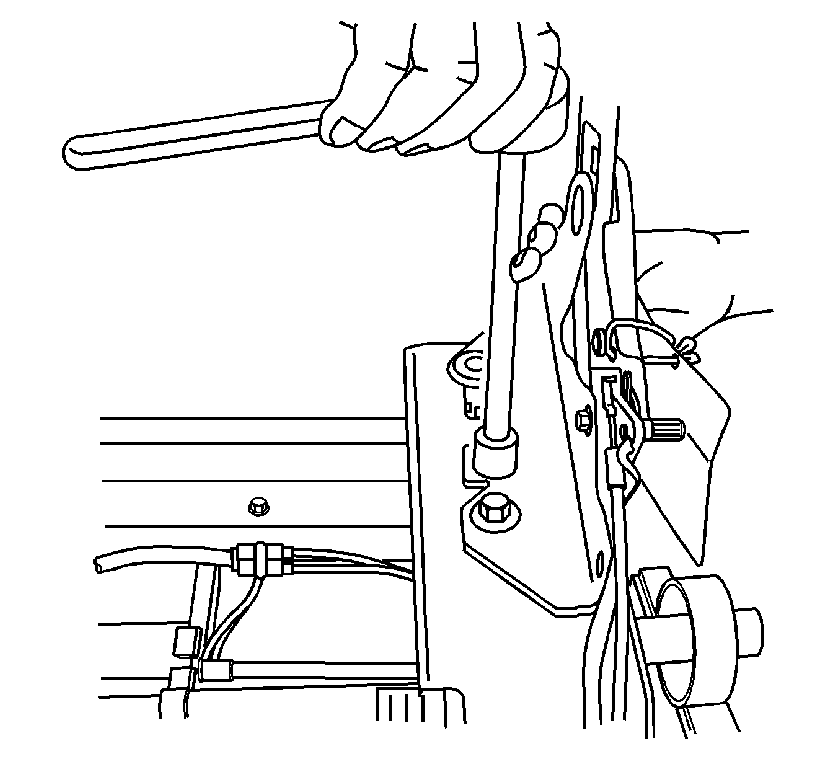
- Remove the seat belt bracket (2)
on the door side of the seat. The new seat adjuster does not have this part.
- Remove the seat belt pretensioner. Refer to
Seat Belt Buckle Pretensioner Replacement
in SIR.

- If equipped, remove the electrical harness
from the power seat motor harness.

- Remove the electrical harness clip and disconnect
the harness retainer from the adjuster bracket.
- Recline the seat back to the full reclined position.
- Remove the trim cover J-hooks from under the seat pan.

- Remove
the seat trim and the pad to access the seat pan bolts.
- Remove the 4 seat pan bolts.
- Remove the seat pan

- Remove the 2 adjuster cover plates.
- Remove the seat back frame bolts.
- Remove the seat back from the adjuster.
- Remove the seat adjuster.
Installation Procedure
- Place the adjuster covers on the seat adjuster.
- Place the seat back frame on the adjuster
covers.
Notice: Use the correct fastener in the correct location. Replacement fasteners
must be the correct part number for that application. Fasteners requiring
replacement or fasteners requiring the use of thread locking compound or sealant
are identified in the service procedure. Do not use paints, lubricants, or
corrosion inhibitors on fasteners or fastener joint surfaces unless specified.
These coatings affect fastener torque and joint clamping force and may damage
the fastener. Use the correct tightening sequence and specifications when
installing fasteners in order to avoid damage to parts and systems.
- Install the bolts that secure the seat back to the adjuster.
Tighten
Tighten the bolts to 24 N·m (18 lb ft).
- Install
the seat pan.
- Install the bolts that secure the seat pan to the adjuster.
Tighten
Tighten the bolts to 24 N·m (18 lb ft).

- Install the seat pad and trim cover together.
- Install the seat cushion J-hooks and the hook and loop retainers to secure
the trim to the seat pan.
- Press down on the cushion trim pad to secure the hook and loop retainers
to the seat pad.
- Install the electrical harness clip and
the retainer on the adjuster bracket.
- Connect the electrical harness to the seat
motor harness.
- Install the seat belt pretensioner. Refer to
Seat Belt Buckle Pretensioner Replacement
in SIR.
- Install the seat belt bracket.
- Install the seat trim panel. Refer to
Front Seat Adjuster Track Finish Cover Replacement
.
Important: Inspect the drive cables. Verify that the
cables are straight between the motors and the drive screws.
- Install the front seat. Refer to
Front Seat Replacement - Bucket
.
Front Seat Adjuster Replacement Two-Way Manual
Removal Procedure
- Remove the front seat from the vehicle. Refer to
Front Seat Replacement - Bucket
.
- Remove the front seat trim panel. Refer to
Front Seat Adjuster Track Finish Cover Replacement
.
Important: The bracket is NOT included with a seat adjuster. Reinstall the existing bracket.
- Remove the seat belt bracket (2) on the door side of the seat.
- Remove the seat belt pretensioner. Refer to
Seat Belt Buckle Pretensioner Replacement
.
- Remove the seat trim and the pad. Refer to
Front Seat Cushion Replacement
.
- Remove the 4 seat frame bolts.
- Remove the seat frame.
- Remove the 2 adjuster cover plates.
- Remove the seat back frame bolts.
- Remove the seat back from the adjuster.

- Remove the adjuster from the seat cushion frame.
- Remove the adjuster crosswire and assist springs.
- Remove the crossbrace bolts in order to separate the left and the right adjusters.
Installation Procedure
- Install a crossbrace to the left and the right adjusters.
- Ensure that the tab bending downward at the center of the crossbrace faces the rear of the adjusters.
Notice: Use the correct fastener in the correct location. Replacement fasteners
must be the correct part number for that application. Fasteners requiring
replacement or fasteners requiring the use of thread locking compound or sealant
are identified in the service procedure. Do not use paints, lubricants, or
corrosion inhibitors on fasteners or fastener joint surfaces unless specified.
These coatings affect fastener torque and joint clamping force and may damage
the fastener. Use the correct tightening sequence and specifications when
installing fasteners in order to avoid damage to parts and systems.
- Secure the crossbrace with two bolts.
Tighten
Tighten the crossbrace bolts to 6 N·m (53 lb in).
- Install the crosswire and assist springs.
Important: Install the right and left seat adjuster sliding mechanism in the same position that the mechanism had when you attached the adjuster-to-seat bottom frame.
Install the adjuster assembly to the floorpan attachments
before you attach the adjusters to the seat. Use the floorpan as a guide during assembly in order to ensure correct adjuster alignment. The floorpan will act as an assembly fixture.
- Install the adjuster assembly to the floorpan.
- Install the bolts which secure the seat adjuster to the floorpan.
Tighten
Tighten the bolts to 42 N·m (31 lb ft).
- Install the 2 adjuster cover plates.
- Position the seat frame on the adjuster.
- Install the 4 bolts which secure the seat frame to the adjuster.
Tighten
Tighten the bolts to 24 N·m (18 lb ft).
- Install the seat cushion cover and pad. Refer to
Front Seat Cushion Replacement
.
- Install the seat belt bracket (2).
- Install the seat belt pretensioner. Refer to
Seat Belt Buckle Pretensioner Replacement
.
- Install the front seat trim panel. Refer to
Front Seat Adjuster Track Finish Cover Replacement
.
- Install the front seat in the vehicle. Refer to
Front Seat Replacement - Bucket
.
