REPLACING CHERRY POWER MIRROR CONTROL SWITCH W/ MICROCRAFT

VEHICLES AFFECTED: 1985-19881/2 C; 1986-19881/2 H
The following procedure is required when replacing the Cherry "touchpad" power mirror control switch with the Micro Craft "joystick" power mirror control switch using the Switch Service Kit.
1. Remove the trim covering and foam sealer in the upper front corners of the front doors to obtain access to door harness mirror connector.
2A. 1985 "C" Car
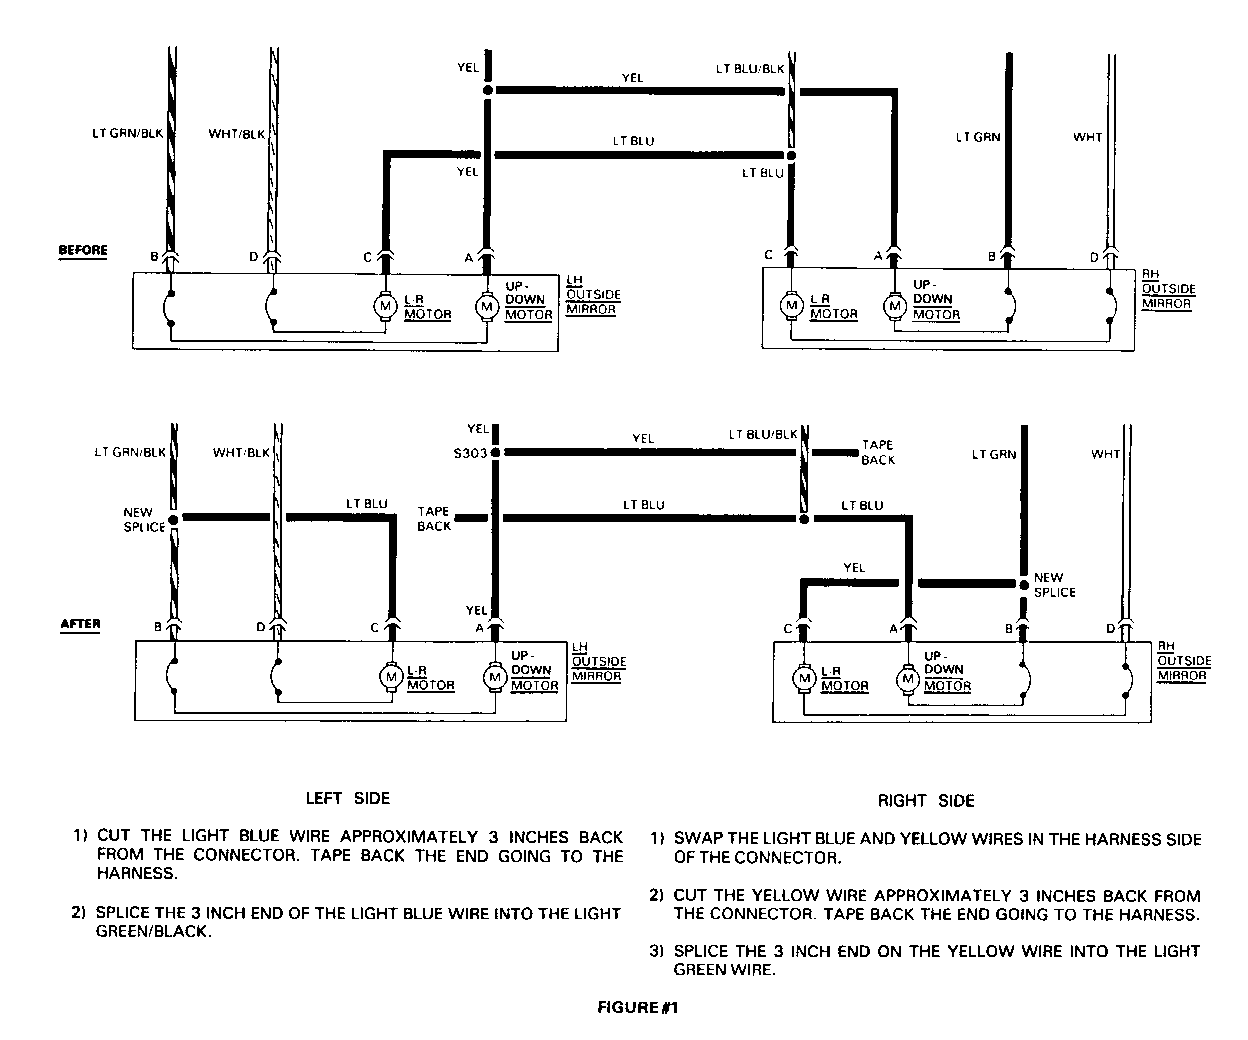
Left Side* Right Side*
1. Cut the light blue wire 1. Swap the light blue and approximately 3 inches back yellow wires in the harness from the connector. Tape side of the connector. back the end going to the harness.
2. Splice the three inch end of 2. Cut the yellow wire the light blue wire into the approximately 3 inches back light green/black wire. from the connector. Tape back the end going to the harness.
3. Splice the three inch end on the yellow wire into the light green wire.
* See Figure 1 for reference.
IMPORTANT: Do not use the right or left mirror motor jumper harnesses.
2B. 1986 thru 19881/2 "H" Car; 1986 thru 19881/2 "C" Car
In order for the kit to work, there is one more thing to be done. The right door jumper harness must be changed. The right jumper has a three wire end and a four wire end. On the end with three wires, the blue wire is to be moved to the empty cavity of the connector. The mirrors will work with the corrected jumper installed.
Insert the right and left mirror motor jumper harnesses between the mirror motor pigtails and door harnesses. Be sure to use the correct part number for each door.
3. Fully seat mirror control switch into the escutcheon. Position the switch so the pigtail exits directly under the word" mirrors" on the escutcheon. Secure the switch into the escutcheon using the set screw.
4. Replace the old mirror switch with the new mirror control switch/escutcheon assembly.
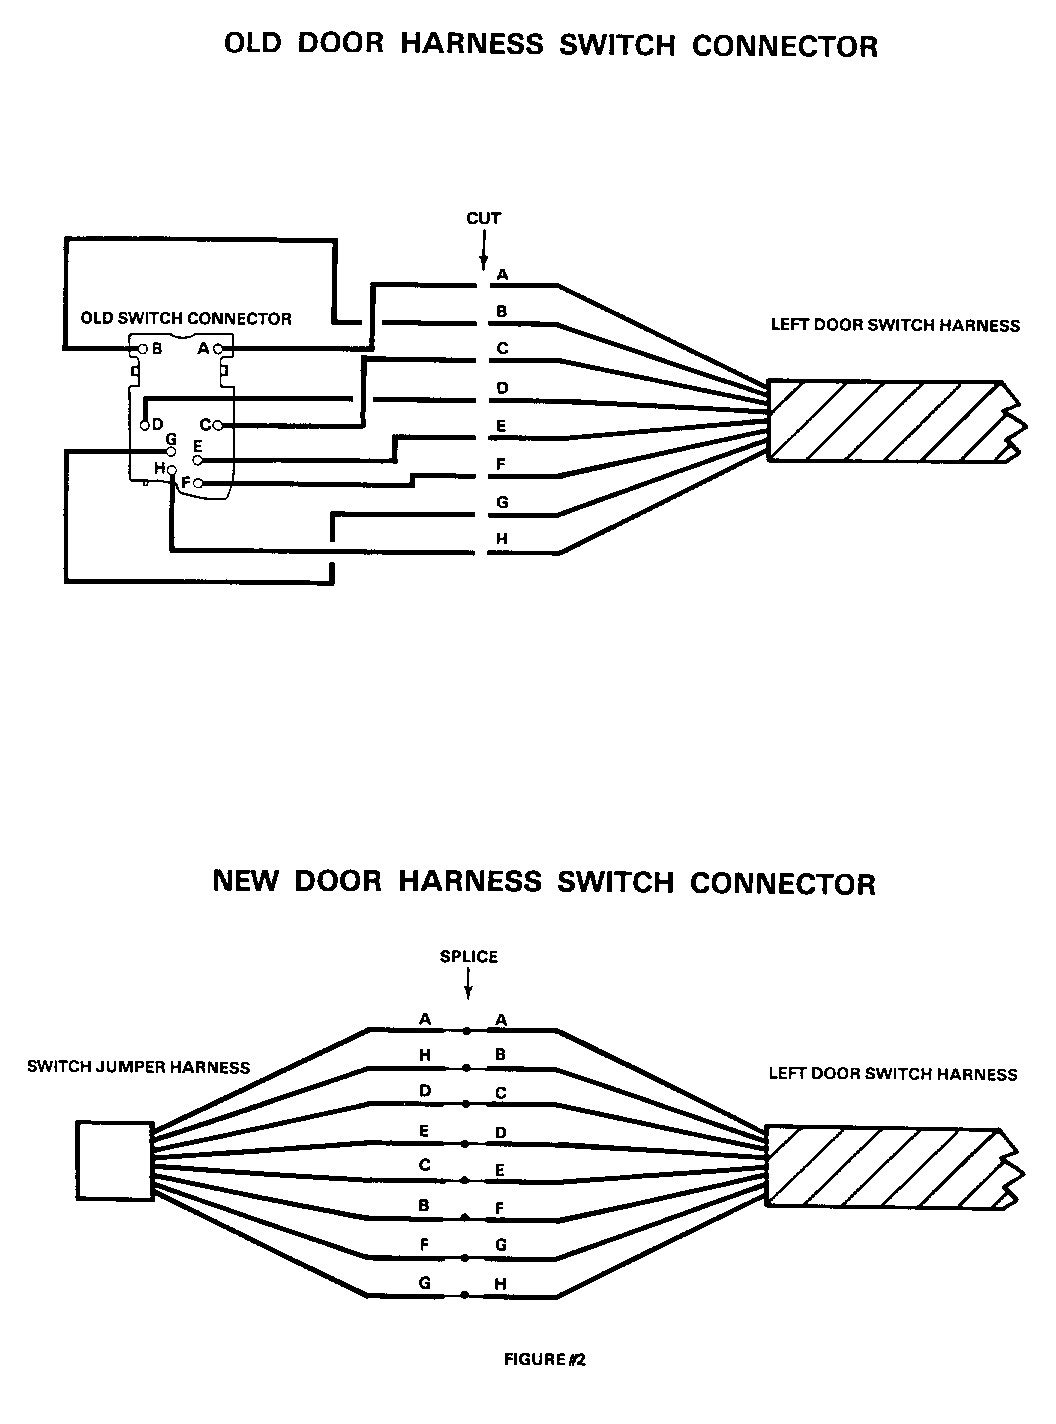
5. Replace the door harness switch connector with the new switch jumper harness by using the following directions:
A. Label each wire from the old door harness switch connector according to the cavity of the connector that it came out of.
B. Cut the old door harness switch connector off.
C. Splice the new switch jumper harness to the labeled wires as follows.*
New Connector Cavity Old Connector Cavity -------------------- -------------------- A A H B D C E D C E B F F G G H
* See Figure 2 for reference.
IMPORTANT: Make sure the splices do not make contact with one another when testing the switch.
The Switch Service Kit (Part Number 25535943, Buick and 25535944 Oldsmobile) includes:
Part No. Quantity Name -------- -------- ---- * 12394446 (OLDS) 1 Mirror Switch Escutcheon 12394447 (BUICK) 1 Mirror Switch Escutcheon 12083385 1 Switch Jumper Harness 12083386 1 Left Door Mirror Motor Harness 12083387 1 Right Door Mirror Motor Harness 20619687 1 Mirror Control Switch 25536242 1 Instruction Sheet
General Motors bulletins are intended for use by professional technicians, not a "do-it-yourselfer". They are written to inform those technicians of conditions that may occur on some vehicles, or to provide information that could assist in the proper service of a vehicle. Properly trained technicians have the equipment, tools, safety instructions and know-how to do a job properly and safely. If a condition is described, do not assume that the bulletin applies to your vehicle, or that your vehicle will have that condition. See a General Motors dealer servicing your brand of General Motors vehicle for information on whether your vehicle may benefit from the information.
